The error “Windows 11 Ethernet doesn’t have a valid IP configuration” is an error that emerges on a Windows 11 computer when there is an issue with its network connection. Besides, this error note typically exhibits that the computer is incapable to acquire a valid IP address from the network. An IP (Internet Protocol) address is a distinctive identifier that is allocated to every device connected to a network, such as your PC or a smartphone. Further, this address is utilized to route data across the network and authorizes devices to intercommunication with each other.
If the Ethernet connection on a Windows 11 computer doesn’t have a valid IP configuration, it implies that the computer is incapable to communicate with other devices on the network. Further, this can transpire for a variety of reasons, including problems with the computer’s network adapter, issues with the network settings, or problems with the network itself.
Fortunately, there are several actions you can take to troubleshoot and resolve this issue. In this article, we’ll take a closer look at the probable reasons for the “Ethernet doesn’t have a valid IP configuration” error and deliver step-by-step instructions on how to fix it.
Also Read- Ethernet Doesn’t Have A Valid IP Configuration: Solved
What are the Methods to resolve the error message “Ethernet Doesn’t Have A Valid IP Configuration”?
With the help of the methods outlined in this article, you’ll be able to successfully troubleshoot and resolve the “Ethernet doesn’t have a valid IP configuration” error on your Windows 11 computer.
Fix 1: Quick Restart your PC

The solution to rectify the “Ethernet doesn’t have a valid IP configuration” error on Windows 11 is to execute a speedy restart of the computer. Due to stability issues with the new operating system, a restart can assist resolve network connectivity problems.
Following are the steps to perform a quick restart:
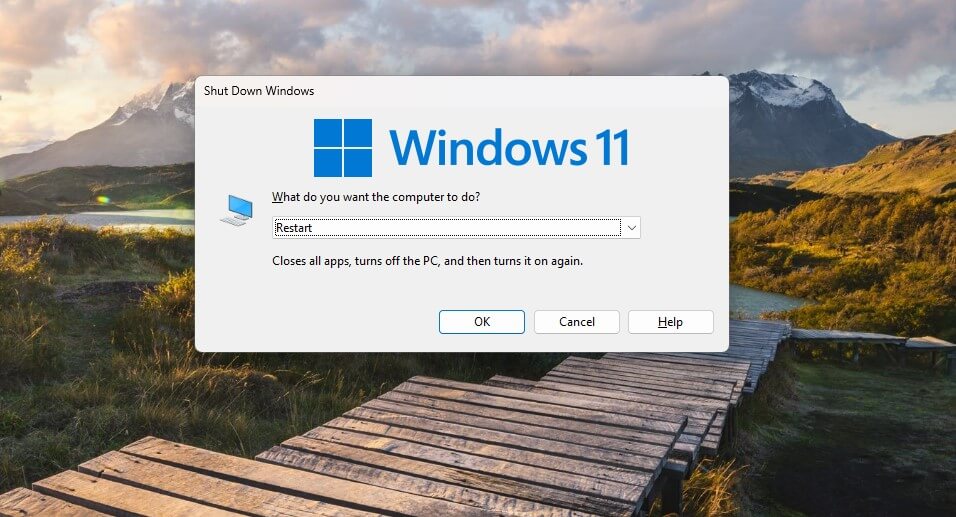
- Simply, press the ALT along with F4 keys together to bring up the Shut Down Windows dialog box.
- Now, you need to tap on the drop-down menu and select the Restart option.
- Finally, tap on OK or you can press the Enter key as well to confirm the restart.
It’s required to save any work you have open before restarting and to authorize the PC to restart without any interruptions. Further, if the issue endures, it’s recommended to attempt the restart sequence a few times to eliminate any bugs or glitches that may be inducing the error.
Also Read- [Fixed] Mac Studio 10G Ethernet Not Working
Fix 2: Restart Your Modem/Router
If you’re undergoing the “Ethernet doesn’t have a valid IP configuration” error on Windows 11, the issue may not necessarily be with the connections. It could be induced by a glitch in the operating system or a problem with the modem/router. Fortunately, many of these issues can be resolved with a simple restart. Here’s how to troubleshoot the problem:
- Start by turning off your modem/router by unplugging it from the power source. If your device has a built-in battery, make sure to remove it as well.
- Now you need to wait for a couple of minutes before plugging it back in and then restarting your Windows 11 computer.
- Once both devices have rebooted, verify whether the error message “Ethernet doesn’t have a valid IP configuration” has been fixed.
Also Read- Change Network Adapter Interface Connection Priority Order In Windows 11
Fix 3: Reset your Computer’s TCP and IP using the Command Line
When your Windows 11 computer is incapable to connect to the internet due to the “Ethernet doesn’t have a valid IP configuration” error, it could be caused by a problem with the Internet Protocol or the Transmission Control Protocol. TCP is responsible for transmitting data between devices, while IP acts as an identifier for a computer on the internet.
Resetting the TCP and IP protocols can potentially rectify the error notice by resetting any misconfigurations or problems with these protocols. By utilizing the command line, you can effortlessly reset these protocols on your Windows 11 computer, potentially fixing the concern with your Ethernet connection.
Following the steps outlined below can assist you to reset your IP and TCP protocols:
- First, you need to click the Start button and search for Command Prompt in the search bar.
- After searching for Command Prompt, in the left pane click on Run as Administrator.
- Now, in the Command Prompt window, jot down or paste this command
netsh winsock resetand then hit Enter to reset your TCP. - Then, paste this command
netsh int IP resetand hit Enter to reset your IP address. - Lastly, you need to restart your Windows 11 computer to complete the process.
Also Read- 9 Mistakes We Do After Buying New Laptops
Fix 4: Updating your Network Adapter Driver on Windows 11

Sometimes, the “Ethernet doesn’t have a valid IP configuration” error can cause by outdated or corrupted network adapter drivers. Updating or reinstalling the driver can help fix the issue. This solution works by allowing Windows 11 to search for the latest driver software for your network adapter and install it. Once the driver remains updated or reinstalled, it should resolve any issues with the Ethernet connection and the error message should disappear. You can update network adapter drivers by following the steps given below:
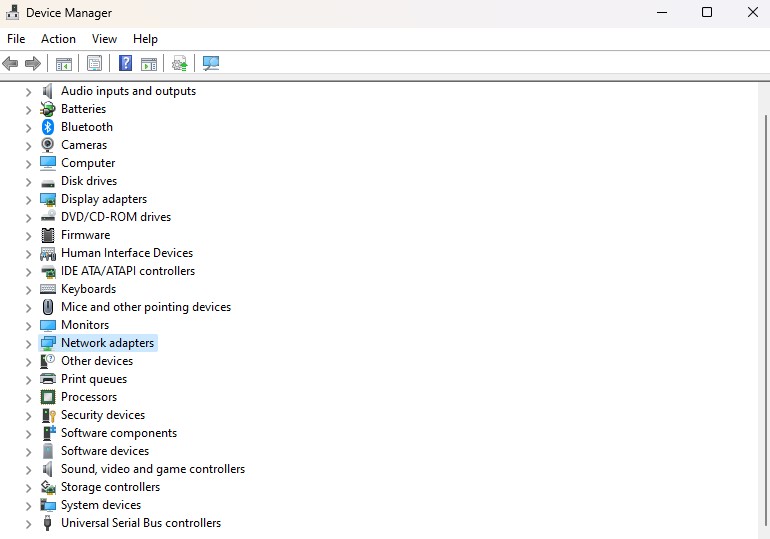
- Begin by right-clicking on the Start button on your desktop and then selecting Device Manager.
- After that, expand the Network Adapters section.
- Now you need to right-click on the Ethernet connection and select Update Driver.
- Finally, select Search automatically for updated driver software and wait for the update to complete, then restart your PC to apply the changes.
Fix 5: Clear Network Cache for Improved Internet Performance and Error Prevention
Clearing the network cache can help prevent network-related errors. And improve Internet performance because it removes stored data from previous network connections. When you connect to a website or online service, your computer stores information in the network cache. Such as IP addresses and website data, to speed up future connections to the same website. However, over time, this stored data can become outdated or corrupted, leading to network errors and slower performance.
By clearing the network cache, you remove this outdated and potentially corrupted data. Thus authorizing your computer to establish new, optimized connections. This can help prevent network errors and improve the speed and performance of your Internet connection.
You can clear the cache using the command prompt on your Windows 11, follow the steps given below:
- First, you to jot down Command Prompt in the search bar.
- Once you search for it, you need to click the Run as Administrator option located in the right pane.
- In the command prompt, simply type or paste this command
ipconfig/releaseand hit enter to Run it.
How do I enable the Ethernet port in Windows 11?

Activating the WiFi or Ethernet network adapter on your Windows 11 device. This allows you to connect to the internet and use network-related services. Sometimes, network adapters may disabled due to myriad reasons, such as software updates or network errors. When the network adapter is disabled, you will not be capable to connect to the internet or accessing network-related services.
By following the steps provided below, you can easily enable your network adapter and restore network connectivity:
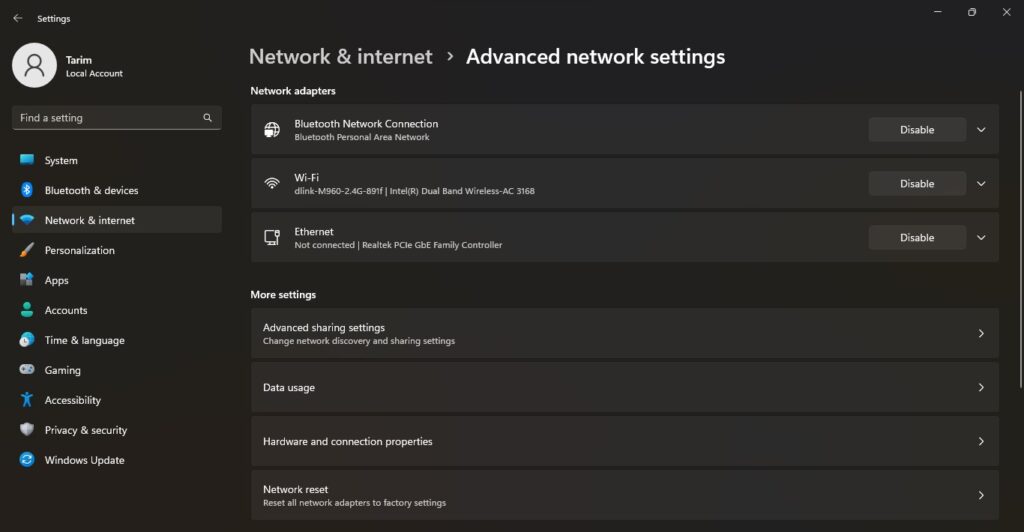
- First, tap on Network & Internet in the Windows 11 settings.
- After that navigate to the Advanced network settings tab on the right side of the screen.
- Finally, under the Network Adapters section, click the Enable button.
How do I find Ethernet properties in Windows 11?

In Windows 11, you can easily check your network connection status by following these simple steps:
First, you require to tap on the Start button located in the taskbar on your Windows 11.
Now jot down Settings in the search bar and select Settings from the search results.
After that, choose Network & Internet.
The status of your network connection will display at the top of the page and from there you can select Properties.
Conclusion- Windows 11 Ethernet Doesn’t Have A Valid IP Configuration
In conclusion, the issue of “Ethernet doesn’t have a valid IP configuration” on Windows 11 can induce problems with network connectivity. And preclude access to the Internet and other network resources. Nonetheless, the issue can fix by following simple methods. Such as clearing the network cache or updating Network Adapter Driver in Windows 11 settings. By taking these measures, you can resolve the issue and restore network connectivity on your Windows 11.


