| Airport Time Capsule |
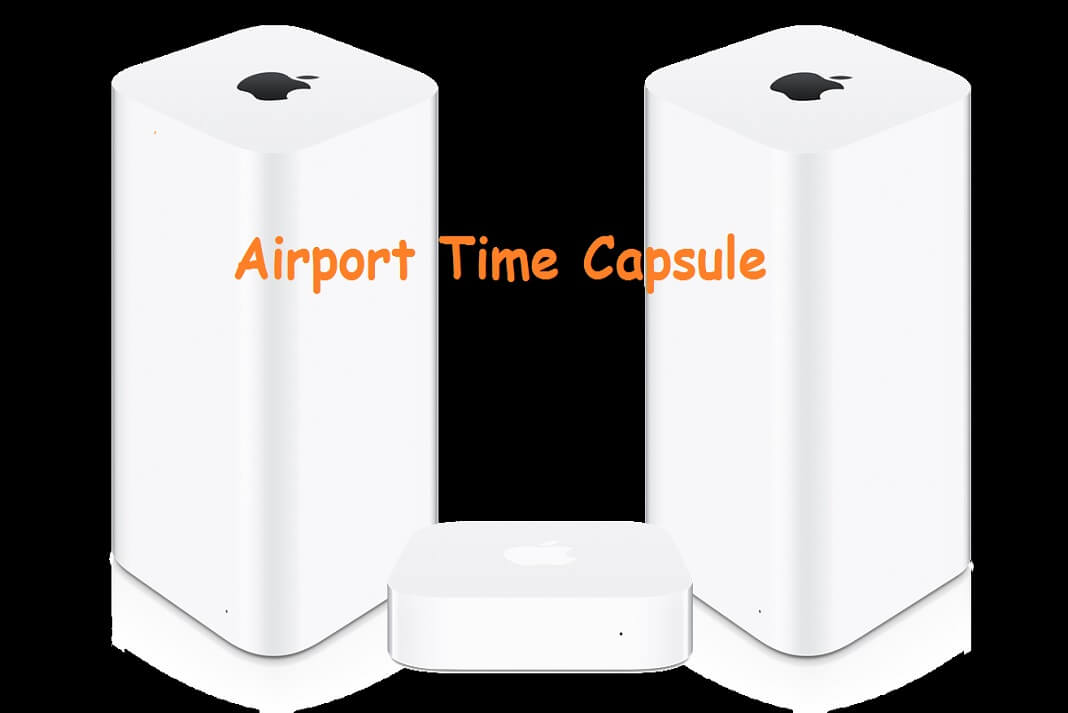
Airport Time Capsule
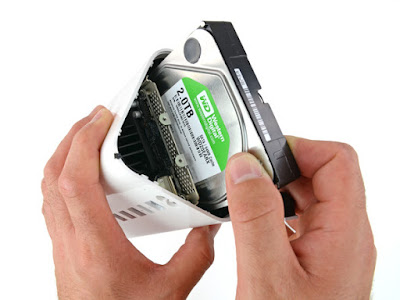
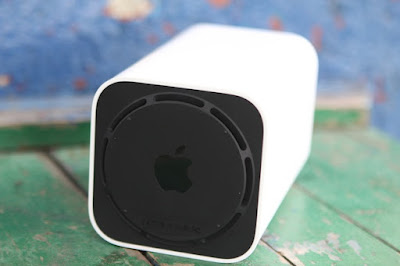
The AirPort Time Capsule (previously known as just Time Capsule), a rectangular tube standing 6.6 inches tall and 3.85 inches wide is a wireless router sold by Apple Inc which is unique among its kind with an internal hard drive featuring network-attached storage (NAS) and a residential gateway router.Unlike some other hard-drive-equipped routers, the Time Capsule uses a SATA interface to the hard drive, versus a USB-to-SATA bridge. Apple, however, declined to disclose the rotational speed of the drive’s platters and if the drive has a SATA 6 Gbps interface or a slower SATA 3 Gbps interface.It comes with a 2 TB or 3 TB single 3.5 inches Seagate Barracuda or a Western Digital’s (WD) hard drive inside.
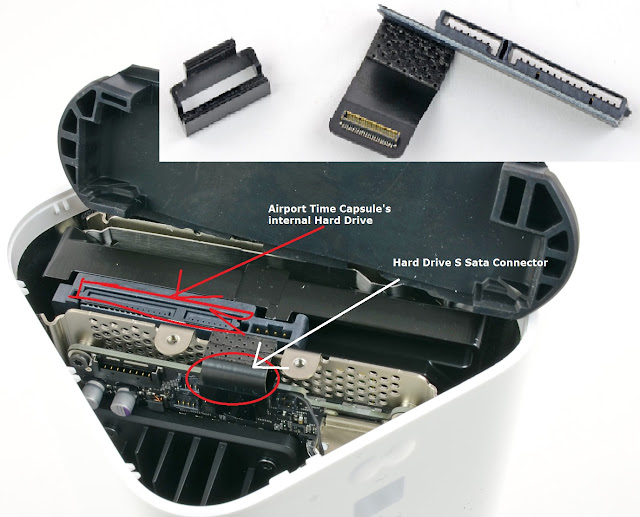 |
| Inside View of Airport Time Capsule- With Sata HDD Connection |
 | |
|
History of Time Capsule
The AirPort Time Capsule was first released on February 29, 2008, with pricing announced at US$299 (£199) for the 500 GB version and US$499 (£329) for the 1 TB version.The first generation Time Capsule included a full AirPort Extreme Base Station with 802.11n wireless, an Ethernet WAN port, three Ethernet LAN ports, and one USB port. The USB port can be used for an external hard drive or a printer to be shared over the network, or both, by using a third-party USB hub.
In early 2009, Apple released the second generation Time Capsule. It offered simultaneous 802.11n dual-band operation, which allows older devices to use slower wireless speeds, without affecting the overall performance of devices that can use higher 802.11n speeds.The second generation model also included the addition of Guest Networking.The hard disk storage space of each model was doubled: capacities were 1 TB 2 TB, while the prices remained unchanged.
In October 2009, several news sites reported that many first generation Time Capsules were failing after 18 months,with some users alleging that this was due to a design failure in the power supplies. Apple confirmed that certain Time Capsules sold between February 2008 and June 2008 do not power on, or may unexpectedly turn off. Apple offered free repair or replacement to affected units.
The third generation Time Capsule was released in October 2009. The only change was a reconfiguration of the internal wireless antenna, resulting in an Apple-reported 50% increase in wireless performance and 25% increase in wireless range when compared to previous models.
The fourth generation Time Capsule, released in June 2011, increased the range of WiFi signals. The internal WiFi card was changed from a Marvell WiFi chip to a better-performing Broadcom BCM4331 chip.Apple again increased the storage space in each model as the hard drive sizes were increased to 2 TB and 3 TB. The 2 TB and 3 TB models were kept at the $299 and $499 price points.
The fifth generation Time Capsule was released in June 2013 alongside the sixth generation AirPort Extreme. This generation saw the name change to AirPort Time Capsule and to a taller form factor. 802.11ac support was added with this generation. The 2 TB model was kept at $299, but the 3 TB model dropped to $399.Amazon is giving $20 discount on 2 TB -5th generation model which will cost you $279 from Amazon.
Technical Specification of Airport Time Capsule
| Airport Time Capsule Rear view |
AirPort Time Capsule has six ports on the back:
1. One Gigabit Ethernet Wide Area Network (WAN) port
For connecting a DSL or cable modem, or for connecting to an existing Ethernet network
2. Three Gigabit Ethernet Local Area Network (LAN) ports
For connecting Ethernet devices such as printers or computers, or for connecting to an existing Ethernet network
3. One USB2.0 port
For connecting a compatible USB printer, hard disk, or hub for connecting several devices
4. Power port
For connecting AirPort Time Capsule to an AC power source
Note:- There is no power switch on Airport Time Capsule.
Size and Weight
Dimensions: 98 mm (3.85 inches) by 98 mm (3.85 inches) by 168 mm (6.6 inches)
Weight: 1.48 kg (3.26 pounds)
Compatibility
- Interoperable with 802.11a-, 802.11b-, 802.11g-, 802.11n- and 802.11ac-enabled Mac computers, iOS devices, Apple TV, Windows-based PCs and other Wi-Fi devices
- NAT, DHCP, PPPoE, VPN Passthrough (IPSec, PPTP and L2TP), DNS Proxy, IPv6 (6to4 and manual tunnels)
Security
- Wi‑Fi Protected Access™ (WPA/WPA2)4
- WPA/WPA2 Enterprise4
- MAC address filtering
- NAT firewall
- 802.1X, PEAP, LEAP, TTLS, TLS, FAST
- Time-based access control
Maximum Number of Users Supported
- 50
System Requirements
Setup and Administration
- iPhone, iPad or iPod touch with iOS 6 or later and AirPort Utility 1.3
- Mac with OS X Lion v10.7.5 or later and AirPort Utility 6.3
Wireless Device Access
- Any Wi-Fi-enabled device that uses the 802.11a/b/g/n/ac specification
Shared Printing with a USB Printer
- USB printer
- Mac with OS X v10.2.7 or later
- PC with Windows XP (SP3), Windows Vista (SP2), Windows 7 (SP1) or Windows 8
Shared USB Hard Drive
- Mac with OS X v10.4.8 or later
- PC with Windows XP (SP3), Windows Vista (SP2), Windows 7 (SP1) or Windows 8
Backup using Time Machine
- Mac with OS X v10.5.7 or later
Default SSID And Network Key
- SSID: Apple Network XXXXXX (where XXXXXX is replaced with the last six digits of the AirPort ID).
- Default Time Capsule password: public.
Airport Time Capsule (TC) works smartly with Time Machine in OS X 10.5 Leopard or later to back up your Mac automatically and wirelessly, so you never have to worry about losing anything important again. Every photo. Every file. Every song. Even your apps and OS X settings are saved. AirPort Time Capsule stores it all — up to 2TB or 3TB of data.Once it is setup on the network, it’s immediately available as a file server and Time Machine backup target. As a Time Machine target, it takes a snapshot of the entire system as an initial backup after which, only the files you’ve changed are backed up — automatically, wirelessly and in the background. Since Time Machine continuously makes a copy of everything on your Mac — and saves multiple versions — you can easily access and restore previous versions of a single file, a folder or even your entire Mac.
With up to 3TB of storage space, you can easily backup multiple Macs without worrying about running out of memory. And when you do, you can archive the backups to an external hard drive connected to the USB port at the back of Time Capsule, then wipe the Time Capsule and start over from the beginning. Unfortunately, you can’t use the external drive itself directly as the destination for Time Machine backup, but just for archive and data sharing.
As a file server it supports both AFP(Apple Filing Protocol) and SMB(Server Message Block) provides network access to files stored on the built-in hard drive. The 7.6.1 Time Capsule firmware enables remote access of the hard drive with an iCloud account. In the past, users needed a MobileMe account to remotely access data. Fourth generation models are available with 2 TB and 3 TB of built-in storage.
Note:- Time Capsule doesn’t support external drives formatted using NTFS (Windows) and doesn’t offer the option to format a connected external drive to the HFS+ (Mac) file system for you. In other words, to use an external drive with the Time Capsule, you first need to make sure it’s already formatted using HFS+ or FAT.
Accessing Files from iPhone and iPad
You can download Apps like Remote File Browser to allow iPhone and iPad access files on Airport Time Capsule . They have both a paid version and a free version. Try the free version first they may fulfill your needs of accessing some movies and songs stored on Airport Time Capsule.
Up to Three Times Faster Wi-Fi
The new Time Capsule is 802.11ac compatible with a dual-band model, capable of operating networks on both the 2.4GHz and the 5GHz frequency bands. It’s equipped with six antennas located on the top of the unit, which Apple claims helps the AirPort users connect from farther distances: three transmit/receive for its 2.4GHz radio, and three transmit/receive for its 5GHz radio.
With three-stream 802.11ac technology, the Airport Time Capsule can reach data rates of up to 1.3Gbps when used with 802.11ac-enabled clients, which is triple the 802.11n standard. 802.11ac Wi-Fi also provides double the channel bandwidth with 80MHz-wide channels providing more room for data to flow faster. If you’re using an 802.11a/b/g/n Wi-Fi device, Airport Time Capsule can still optimize the connection for those Wi-Fi standards as well.
Simultaneous Dual-Band Support -Choosing the correct frequency band
No matter which band your wireless devices use, they’ll automatically connect to the best available band for the fastest possible performance.
The primary difference between the 2.4 GHz and 5GHz wireless frequencies is range as the 2.4GHz frequency is able to reach farther than the 5GHz frequency.In general, the higher the frequency of a wireless signal, the shorter its range. Thus, 2.4GHz networks cover a substantially larger range than 5GHz wireless networks.When you set up your AirPort Time Capsule, it creates two high-speed Wi-Fi networks:
- A 2.4 gigahertz (GHz) network for 802.11b, 802.11g, and 802.11n devices, such as iPhone,iPod touch, and older computers
- A 5 GHz network for 802.11n, 802.11a, and 802.11ac devices, such as iPhone, iPad, Apple TV,and newer computers
The 2.4GHz frequency range is much more prone to interference, as it is commonly used by other wireless networks in the area, as well as cordless phones, garage door openers and other home appliances and consumer products, which is why — 2.4Ghz is very congested resulting in dropped connections and slow data throughput.
Notes:
When choosing the band for your router, it is also important to consider the capabilities of your wireless clients. Many older laptops, tablets and other typical wireless devices still work only in the 2.4GHz band, while media streaming devices and newer phones have increasingly better adoption in the 5GHz band as well.802.11ac is available only on the 5GHz frequency band.
Beamforming Puts the Focus on Your Device
With 802.11ac technology comes the intelligent, powerful beamforming antenna array. Beamforming is a signal processing technique used in wireless communications, sonars and radars for directional signal transmission and reception. Beamforming is achieved by combining elements in a transmitter/antenna array in a way where signals at particular angles experience constructive interference, while others experience destructive interference. In general, the router knows where an 802.11ac device is on the network. Then AirPort Time Capsule targets its signal to that device. So your Wi‑Fi signal is stronger, clearer and faster. And each of its clients exchange information as to their physical locations. They use this information to concentrate their radio energy to achieve the highest possible throughput.
| Airport Time Capsule Uses Beamforming for its client |
The new Time Capsule offered about the same range as the previous generation, up to about 270 feet away. Its effective range, however, is within approximately 150 feet or less, which is rather standard for a dual-band router. Note that Wi-Fi range varies a great deal depending on the environment. The device also passed my 24-hour stress test, during which it didn’t disconnect once.
Internet Access for your Guest
Just like other routers Time Capsule also supports guest networking, you can set up a separate Wi‑Fi network just for guests.A guest network allows access only to the Internet, so your primary network – including any external hard drive, printer, or other LAN-attached device – remains secure.
Designed with Performance in Mind- Sped up .Slimmed Down.
Apple has made the new Airport Time Capsule taller and put the antennas at the top, creating a higher platform for dispersing the signal.The new vertical design not only improves Wi‑Fi performance, it also saves you valuable desk space. At less than 10 centimetres square, the footprint of AirPort Time Capsule is 75 per cent smaller than its predecessor.
Get Online Safely and Securely
AirPort Time Capsule includes a built-in firewall that creates a barrier between your network and the Internet, protecting your data from malicious attacks. When you set up AirPort Time Capsule, the firewall is automatically turned on
Printer and Hard Drive Sharing
Protect your Hard Drive with a Password
AirPort Time Capsule can turn your external USB hard drive into a secure drive you can share across your Wi-Fi network and access securely over the Internet. All the documents, videos, photos, and other files instantly become available to anyone on the network, Mac and PC users alike. It’s perfect for file sharing, collaborative projects and more.
Print Without Wires
The USB 2.0 port in AirPort Time Capsule is also great for sharing a printer across your wireless network. Just plug it in and everyone on your network can take advantage of one centrally available printer wirelessly
Limitation of Time Capsule
Along with its advantages there are some limitation of Airport Time Capsule too.Following are some Major drawbacks.
1. For me the biggest disappointing is the USB 2.0 port and no USB 3.0 support.
2. Guest networking — a feature that allows for creating an isolated Wi-Fi network for guests — is available only on the 2.4GHz band but not on the 5GHz one.
3. There’s no way to set up Web filtering, in case you want to block a certain Web sites or keywords.
4. You can’t customize QoS or firewall services, either, and this means it’s not possible to manually prioritize Internet traffic for certain applications, such as media streaming or online gaming.
5. There’s no media streaming options that allow for streaming digital content, either stored on the Time Capsule’s internal storage or on the connected external hard drive, to connected devices. In other words, if you put music, photos, or videos on the Time Capsule’s storage, they won’t be available to network media streamers, such as the Roku or the WD TV, or even the Apple TV.
6. Print Server, FTP and Web hosting are not supported.You can’t use the Airport Time Capsule as a server for Printing, FTP or Web functions, either.
7. The lack of an ADSL modem is a long-standing complaint.You can not connect to the
internet without the help of an ADSL router or modem.
Setting up Airport Time Capsule
| A Typical Home Network with Airport Time Capsule |
Use your Mac or an iOS device to set up your AirPort Time Capsule.
You can set up your AirPort Time Capsule to do one of the following:
- Create a new network that wireless computers and devices can use to connect to the Internet and to each other.
- Extend an existing network. If the network is connected to the Internet, all the computers and wireless devices on the AirPort network can use the Internet connection.
Computers connected to your AirPort Time Capsule using Ethernet can also access the
network to share files and connect to the Internet.
If you’re using your AirPort Time Capsule to connect to the Internet, you need a broadband
(DSL or cable modem) account with an Internet service provider, or a connection to the
Internet using an existing Ethernet network. If you received specific information from your
ISP (such as a static IP address or a DHCP client ID), you may need to enter it in AirPort Utility.
Have this information available before you set up your AirPort Time Capsule.
Setting Up AirPort Time Capsule Using a Mac
You’ll need:
- A Wi-Fi enabled Mac computer or a Mac computer connected to your AirPort Time Capsule with an Ethernet cable (in order to set it up using Ethernet)
- OS X v10.7.5 or later
- AirPort Utility v6.3 or later
Use Software Update to get the latest version of OS X and AirPort Utility.
To set it up:
1. Open AirPort Utility, located in the Utilities folder in the Applications folder.
2. Select your AirPort Time Capsule and click Continue. If you don’t see the AirPort Time Capsule you want to configure, choose it from the Wi-Fi status menu in the menu bar.
3. Follow the onscreen instructions to create a new network or extend an existing network.
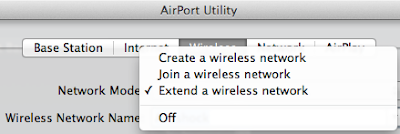 |
| Airport Time Capsule Network Mode |
Setting Up AirPort Time Capsule Using an iOS device
You’ll need:
- An iPad, iPhone, or iPod touch
- iOS 6.1 or later
Check Settings on your iOS device for the latest version of iOS.
To set it up:
1. Tap Settings on the Home screen, then tap Wi-Fi.
2. Tap the name of your AirPort Time Capsule.
3. Follow the onscreen instructions to create a new network or extend an existing network.
Setting Advanced Options
To set advanced options,such as advanced security options or to change existing Wi-Fi network, closed networks, DHCP lease time, access control, IPv6, and more.
To set advanced options or make changes to a network you’ve already set up:
1. Choose the wireless network you want to change.
If you haven’t set up your AirPort Time Capsule, the default network name is Apple Network XXXXXX, where XXXXXX is the last six digits of the AirPort ID.
2. Open AirPort Utility.
3. Select the AirPort Time Capsule you want, then click Edit.
 |
| Edit Airport Time Capsule Using Airport Utility |
4. If you’re prompted for a password, enter it (Default password is public).
5. Adjust the settings you want for your AirPort Time Capsule and your network.
When you go to set up AirPort Utility it will ask you whether you want to use Time Capsule as a router, it will have several options under router mode. And you can select no to the router and choose to just make it a wireless hard drive if you want.
 |
| Airport Time Capsule Router Mode |
If you plan to share your Internet connection with wireless-enabled computers on your
network or with computers connected to the Ethernet ports, you need to set up your
Time Capsule as an AirPort base station.
AirPort Time Capsule can turn your external hard drive connected to USB 2.0 Port at the back of the Airport Time Capsule into a secure drive, you can share across your Wi-Fi network and access securely over the Internet with a password.Similarly you can also make the Time Machine Backup drive password protected.To make the External USB hard drive password protected follow the steps below:
1. Open AirPort Utility located in System Preferences.
2. Select the AirPort Time Capsule, then click Edit.
3. Go to the Disks tab, check the box for Enable file sharing.
4. Select one of the security option under “Secure Shared Disk”.
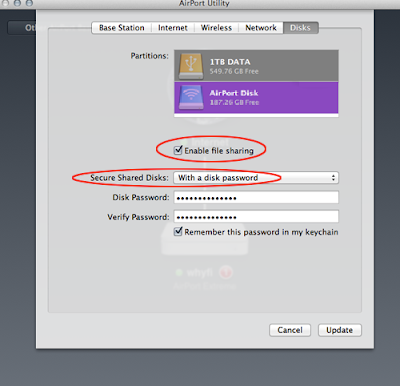 |
| Secure Airport Time Capsule Hard Drive Over the Network |
5. There are three sharing options: via user accounts, via a disk password, or via the device’s password.In the dropdown for Secured Shared Disks, select With a Disk Password. This password is independent from the password entered for the Time Capsule configuration, which is used for managing the Time Capsule. The password you are now entering will be used to connect to the drive for backups. Check the box for Remember this password in my keychain.
6. Click Update. A small window will appear asking you if you’re sure you want to continue. Click Continue and the Time Capsule will begin to update the changes made.
Using Time Machine with Your AirPort Time Capsule
To set up or adjust Time Machine on a computer using Mac OS X v10.5.7 or later:
1. Choose Apple > System Preferences, and then click Time Machine.
2. Slide the switch to ON and click Select Disk.
3. Choose your AirPort Time Capsule and click Use Disk.
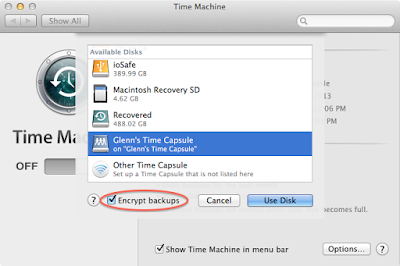 |
| Use Airport Time Capsule Drive As a Backup Destination |
4.You will need to enter the Time Capsule password you choose during the setup process. Enter the password and click Connect.
If You Forgot Your Network Password or Time Capsule Password
You can clear the AirPort network password or Time Capsule password by resetting
your Time Capsule.
To reset your password:
1. Use something pointed (such as a ballpoint pen) to press and hold the reset button for
one second.Holding the reset button for a seconds make the existing network unsecure for 10-15 mins allowing you to connect to your Wi-Fi network even without a password and change the settings.
Important: If you press the reset button for more than one second, you may lose your
network settings and you will have to set up the Time Capsule from beginning but that does not erase the Time Machine Backup on Airport Time Capsule HDD.
2. Select your AirPort network.
- On a Mac, use the Wi-Fi status menu in the menu bar to select the network created by your AirPort Time Capsule (the network name doesn’t change).
- On an iOS device, choose the network in Wi-Fi Settings.
3. Open AirPort Utility.
If AirPort Utility isn’t installed on your computer, you can download it from
support.apple.com/downloads/#airport. If AirPort Utility isn’t installed on your iOS device,
you can install it from the App Store.
4. Select your AirPort Time Capsule and click Edit.
5. Click Base Station and enter a new password for your AirPort Time Capsule.
6. Click Wireless and choose an encryption method from the Wireless Security pop-up
menu. Then enter a new password for your AirPort network.
7. Click Update to restart your AirPort Time Capsule and load the new settings.
Tips and Troubleshooting
If You Can’t Connect to the Internet
- Try connecting to the Internet directly from your computer. If you can’t connect,check to make sure your network settings are correct. If they appear to be correct and you still can’t connect, contact your Internet service provider (ISP).
- Make sure you’re connecting to the correct wireless network.
- Try unplugging it and plugging it back in.
- If your AirPort Time Capsule still won’t respond, you may need to reset it to the factory default settings.
Important: Resetting your AirPort Time Capsule to factory default settings erases all of the current settings and resets them to their original state.
To reset your AirPort Time Capsule to its factory settings:
- Use something pointed (such as a ballpoint pen) to press and hold the reset button until the status light flashes quickly (about 5 seconds).
Your AirPort Time Capsule resets with the following settings:
- Your AirPort Time Capsule receives its IP address using DHCP.
- The network name is reset to Apple Network XXXXXX (where XXXXXX is replaced with the last six digits of the AirPort ID).

Reset Airport Time Capsule Network - The AirPort Time Capsule password is set to public.
If your AirPort Time Capsule still doesn’t respond, try the following:
1. Unplug your AirPort Time Capsule.
2. Use something pointed to press and hold the reset button while you plug in your
AirPort Time Capsule.
If Your AirPort Time Capsule Status Light Flashes Amber
The Ethernet cable may not be connected properly, or there may be a problem with your Internet service provider or with the AirPort Time Capsule settings.
If you’re connected to the Internet with a DSL or cable modem, the modem may have lost its connection to the network or the Internet. Even if the modem seems to be working properly,try disconnecting it from its power supply, waiting a few seconds, and then reconnecting it. Make sure your AirPort Time Capsule is connected directly to the modem via Ethernet before reconnecting power to the modem.
How to remotely access Time Capsule using iCloud
Time Capsule setup:
- Open Airport Utility.
- Open Time Capsule Base Station tab.
- Put iCloud NAME in “Back to My Mac”.
- Enter Password, then wait for activation (less than 1 minute normally)
- Open Time Capsule Disks tab.
- Check mark “Enable file sharing”.
- Check mark “Share disk over WAN”.
- Password self explanatory.
Make sure the Back to My Mac option is checked in your Mac’s iCloud Preferences
- Open iCloud in System Preferences
- Put a check mark on “Back to My Mac”, wait for activation (less than 1 minute normally)
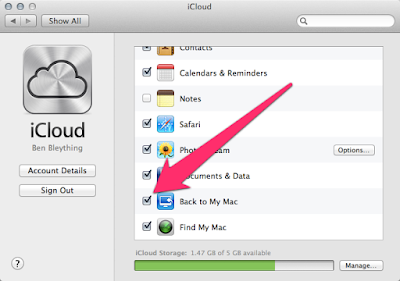 |
| Back to My Mac In iCloud Preferences |
In order to connect to Time Capsule Disk off your local (home) network you must have an internet connection, if you do then do this:
1. Open Finder
2. In Finder open Shared if collapsed and double click on your Time Capsule name.
3. Double click your Time Capsule, enter password (if you required).
4. Once connected to your Time Capsule double click on your Disk to mount it enter password (if your required).
5. Done, remember the connection speed is dependent on your internet quality (broadband vs dial-up).
Sources: https://en.wikipedia.org/wiki/AirPort_Time_Capsule
http://www.apple.com/au/airport-time-capsule/




This comment has been removed by a blog administrator.