Steam is an amazing platform for PC gamers. It is a spot where they can find all their favorite games and play them seamlessly. However, just like any other game client, Steam is bound to run into errors off and on. In this article, we will be discussing various ways to fix the steam keeps disconnecting/reconnecting issue on PC.
Usually, the users’ experience with Steam is seamless. But it is not always pleasant. Users have been facing the issue of steam keeps disconnecting and reconnecting. in this piece, we will try to fix just that.
How to fix Steam keeps disconnecting/reconnecting issue?
- Check the internet connection
- Clear Steam browser cache
- Add Steam to your antivirus exception
- Update Display Adaptor
- Change DNS Server
- Perform a clean boot
- Uninstall and Reinstall Steam
Now, let us discuss these solutions in detail. You can try these fixes one by one and see which one works for you.
The issue of Steam disconnecting and reconnecting may occur due to a variety of reasons. Some of them may be a faulty internet connection, prevention by Windows firewall, outdated drivers, etc.
1.Check the internet connection
The first and the most important thing you can try is to check the internet connection. You can try performing a hard reset of your modem/ router. Alternatinely, you can try using a wired internet connection instead of WiFi. If there are no issues with your internet connection, kindly perform the fixed given below to get over the issue.
Also Read: How To Disable Auto-Updates On Steam?
2.Clear Steam Browser cache
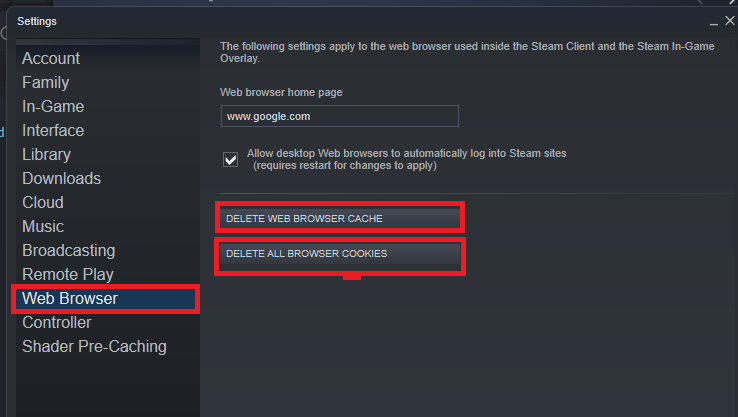
Clearing the Steam browser cache improves the overall performance of the game client. So, without any second thought, you must give it a try. Below is how to clear Steam’s browser cache:
- Launch Steam on your PC.
- Click on the Steam option in the top-left corner.
- Select Settings from the resultant menu.
- Now, click on Clear Web Browser Cache and Delete all browser Cookies.
- Then, click on OK.
3. Add Steam to your antivirus exception
Sometimes, the antivirus on your PC fails to identify a particular program and flag it as a threat. In other words, antivirus may be stopping Steam from running properly. In such a case, you can try adding Steam to the antivirus exception. If you are using Windows Defender, below is how to add Steam to the antivirus exception:
- Press Windows + I to launch Settings on your PC.
- Click on Privacy & Security> Windows Security.
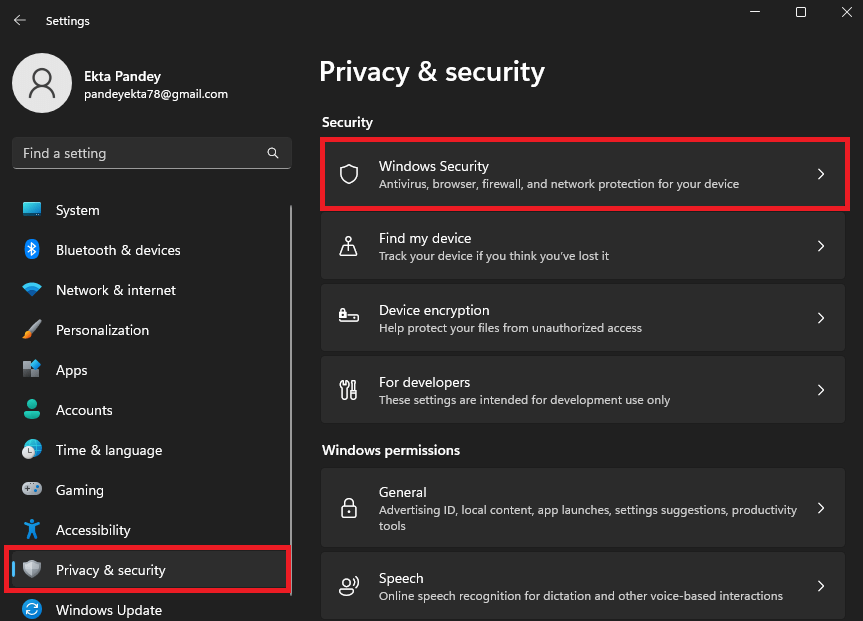
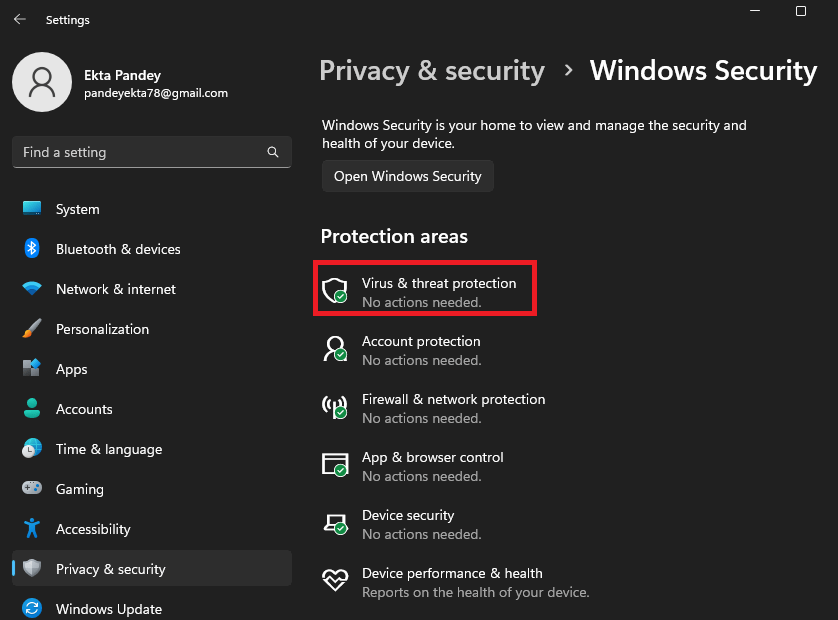
3. Now, click on Virus & threat protection.
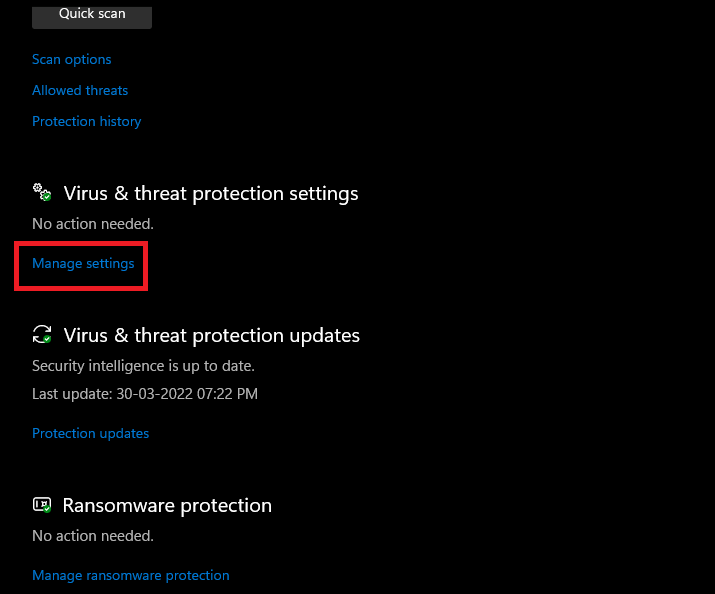
4. Click on Manage Settings under Virus and threat protection settings as shown below in the screenshot.
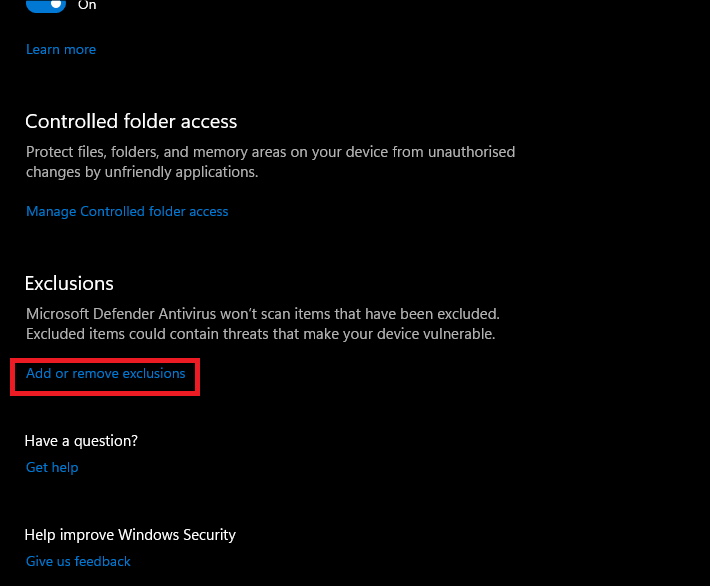
5. Click on Add or remove exclusions under Exclusions.
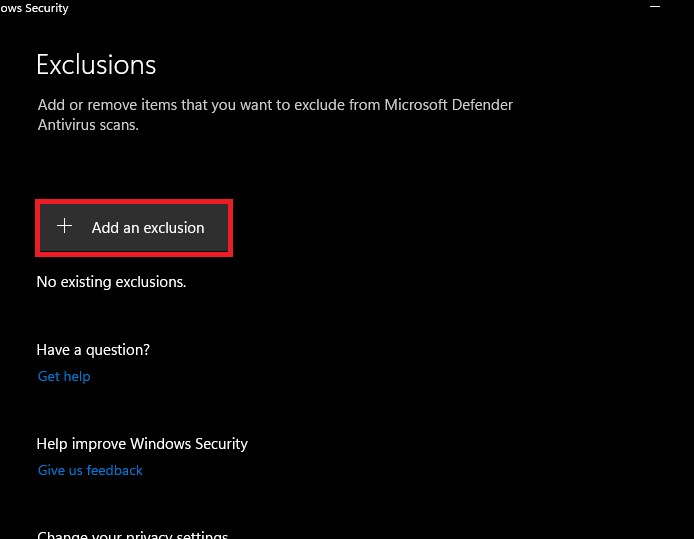
6. Click on Add an exclusion.
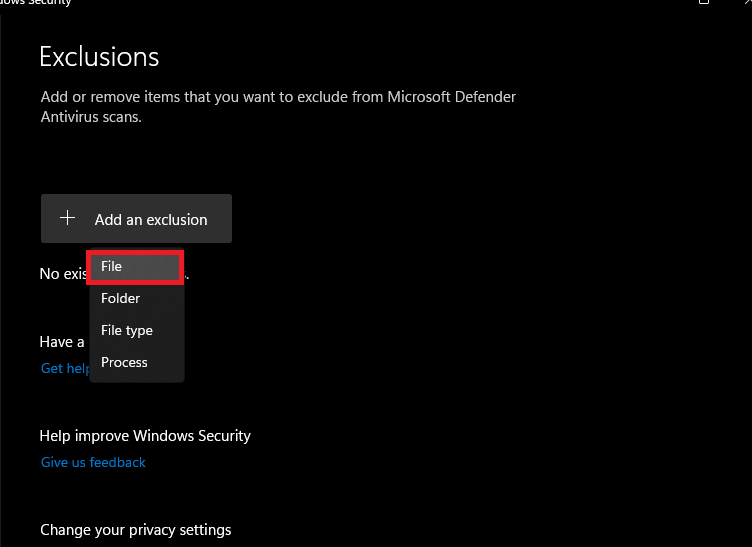
7. Select File and navigate to the location where you have stored the Steam executable file.
You can also try turning off the real-time protection of the Windows defender temporarily. Below is how to do it:
- Follow the 1 to 4 steps given above.
- Turn off the toggle under Real-Time Protection.
In the same way, if you are using third-party antivirus on your PC, you can add Steam to their exclusions or turn them off completely for a specific period of time.
Also Read: 8 Best Games On Steam 2022! (New Releases)
4. Update Display Adaptor
To update the Display Adaptors, you just need to follow a few simple steps given below:
- Press the Windows+X key to launch the WinX menu.
- Select Device Manager from the list.
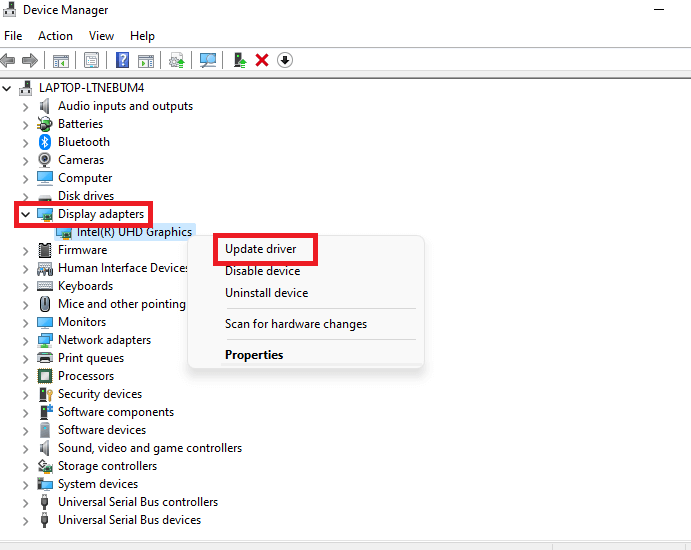
- Make a double-click on the Display Adaptors.
- Make a right-click on the option under it.
- Choose Update Driver from the context menu.
- In the next step, click on Search automatically for drivers.
- In the driver is available, follow the on-screen instructions to update it.
5. Change DNS Server
Many users have been able to fix the specified issue by changing the DNS server. To do this, you need to follow a few simple steps given below:
- Press Windows + I key to launch the Settings on your PC.
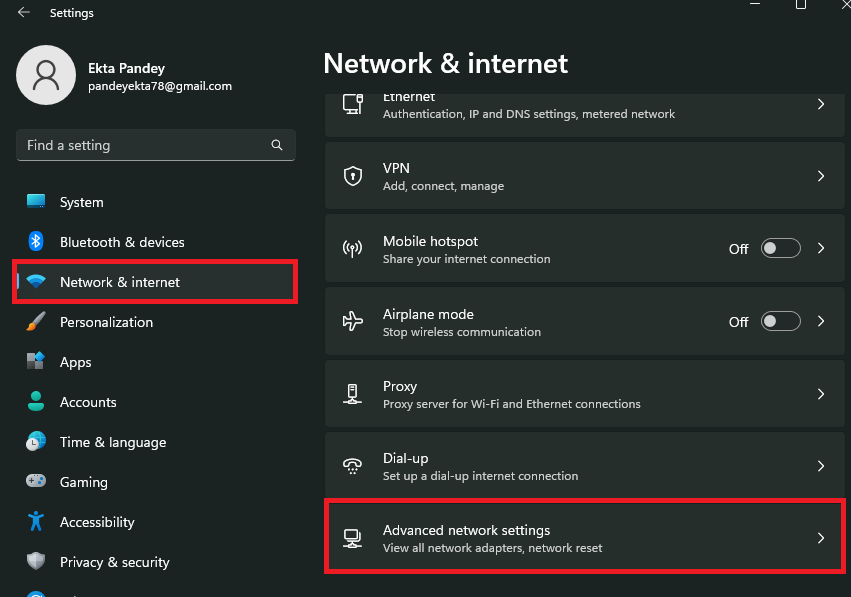
- Click on Network Internet> Advanced Network Settings.
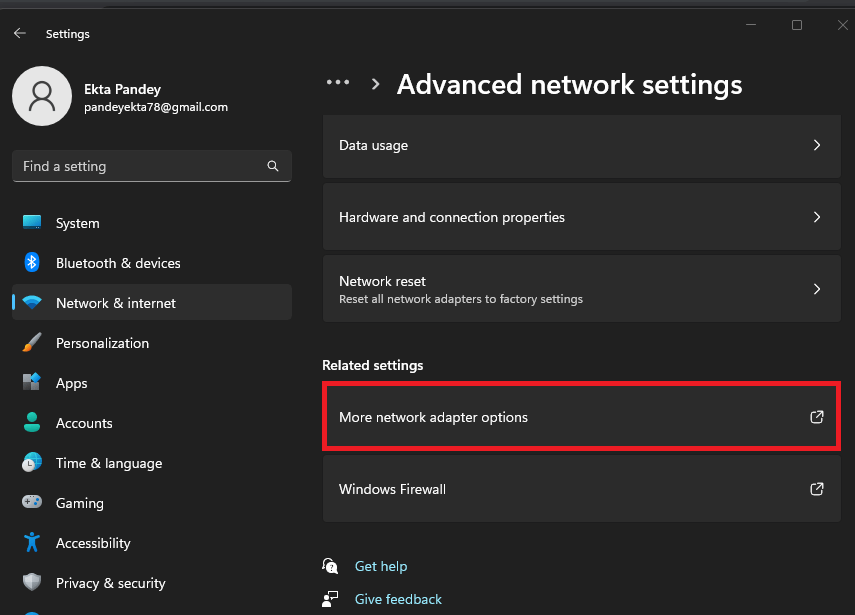
3. Then, click on More Network Adaptor Options.
4. On the window that opens up, make a right-click on your network adaptor and Choose Properties from the context menu.
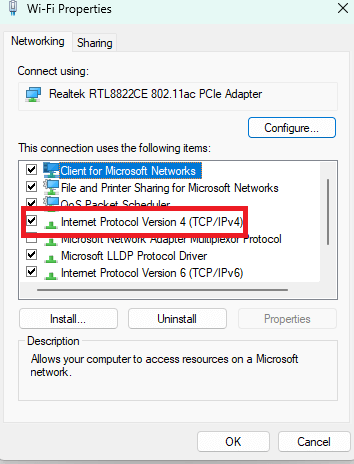
6. On the Properties Window, make double-click on the Internet Protocol Version 4 (TCP/IPv4) option.
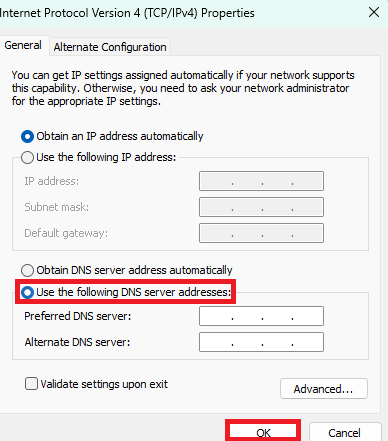
7. Select Use the following DNS Server Addresses. Now, enter any of the following addresses:
Google: 8.8.8.8 8.8.4.4
Cloudflare: 1.1.1.1 1.0.0.1
8. Click on OK.
9. Now, press the Windows + R key to launch the Run dialog box on your PC.
10. Enter cmd in the dialog box.
11. Press Ctrl + Shift + Enter to launch it as an administrator.
12. On the Command Prompt window, enter the following command and hit Enter.
ipconfig /flushdns
ipconfig /release
ipconfig /renew
13. After that, close the Command Prompt window and relaunch the Steam client window to see if the issue has been fixed now.
6. Perform a Clean Boot
Another fix you can try is to perform a clean boot on your PC. In case the issue is caused due to a software conflict, this is the perfect solution. Sometimes, there are some background programs that interfere with an app’s performance. To detect and overcome this issue, a clean boot is a perfect solution.
7. Uninstall and Reinstall Steam
If none of the fixes seem to work, you can try uninstalling and then reinstalling Steam on your PC. It works in almost all cases.
Also Read: Civilization 6 Does Not Start On Steam? Try These Fixes
CONCLUSION
So, these are the various ways to fix the Steam keeps disconnecting/reconnecting issue. Go ahead and try these fixes in no specific order. If you face any difficulties while doing so, do let us know in the comment section. We would love to help you.


