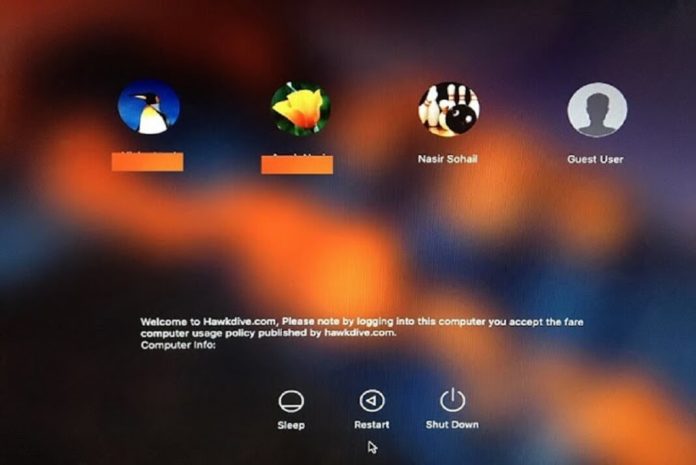
Have you ever noticed a Mac showing a custom “Welcome Message” before you can login, or have you ever accepted any fair computer usage policy before you can log into a Mac. Starting from OS X 10.7 Lion, Mac users can add a custom text message or a banner to Mac login screen. This could be very helpful for a lab or work computer to convey an important message or a fare usage policy. Basically, there are two types of messages that can be shown to an end user, first is just a text message showing at the bottom of the login screen and second could be a kind of usage agreement banner with texts and images that a user must agree before he/she can logs into the computer. Setting up such a custom message or banner is as simple as copying a text and pasting it to a file. You can also add a custom message to be displayed when your Mac is locked or screen saver starts. This post will focus on how to add a custom message to your macOS Login Screen?
| Add a custom message to your macOS Login Screen |
The login message can also be used to display the contact information of Mac owner, which can be helpful in case the machine is lost or stolen. So, the message could be anything from tips of the day, an inspirational quote, contact information, computer hardware information to a computer usage agreement. Computer hardware information can be used to help identify a Mac in a domain network or to help an instructor to choose the right device in a lab before starting any test or demonstration exercise. There are also third party applications available to do the same task but Apple has already added this feature to OS X 10.7 lion and the later versions. If you don’t want to read the whole article, you can also watch this YouTube video to learn different methods of setting a Welcome Message to macOS Login Screen.
There are following three different places where you can set a custom message. We’ll look at all three places, you can display your message to users trying to login to your Mac.
- Set a custom text message to Login Screen of your Mac
- Set a Policy Banner that appears at Login screen and ask users to accept the policy
- Set a Screen Saver message that appears when your Mac is left Idle.
#1. How to add a custom message to your macOS Login Screen?
Add text to the login screen using System Preferences
To create the message:
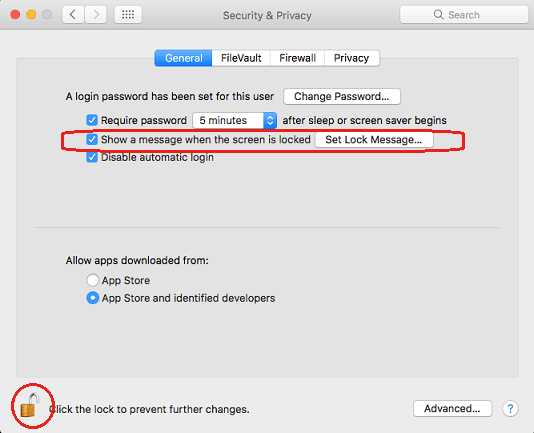
- Click Apple icon at the top left corner and choose System Preferences.
- Click Security & Privacy, then select General tab.
- Open the padlock from the bottom left corner by clicking it and supplying the administrator password.

How to add a custom message to your macOS Login Screen? - Now check the box next to “Show a message when the screen is locked,” then click Set Lock Message.
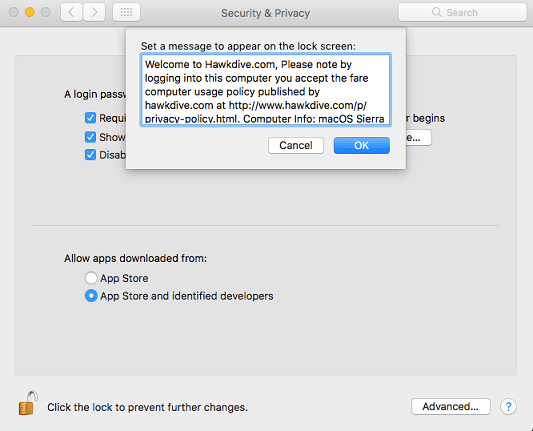
- Enter the desired message to display at the bottom of the login window. There is no limitation for the number of words or characters. And only the text messages are allowed.

Set a custom Welcome Message to Login Screen in Mac - Once you have finished typing the login message, click OK and then click the lock. That’s it.
In order to remove the welcome message from login windows or to revert to default settings type the following command:
#2. How to set a Policy Banners at Login screen in Mac OS X?
A policy banner is just a customized login message which may contain text, images, or both. It could be a set of rules, greetings, an inspirational quote or any kind of notifications or rules set by system administrator to convey the desired message to Mac users. The policy banner usually appears before the login window and must be accepted before proceeding further. Once the message is accepted, your Mac shows the available user account to login with. This is majorly used to get the terms and conditions accepted by the end users before they can use the Mac.
 |
| Policy Banner before Login Screen in Mac |
In order to set a Policy Banner at login screen in macOS, you just need to create a banner. Creating Policy banner is very simple.
- Just open the TextEdit app from /Application folder.
- Type your policy contents or terms & conditions.
- Include or insert images by dragging it to TextEdit.

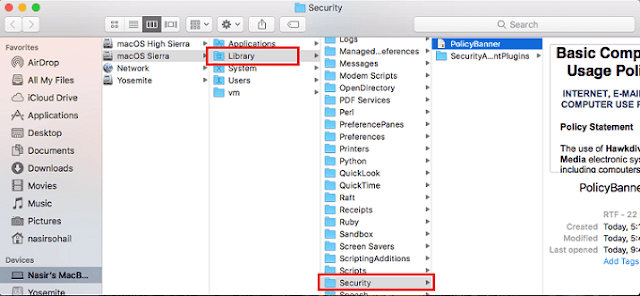
Sample Policy Banner Rich Text Document - Save the file to location /Library/Security/ folder in a plain text (.txt) or rich text (.rtf). Make sure you name the file as “PolicyBanner“.

Policy Banner to show at Login Window in Mac - You may want to initially save the file to desktop and then copy it to /Library/Security.
- Restart your Mac and you should see the Welcome message, login message or Policy Banner or whatever you want to call it.
Important Tips for System Administrator: If you have to set the same policy banner across multiple Macs, you may want to use a third party software or Apple Remote Desktop (Cost $79.99). Such software can make your job easier by distributing the same file across all the systems. For more information on Troubleshooting and fixing problems related to Policy banner refer to apple support article.
#3. How to display a custom message in screen saver on your Mac
Screen saver is just used to fill empty screen when your Mac is left idle. It is an important feature for computer security and privacy as it hides the documents you are currently working on. Sometimes, your manager wants to convey various different messages or policies to end users. Showing multiple images containing different policies, ethics and company’s achievements in form of screen saver could be a better idea. To do this, first create a few pictures with policy and desired messages written on it and save them in a folder on your desktop. Then follow the steps written below. You can even show a custom text message in screen saver on your mac. Here is how you can do this:
- Click Apple icon at the top left corner and choose System Preferences.
- Select Desktop & Screen Saver and click Screen Saver tab.
- Now the different types of screen savers appear on left side of the window, and the right side shows the preview of selected screen saver.
- Click any of the screen saver types like Floating, Flip-up, Ken Burns, or classic to select it.
- Now select “Choose Folder…” option in the “Source:” pop up menu on the right – just underneath the preview of selected screen saver.
- Choose the folder containing the images of policy and desired messages.Click choose and you are done.
- Now left the Mac idle until the screen saver starts.
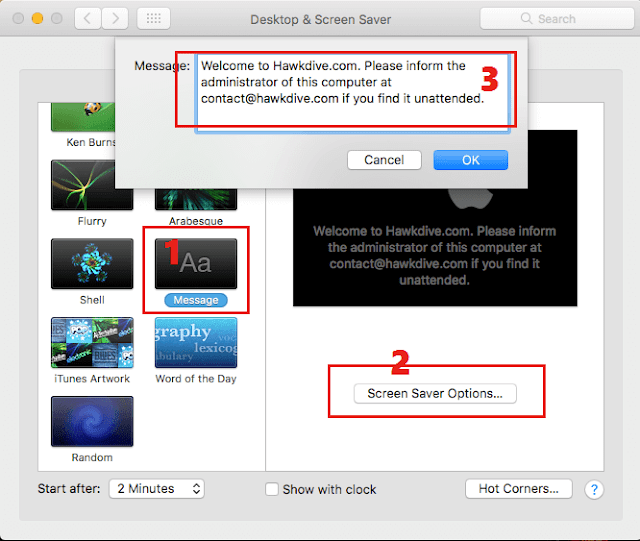
- If you don’t want to show images in screen saver but a text message. Select the message option on the left side of the window.

Show Custom Text Message in Screen Saver on Mac - Click “Screen Saver Options…” on the right side of the window and supply the custom message to show when screen saver starts. Click “OK” and you are all set.





This design is wicked! You certainly know how to keep a reader amused.
Between your wit and your videos, I was almost moved to start my own blog (well, almost…HaHa!) Excellent job.
I really loved what you had to say, and more than that, how you presented it.
Too cool!
🙂