Many users after updating to Windows 11 are facing the issue of mouse left-click not working. So, in this article, we will be discussing how to fix the mouse left-click not working on Windows 11. If you are using a mouse or a touchpad, you can try these fixes.
Left-click is used for selecting, clicking as well as dragging. So, if it is not working in your case, you must try the fixes given below. Some of the tricks may require you to use the left-click, so you can use a touchpad or another mouse in that case. Now, let us discuss how to fix the mouse left-click not working on Windows 11.

Also Read: How To Fix Black Screen With Mouse Cursor Issue In Windows 11
Fix Mouse Left-click not working on Windows 11
- Reconnect Mouse
- Restart Files Explorer
- Check Mouse Properties
- Reinstall Mouse Driver
- Run DISM tool
- Perform a clean boot
Now, let us discuss these points one by one.
1. Reconnect Mouse
- The first and foremost thing you can do is disconnect the mouse. Then, reconnect it. If possible, you can try using it on any other device.
- Now, if the left-click starts working on any other device, the problem lies in your device. It can be fixed by trying the fixes given below.
- In case, the mouse left-click doesn’t work on any device, there may be some issue with the mouse itself. If this is the case, a computer technician will help.
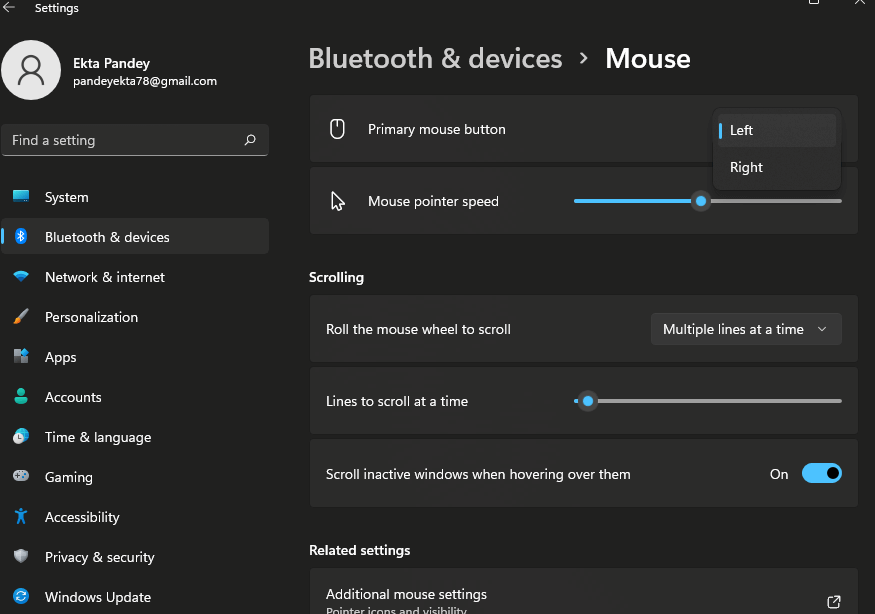
Set primary mouse button as Left
- Go to the Settings. (Windows+I)
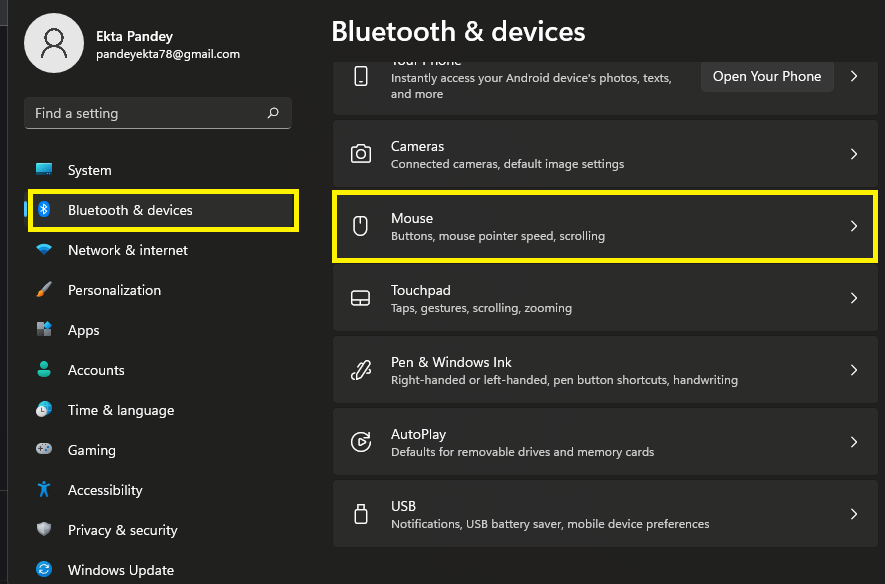
- Click on Bluetooth & Devices on the left-pane.
- Scroll down & Select Mouse on the right-side.
- Now, set the primary mouse button as Left.
Also Read: How To Fix Apple Mouse Not Working
2. Restart Files explorer
Another way to fix the issue of mouse left-click not working on Windows 11 is to restart Files Explorer. To do this:
1. Open the start menu.
( Click on the Windows icon on the taskbar)
2. Now, type Task Manager in the search bar at the top.
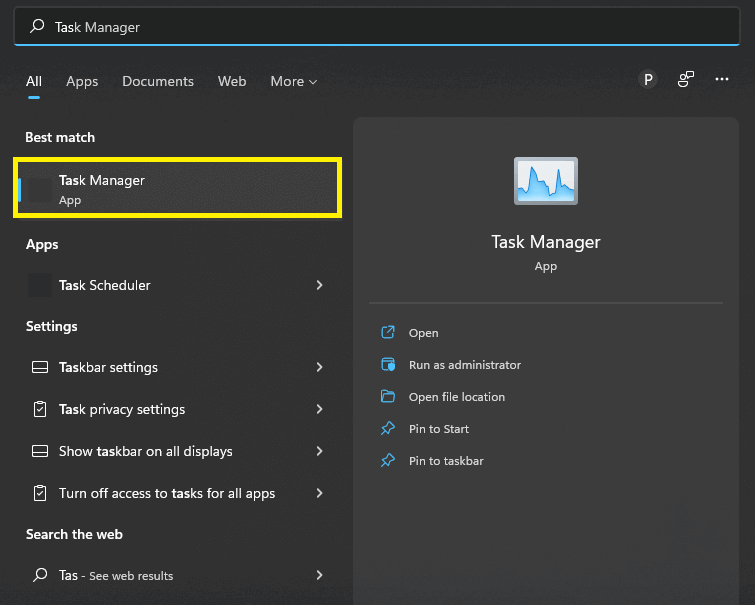
3. Click on Task Manager under best match.
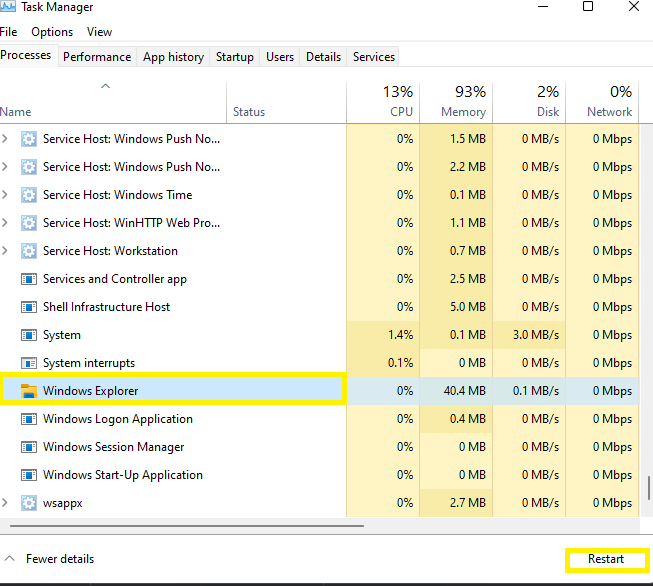
4. Scroll down and locate Windows Explorer.
5. Click on Windows Explorer and tap Restart at the bottom.
Also Read: 2 Best Ways To Set Skype Status To Always Available
3. Check Mouse Properties
To check Mouse properties:
- Go to the Settings app on your device. (Windows + I )
2. Click on Bluetooth & Devices on the left side.
3. Scroll down and select Mouse.
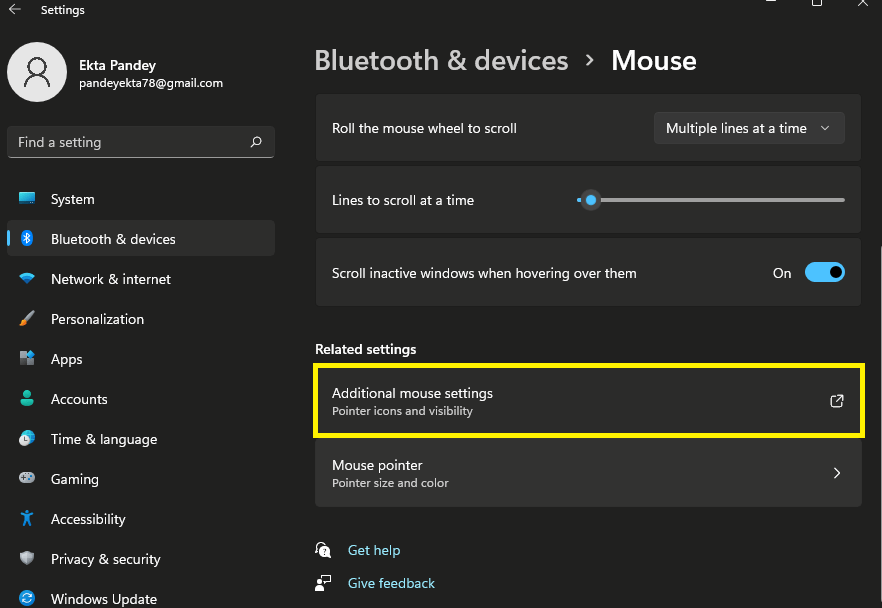
4. Tap Additional Mouse Settings under Related Settings.
5. Mouse properties window will open up.
6. Under the Buttons tab, check the box next to Turn on Click Lock ption.
7. Click on Apply and then OK.
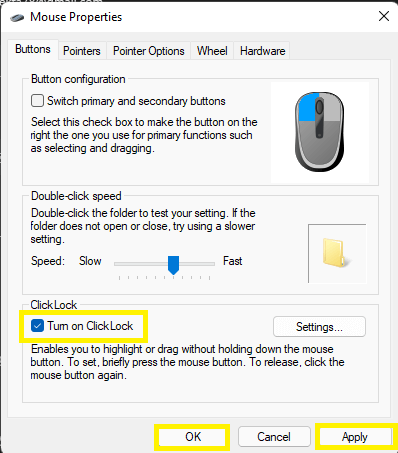
8. Now, uncheck the box next to the Turn on Lock option.
9. Click Apply and then OK.
Now, check if the left-click of the mouse starts working on your Windows 11 PC. If the issue persists, kindly move on to the next method given below.
Also Read: Universal Control Not Working Between Mac And iPad? Try These fixes
4. Reinstall Mouse Driver
An older version of mouse manager may also be responsible for this. So, in this case, try updating or reinstalling Mouse Driver. For this:
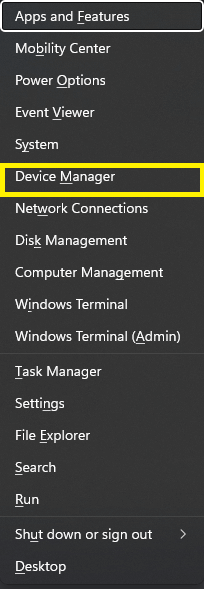
1. Go to the WinX menu. ( Press Windows+X key combination/ Right-click on Windows icon on the taskbar)
2. Select Device Manager from the pop-up.
3. Locate Mice and other pointing devices option.
4. Click on the > icon next to it.
5. Right-click on your Mouse driver.
6. Select Properties from the context menu.
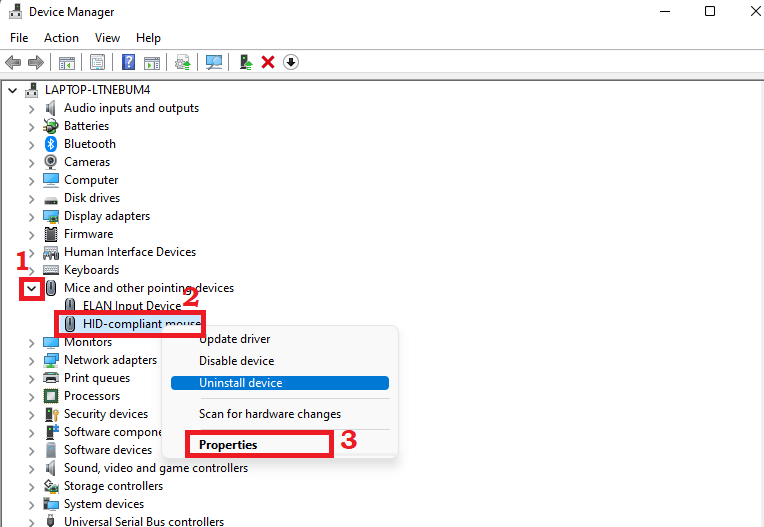
7. Under the Drivers tab, click on Uninstall.

8. Follow the on-screen instructions to complete uninstallation.
9. Then, plug or connect to the mouse again to reinstall it.
Also Read: AirPods Cannot Connect To Windows 11? Try These Fixes
5. Run DISM tool
Another method to fix this problem is to run DISM too. It is a command-line tool that can help you find and repair any corrupted system files. It is free and can fix the problem. So, to run the DISM tool:
- Open Command Prompt. (Open Start menu and enter cmd in the search box)
- Enter the following command:
DISM /Online /Cleanup-Image /RestoreHealth
3. Press Enter.
4. Wait for a few minutes until the system detects and repairs the corrupted files automatically. Do not close the window until the process is completed.
Also Read: How To Fix Keyboard Shortcuts Not Working On Windows 11
6. Perform a clean boot
A “clean boot” launches Windows with the bare minimum of drivers and starting applications, allowing you to see if a background program is interfering with your game or application. This is similar to starting Windows in Safe Mode, but it gives you greater control over which services and apps startup at launch, which might help you narrow down the source of a problem.
How to perform Clean Boot on Windows 11?
1. Enter MSconfig and press Enter.
2. Open System Configuration app under best match.
3. Under the General tab, click Selective startup.
4. Uncheck the box next to Load Startup items.

5. Check the box next to Load System Services and Use the original boot configuration.
6. Now, switch to the Services tab.
7. Check the box next to Hide All Microsoft Services.
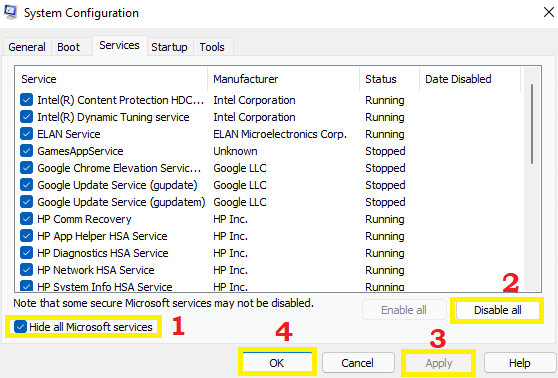
8. Then, tap Disable all.
9. Click on Apply and then OK.
10. Restart your PC.
Also Read: Mac Not Restarting After Upgrading To macOS Monterey? Try These fixes
CONCLUSION
So, these are the different ways to fix the mouse left-click not working on Windows 11. If any of the methods above helped you in a way, do let us know in the comment section. Moreover, if you face any problems while performing the various steps mentioned in this article, you can tell us in the comment area. We would love to help you.


