MAC Address is important to know these days. Devices that are on a network can be hard to find, so it can be hard. The names of most systems can be changed by their owners, which is why you’ll often see “William’s PC” or “William’s iPhone” on a Wi-Fi network. But you can’t trust these names because they can be changed. MAC addresses are a better way to make sure you’ve correctly identified a given device. A whitelist of devices that are allowed to get in could be one reason you need this information.
In the process of making network adapters, manufacturers give each one a unique MAC address. This makes sure that any device that can connect has at least one MAC address.
In contrast to the names people give their gadgets, these identifiers are supposed to stay with them for a long time. There are ways to change William’s PC name to “Will’s Laptop,” but it’s more difficult than renaming “William’s PC” to “Will’s Laptop” Just one problem: It can also be hard to find your device’s MAC address with this method, too.
Difference between MAC Address v/s IP Address
Everyone on the network has two types of addresses: a MAC address and a host name or IP address. MAC address and IP address are both used to identify a network device. People often mistake one for the other. MAC Address is a way to tell which devices are on a network, and IP Address is a way to tell which network connection you have.
When you buy a computer, the manufacturer gives it a permanent MAC address. The IP address is provide to you by your Internet Service Provider, which changes depending on where you live. When data is sent from one device to other, it needs both addresses to get there.
This article will show you how to find the MAC address in the Windows 11 system using Settings, PowerShell, Command Prompt, Control Panel, and System Information, among other things.
Also read:How To Find Wi-Fi Network Security Key Password In Windows 11
In Windows 11, how do you find a MAC address?
Windows 11 and 10 have a single place where you can find the settings you use the most. There aren’t many options here, but the app can tell us our MAC address.

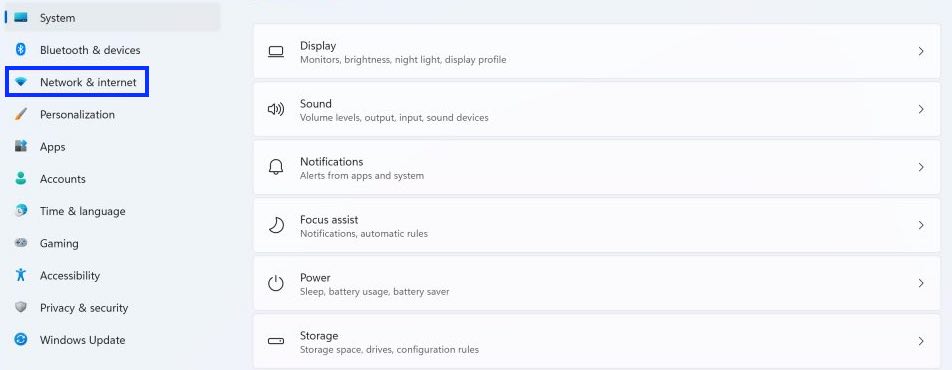
1. In Settings, go to the ‘Network and internet’ page. In order to do this quickly, click the Start menu and choose Network Settings from the pop-up menu. You can also search for Settings, open the app, and then click “Network & Internet” in the sidebar to get to the settings.
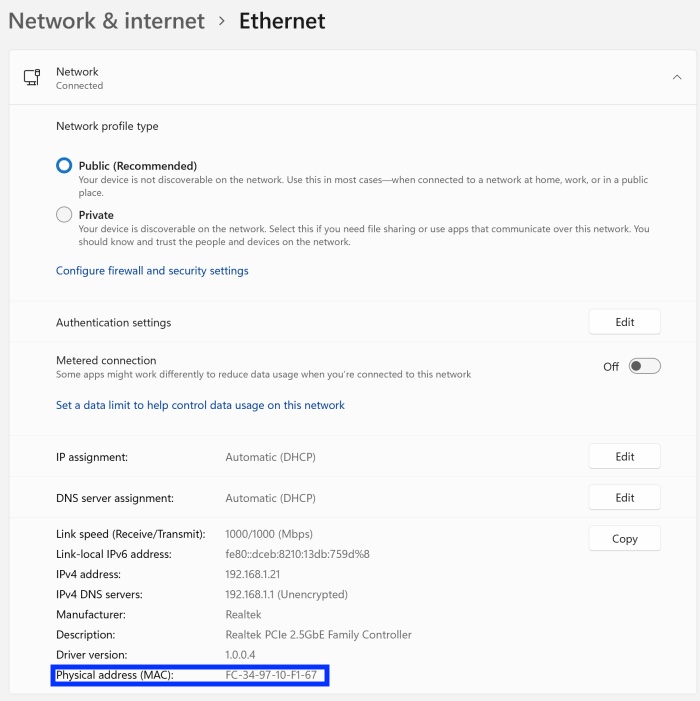
2. If you want to find the Ethernet MAC address, open the Ethernet sub-menu and go to step 3.
For the Wi-Fi adapter’s MAC address, click Wi-Fi.
To get to hardware settings, then click on that.
3. Look for ‘Physical address (MAC)’ at the bottom of the page.

Look for it When the Ethernet or Wi-Fi / Hardware properties submenu is opened, this setting might be on the screen right away. If it isn’t, you might have to scroll down to find it. A list of the MAC address will show up there with six alphanumeric pairs separated by hyphens.
Also read:7 Ways To Fix Overheating Issue Windows 11
In Control Panel, you can look up a Windows 11 device’s MAC address.
There aren’t many ways to find the old Control Panel in Windows 11 and Windows 10 before it. The Settings app’s predecessor has more options and may be more familiar to more advanced users.
1. Go to the Control Panel. To do this quickly, use the Start menu’s search tool.
2.The Network Sharing Center is on the second step. You can open it. To get to this, click the “View network status and tasks” link under “Network and Internet.”

3. Choose the type of connection you want to have with your phone. Network Sharing Center should show your current internet connection type (Ethernet in our example) as a link that you can click on. Click on it.
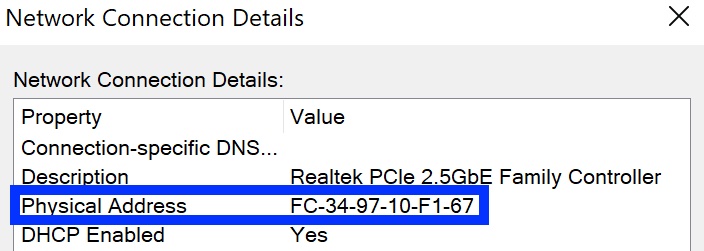
4. When you’re done, click the “Details…” button on the right. A window should open up with information about your connectivity options, download speeds, and other things that you can do. The “Details…” button is on the bottom of the screen. Click on it.
5. Find “Physical Address.” It doesn’t say “MAC Address” in this window, but the “Physical Address” field should be correct and should match the information we get from the Settings app and our next method.
Also read:How To Run Troubleshooters In Windows 11
PowerShell can be used to find the MAC address of a Windows 11 device.
Microsoft includes its command shell and scripting language, PowerShell, with Windows 11 by default so people don’t have to point and click to do simple things.
1. Go to PowerShell and click on the Start button. In order to do this quickly, you can right-click on your Start menu and choose “Windows Terminal” from the pop-up menu that comes up. If you don’t need the admin version of the tool, there is also a free version that you can use. Another way to find it is to search for “PowerShell.”
2. Type in the command “getmac /v” without the quotes. The “getmac” part of the command gives us information about our hardware’s Physical Address and Transport Name. The “/v” modifier tells Windows 11 to give us more information, which means it will also give us the Connection Name and Network Adapter results, which is what we want.
3. Find “Physical Address.” Because the command makes it clear that we’re looking for the MAC address, Windows 11 does not mention it. The “Physical Address” should still have six pairs of alphanumeric characters separated by hyphens.
It’s important to note that if you have more than one network adapter, you’ll see them all here.
The last comments.
People who use Windows 11 should be able to find the MAC address on their PCs now. Now it’s time to do what you need to do with your MAC address. This is the time. For people who don’t want to risk remembering their MAC IDs, they can pick one of the methods above and use it whenever they need to. People should do this instead of writing it down somewhere and having to look for it when they need it.


