Today I am gonna tell you about Virtual CD-ROM Drive that you can create to Mount any ISO Image file. An ISO file, often called an ISO image, is a single file, perfect representation of an entire CD, DVD, or BD. The entire contents of a disc can be precisely duplicated in a single ISO file. It’s a software that you have to install and it will show you a CD-ROM Drive in your computer even if you don’t have a physical one and it works perfectly fine just like a Physical DVD/CD drive that you can use to mount Image of a Software and install it.
When you buy any software online sometimes the file is downloaded as an ISO image file which you need to burn on a CD/ DVD before you can run the setup, So in that case you don’t have to burn that image you can just mount it to a virtual CD/DVD-ROM and run the setup to install that software.For anyone who deals with CD-based programs, it allows them to use almost all CD/DVD image without burning them onto CD or DVD in order to easily access your favorite games, music, or software programs.It works like a real CD/DVD-ROM. You can run programs, play games, or listen to music from your virtual CD-ROM. Allowing you to run your game images at over 200x faster than from a conventional CD/DVD-ROM. There are multiple Virtual CD/DVD-ROM drive software available but some of the famous software are MagicDisc, Virtual CD-ROM Control Panel, Nero Image Drive and gBurner Virtual Drive (gBurner Virtual Drive enables you to create up to 16 virtual drives).
Windows 8 users do NOT need this tool. Windows 8 natively supports ISO files. In Windows 8, you can simply open an ISO file and Windows automatically assigns it a drive letter and reads it as a virtual drive.
Here in my Article I am gonna use gBurner Virtual Drive, because that’s the easiest to use and best one with great features that it supports all popular CD/DVD image file formats. Following is a list of all supported CD/DVD image file formats:
- ISO (Standard ISO File)
- GBI / GBP (gBurner Image Files)
- DAA (PowerISO Image Files)
- NRG (Nero Image Files)
- MDF / MDS (Alcohol Image Files)
- BIN / CUE (CDRWin Image Files)
- UIF (MagicISO Image Files)
- ISZ (UltraISO Image Files)
- ASHDISC (Ashampoo Image Files)
- DMG (Apple Mac Image Files)
- GI (RecordNow Image Files)
- BWI / B5I (BlindWrite Image Files)
- IMG (CloneCD Image Files)
- CDI (DiscJugger Image Files)
- PDI (InstantCopy Image Files)
- NCD (NTI CD-Maker Image Files)
- LCD (CDSpace Image Files)
- CIF (Easy CD/DVD Creator Image Files)
- P01 (Gear Image Files)
- PXI (PlexTools Image Files)
- C2D (WinOnCD Image Files)
- FCD (Virtual CD-ROM Image Files)
- VCD (Virtual Drive Image Files)
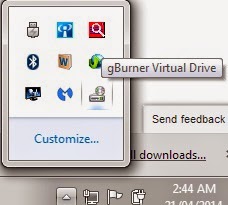
You can download it by clicking here. After you have downloaded it, Install the setup file and it will show you an icon for gBurner Virtual Drive in the system tray at the bottom right hand corner as shown in the picture below.This icon is everything for you to manage the Virtual Drive.
Steps to Mount a CD/DVD-Image to gBurner Virtual Drive.
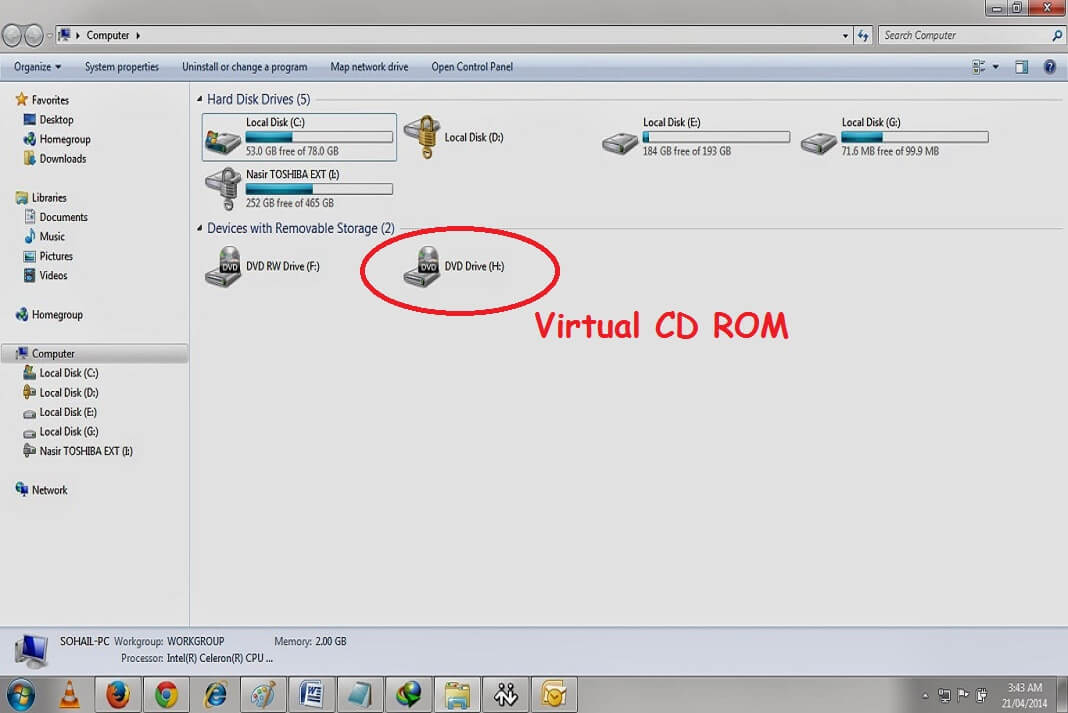
1. Once the gBurner Virtual Drive is installed it will also install a Virtual Drive with an available drive letter in your computer which you can check by going into the Computer by clicking on start and selecting Computer from start menu.In my computer it showed me the drive letter H:.

2. It installs one Virtual drive by default but you can manage it from system tray.You can disable the first one or install more upto 16 Virtual Drive and for that just right click on the system tray icon and point to Set Number of Drives.
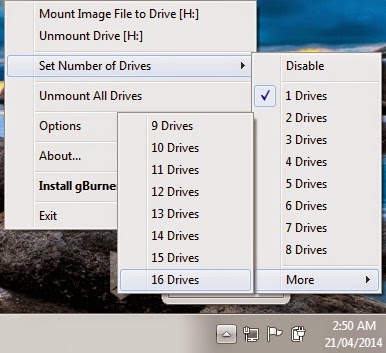
3. To Mount an image to Disk Just Right click on the tray icon and select Mount Image file to Drive and then browse the file and select to open that file.It will be mounted to that Drive letter and will show you in the computer.4. To Unmount again the same way right click on the tray icon and select Unmount Drive [X:].


