In 2021, the amount of data we store on our laptops and computers are beyond our measure. From office files to study notes to presentations and much more. Zipping compresses these heavy files into small, light data that can quickly transfer from one computer to another. Zip programs like WinZip and WinRaR help in this process.
It is a necessary tool that will help you to send multiple attachments and media files over emails and drivers. Furthermore, Windows 11 users will benefit hugely from learning how to zip their bulky files and if the need arises to unzip them.
Also read: How To Change Date And Time In Windows 11
How To Zip Your Files In Windows 11?
Step 1: Find the file in Windows 11 that you want to zip or compress.
Step 2: To compress or zip multiple files into one, use the selection rectangle to drag all the files and select them together.
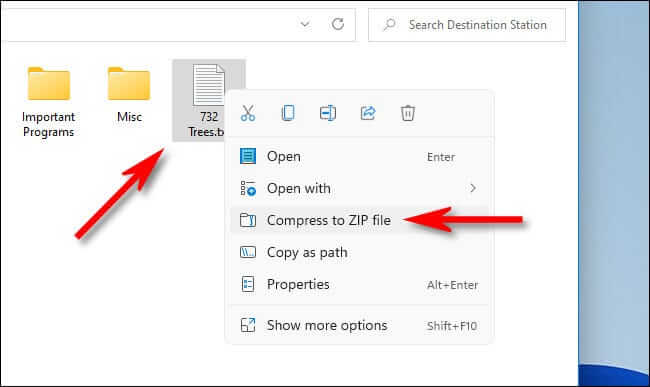
Step 3: Right-click on them or one file (if it’s a single file), and a new pop up will appear on the screen. Select Compress to Zip file.

Step 4: Wait for some time as the Zip file is processed. Once over, the zipped file will appear in the same folder as the original one.
Step 5: Rename the new zip file as you like or leave it with the .zip extension and click on Enter.
Thus, this is simple and easy to zip your files and folders in Windows 11.
Also Read: How To Organize and Manage Your Digital Photos On Windows 11?
How To Unzip A File In Windows 11?
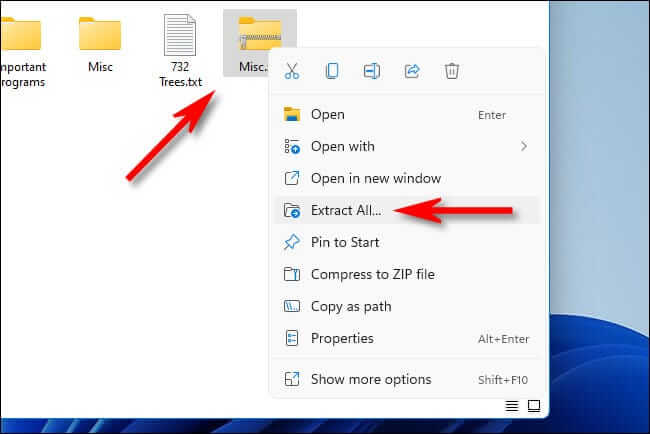
Step 1: Go to the Zipped file from the File Explorer and right-click on it. From the options in the drop-down menu, choose Extract All.

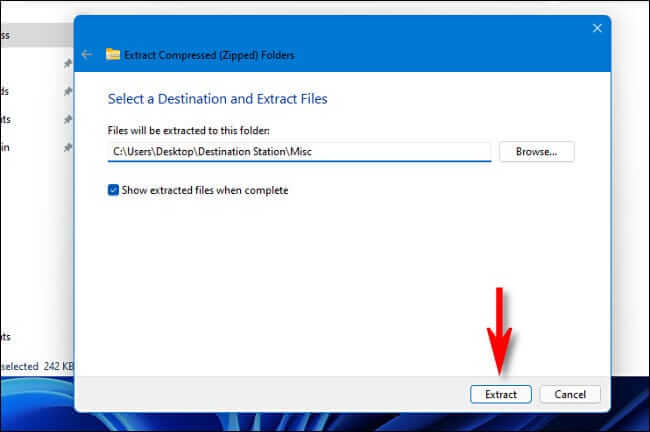
Step 2: A folder with Extract Compressed Zipped Folder will appear with the zip file path.
Step 3: Tap on Browse and select a destination to save the files after unzipping.
Step 4: Enable Show Extracted Files When Complete to see the unzipped files after the process is over. Moreover, tap on Extract.

Furthermore, in a few moments, all the zip files will unzip and appear in your set location.
Also Read: How To Use Focus Sessions To Boost Productivity In Windows 11
Can Windows 10 Zip And Unzip Files?
We can zip and unzip files in Windows 10 easily. To zip files:
Step 1: Go to File Explorer and go to the files and media you want to zip.
Step 2: On an empty space on the screen, right-click and choose New. Furthermore, tap on Compressed Zip Folder.
Step 3: Rename the folder as you like and click on Enter.
Step 4: Highlight and select all the files you want to zip using your mouse cursor. Furthermore, click on Cut.
Step 5: On the new folder, right-click and tap on Paste.
This is how to zip files in Windows 10 and thereby save ample space on your hard disk. Moreover, this process helps store heavy files that you generally don’t use a lot.
Also Read: How To Set The Default Web Browser In Windows 11?
To Unzip files on Windows 10:
Step 1: Go to the compressed folder and right-click on it.
Step 2: From the options in the drop-down menu, choose Extract All. To save these files to your favorite spot, click on Browse or else, they will go to their original destination.
Step 3: To end the process, enable the option that says Show Extracted Files When Complete. Tap on Extract.
Why Can’t I Open A Zip File On My Windows Computer?
Zip files may not open fully for many reasons. One primary reason for the problem is the unstable internet connection during the downloading process. Furthermore, sometimes viruses or poor networks may create problems or corrupt a file disabling you from opening them.
Conclusion
While WinZip and WinRAR are two of the most popular software programs, there are a few more that helps in zipping files. Moreover, many useful zip programs in the market will help you to reduce file size. For example, 7-zip is high compression ratio software that also comes with AES-256 encryption and Windows shell. Some others include Hamster zip achiever, Zipware, Peazip and Express Zip File Compression.


