Generally, in windows 11, the pointer will go from one end of the document to the other whenever you write something into Microsoft Word or any other computer program. The cursor acts as a visual cue that shows you where and in what way you’re typing. Nonetheless, most people find the cursor annoying while typing. If you are someone who is also bothered by the cursor. Then this article is just for you. You can quickly hide it without losing track of where it is. Below are a few methods that will demonstrate how to hide the cursor when typing in your Windows 11 system.

Why do some people want their cursors to be hidden?
Anyone who frequently uses a computer is aware of how crucial it is to protect the privacy of personal data. Some people want their cursor hidden while typing to stop someone from watching them as they work. The cursor’s display can occasionally seem pointless or even problematic. One should hide their cursor if sharing a computer with others to shield private data from prying eyes and probable intruders. Hence, you don’t need to worry anymore because the Windows operating system offers users many ways to protect their privacy as they write.
Also Read: How To Save Windows Spotlight Images In Windows 11
Here’s How You Can Turn on Hide Pointer
Keep your cursor hidden at all times when working if you don’t want others to read what you’re typing. Let’s look at how to hide the cursor when typing in Windows 11. Follow these easy steps to hide the cursor on your Windows 11:
Step 1: Click on Start > Select the Gear icon (Settings)

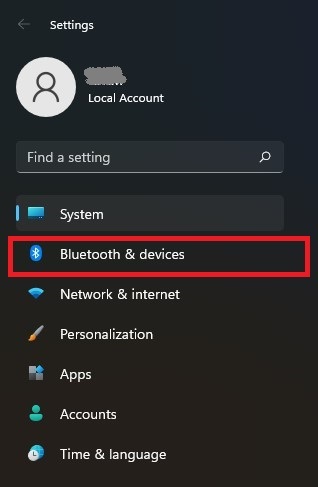
Step 2: In the settings windows, Select Bluetooth & devices
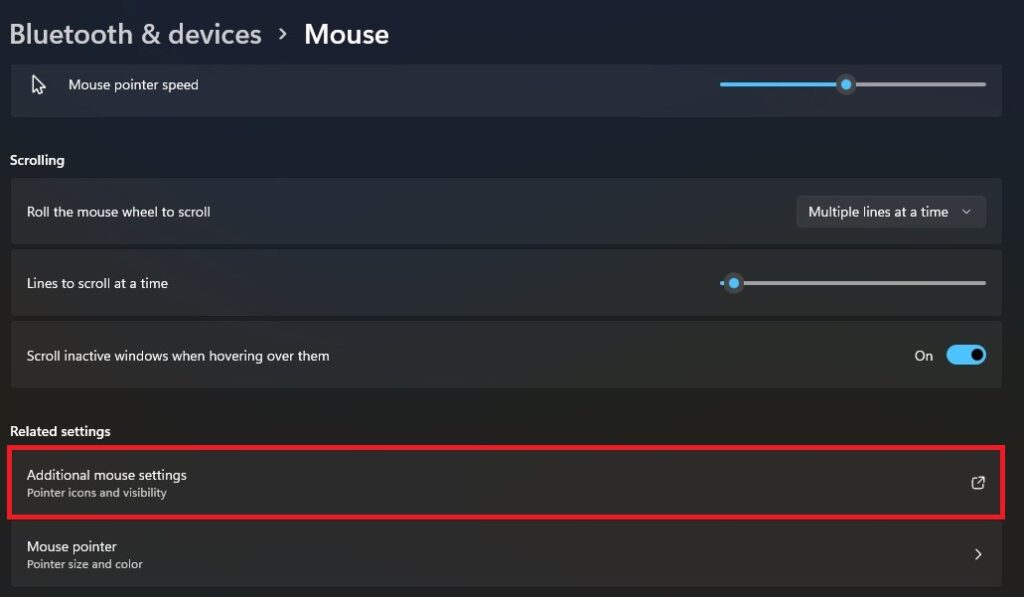
Step 3: Click on Additional Mouse Settings, listed under Related Settings
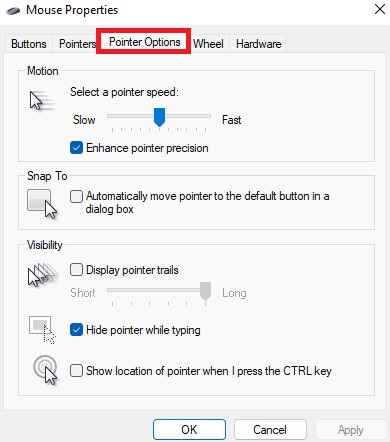
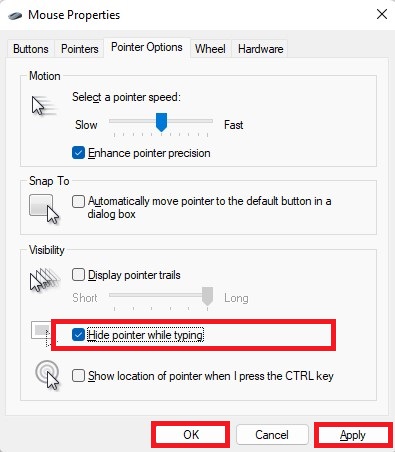
Step 4: Select the Pointer Tab option
Step 5: Check-mark the option for Hide pointer while typing
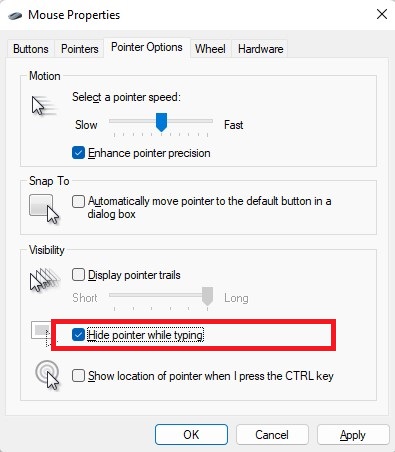
Step 6: Press Apply, then OK
To Turn Off Hide Pointer
You require only a few adjustments y if you want to turn off the Hide option, and everything else remains the same. Just uncheck the Hide pointer while typing and click on Apply then OK.
Keep in mind that, this fix will momentarily hide the cursor when you write in certain Windows applications.
Also Read: How To Add Or Remove Hibernate On The Power Menu In Windows 11
Another way of hiding the cursor through Third-Party Software
You will need to use third-party software in a Windows system if you want your cursor to disappear when you press any key. The solution is GitHub. There you can find a small software called Windows Cursor Hider. This software is written using the AutoHotKey scripting language. When you start typing, the system-wide mouse cursor is hidden. The executable stays in the taskbar and runs in the background. When you move the mouse or touch the trackpad on a laptop, your cursor emerges from hiding. The main drawback is that your cursor will be hard to see even when utilizing keyboard shortcuts for navigation or anything else.
Also Read: Hands-On Paint 3D App For Windows 11
Additional Techniques to Make Your Mouse Cursor Less Visible
If neither of the options above works for you, you could try modifying the mouse cursor and pointer to cause less interference. Follow the steps given below:
Step 1. Go to Settings.
Step 2. Choose Accessibility.
Step 3. Then on the left panel, choose the Mouse pointer and Touch tab.
From this point, you may select the size and thickness of the mouse pointer that will be displayed.
Also Read: How To Enable The Widgets Toolbar In Windows 11
Further Ways to Customize Your Cursor
Your cursor should now disappear when you begin typing, allowing you to concentrate more intently on your writing. Additionally, most people personalize their computer’s wallpaper, audio, and other features, yet they rarely consider changing the cursor. If you are someone looking to customize it so you can give your Windows a unique cursor. Fortunately, changing the appearance of your cursor is simple. Let’s examine how to employ a personalized cursor in Windows.
If you want to customize how the mouse pointer appears, Windows 11 offers a few basic cursor choices. You can change the color and size of the cursor by selecting one of these default options. Down below are some easy steps you need to follow:
Step 1. Open the Settings app by clicking the Start button in the taskbar
Step 2. This time select the Accessibility option
Step 3. Find and select the “Mouse pointer and touch” option
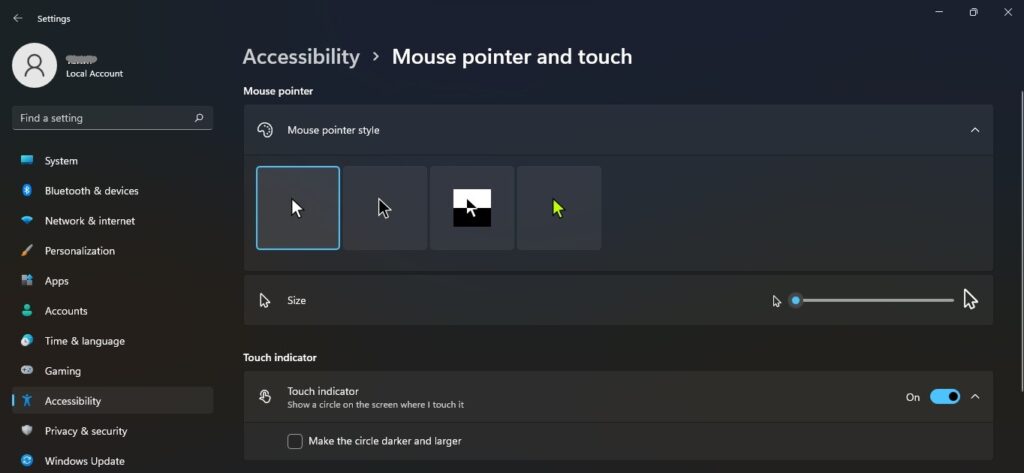
From there you can change the size, style, and color of the mouse. For customizing the cursor you need to scroll down and select Text cursor and modify it according to your preference.
Also Read: How To Fix Kodi Not Starting In Windows 11


