What is screenshot(Print Screen)?
A screenshot is an image of your Mac desktop screen or an active window. It is also called Print Screen as in Windows Keyboard there is a physical button labelled “Print Screen” or “Prt SC” that captures the whole screen upon pressed. Screenshot or Print Screen is the best way to show someone exactly what you see on your computer screen. Screenshots on your Mac are great ways to share moments from your favorite videos, high scores from your games on Mac, sharing technical error with your IT Specialist, or even contributing to a blog article.There are multiple ways of taking screenshot on Mac, here I have explained quite a lot of possible ways to take effective screenshot on your Mac. Regardless of your profession- a student, a teacher, a software engineer, or a blogger, you will need to take a screenshot once in a while. For instance you may need to take screenshots to prepare a presentation for your lecture, or in some cases reporting an issue with your computer to an expert, Luckily Mac OS X has made it much simpler to capture and share screenshots(Print Screen) using its inbuilt feature. You just need to press a combination of keys and it prints the whole screen into an image file and saves it to Desktop by default. Simply read through a couple of steps written below and you’ll be an expert in taking screenshots on Mac. There are multiple ways to take screenshot(Print Screen) on a Mac and you will love to do that, So just go through all the step and use the best option that suits you.
You may also like : How to record Mac Screen? – 8 Best Screen recorder for Mac
How to Take a Screenshot (Print Screen) on Mac?
- How to take Screenshot or run Print Screen on Mac?
- How to take Screenshot of selection or any specific Windows on Mac?
- How to take Screenshot using Grab or Preview app on Mac?
- How to take Screenshot silently using Terminal Command?
#1. Take Screenshots using keyboard Shortcuts:
Take a screenshot(Print Screen) of your entire Mac screen
This is the easiest option to print the whole screen which would capture screenshot of your entire Mac desktop (no matter what is showing on your display screen). You can generally use this to capture video frames, game scores or an error message. Here are the steps to do this:
- Press Command + Shift + 3 all at the same time.
- You’ll hear a camera click sound, and your screenshot will be saved on your desktop in .PNG format automatically, with the name Screen Shot [Date + Time].
- If you do not want to save the Screenshots to your Desktop as .PNG image files but just want to copy the Screenshots to the Clipboard and paste it into a document, hold down the control key in addition to Command+Shift+3. For example, if you want to paste a screenshot of your entire Mac screen into a Word document, press Command-Control-Shift-3, go to your Word document, then paste the screenshot where you want it.
How to Take a screenshot of part of your Mac screen
In case you just want to take the screenshot of a part of your Mac screen, you should follow this step. You can use it for capturing a pop up message, an specific app Window in Mac, an image on the web, or a part of your chat.
- Open the window or pop up or chat screen you want to take the screenshot of.
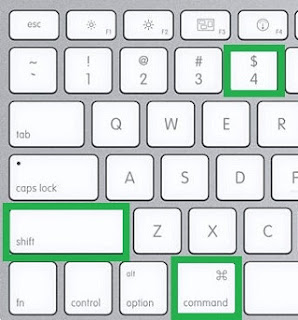
- Press Command + Shift + 4 all at the same time. The mouse pointer will turn into a crosshair.

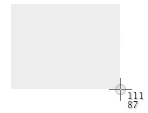
Take a screenshot of part of your Mac screen - Place the new crosshair cursor at one corner of the area you want to capture (for example, top left), then click and hold.
- Drag the crosshair over the area of the screen you want to capture.

Screenshot Crosshair in Mac - Hold down Option to change the lock point to the center of the area. Hold down Shift to lock all sides but the one in the direction you’re currently moving.
- When you’re done with the selection of the area, just let go of the mouse button or trackpad. Whatever is contained in the outline generated by crosshair will be saved as a screenshot.
- You’ll hear a camera shutter sound, and your screenshot will be saved on your desktop in .PNG format automatically, with the name Screen Shot [Date + Time].
- Again you may hold down the control key in addition to the shortcuts mentioned above, in case you just want to copy the Screenshots to the Clipboard and paste it into a document directly. For example, if you want to paste a screenshot of part of your screen into a Word document, press Command-Control-Shift-4, and then click and drag the mouse over the area of the screen you want to capture, then release the mouse button to copy the screenshot in the clipboard.Now go to your Word document, and paste the screenshot where you want it.
How to take a screenshot of specific window on your Mac screen
If you want to take screenshot of a specific application window — and nothing else — follow this step.You can use this option to screenshot the whole application windows precisely, no matter which shape it is in.
- Open the application window or click on it to make it active.
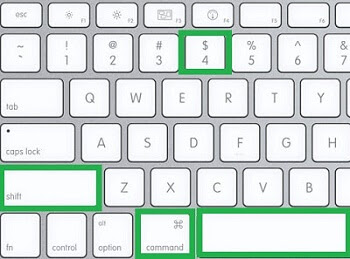
- Press Command + Shift + 4 all at the same time and then press the spacebar, you’ll see your cursor turn into a camera and the current window will be highlighted.To switch back to the crosshair, just press the spacebar again.

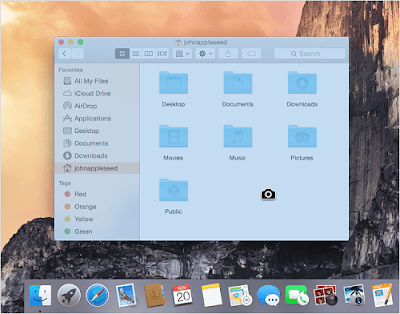
Take a screenshot of specific window on your Mac screen - To change the focus to a different window, move the cursor over that window and Place the camera cursor on top of the window you want to screenshot. The window will turn blue to make sure it’s the selected one.

When taking screenshot of a specific window:The mouse cursor changes to a Camera Icon - Click to take the screenshot.
- You’ll hear a camera shutter sound, and your screenshot will be saved on your desktop in .PNG format automatically, with the name Screen Shot [Date + Time].
- Again you may hold down the control key in addition to the shortcuts mentioned above in case, you just want to copy the Screenshots to the Clipboard and paste it into a document directly. For example, if you want to paste a screenshot of specific window on your Mac screen into a Word document, press Command-Control-Shift-4,+ Spacebar and then place the camera cursor on top of the window you want to screenshot, then click to take the screenshot. Now go to your Word document, and paste the screenshot where you want it.
Additional Controls while taking Screenshot
Just like you add the control key to any of the combinations above (for example: command+control+shift+4), the image will be copied to the clipboard instead of being saved in the default location (desktop), Similarly there are other additional controls that you could add to the initial shortcut to perform desired task.
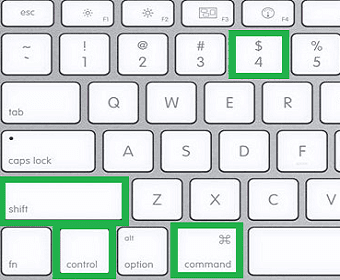 |
| Take a screenshot of part of your Mac screen and copy to Clipboard |
- Pressing shift with initial shortcuts will lock your adjustments to either the X or Y axis only (depending on how you’re moving the mouse when you press it).
- Pressing the option key will scale the selected area from the center, instead of from where you first clicked.
- Holding the spacebar after selecting an area of the screen will let you move the selection while locking the aspect ratio
- To cancel the screenshot mode, press the Escape (esc) key before you release the button.
#2. Taking Screenshot Using Grab Utility on Mac:
Grab is an app for Mac OS X that lets you take screenshot of your Mac OS X screen. It supports capturing the entire window, the entire screen, or only a portion of your screen.Grab has a few extra advantages over keyboard shortcuts such as: timed screen captures, screenshot preview and saving to a specific folder. Here are the steps to take screenshots using Grab utilities on Mac.
 |
| Grab Utilities to take a Screenshot (Print Screen) on Mac |
Open Grab utilities from Applications > Utilities folder. It opens with no specific window but a number of menu options on top.You’ll need to use Capture menu to take the screenshot on Mac.
 |
| Take Screenshot Using Grab Utility |
In the Capture menu, you have four options Screen, Selection, Window, and Timed Screen.The fourth option Timed Screen allows you to take a screenshot 10 seconds after pushing the Start Timer button. This is useful for capturing events wherein you want the menu, tool-tips and the mouse cursor on a certain place.
1. Take a screenshot of the Selection of the screen
 |
| Take Screenshot of Selection Using Grab Utility |
Open Grab Utility and Click Capture > Selection, the mouse pointer will turn into x- and y–coordinates indicator and will show you the pointer’s location on the screen.
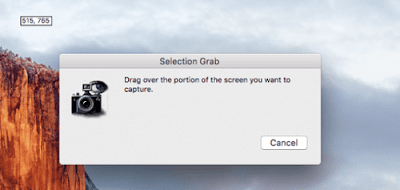 |
| How to take a screenshot on Mac |
Click and drag the pointer over the area you want to capture or Print Screen.Release the mouse button and the capture will open in a new window that you can save on your computer. Select File > Save from the top menu once the preview of your screenshot appears.
2. Take a screenshot of a specific window on your Mac screen
Open Grab Utility and Click Capture > Window, A prompt will appear asking you to select the window you want to capture.
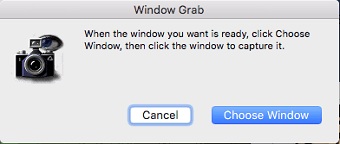 |
| Choose the window to Take Screenshot on Mac |
Press the “Choose Window” button in the prompt window, then click inside the window you want to capture. A shutter sound indicates Grab has taken a Screenshot of the window.Save your screenshot after the preview appears on your screen
3. Take a screenshot of your entire Mac screen
Similarly, Open Grab Utility and Click Capture > Screen, a prompt will open instructing you to click the screen when you are ready to capture it.
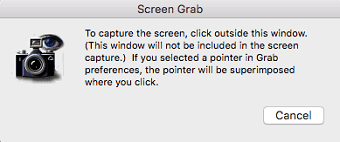 |
| Take Screenshot of Entire Screen Using Grab Utility |
Click outside the prompt window to take your screenshot. A click indicates Grab has your screenshot.Save your file after the preview appears on your computer.
4. Take a timed screenshot
Sometimes, you need a few seconds to prepare for a screenshot—or maybe you wants tool tips and menu bar also appear in screenshot which can not be captured by any of the above method, or you’re taking a screenshot which requires your both hands on the keyboard. Whatever the circumstances may be you can capture such moments using timed Screenshot option of Grab utility.
Open Grab Utility and Click Capture > Timed Screen. A small window will pop up, informing you that Grab will capture the screenshot ten seconds after you start the timer. Once you’re ready, press Start Timer and prepare your screen to take shot.
 |
| Take timed screenshot with Grab Utility |
After ten seconds, it will take the screenshot, and show you the image.
#3. Take Screenshot Using Preview:
 |
| Take a screenshot on Mac using Preview |
To take a screenshot with Preview, go to File > Take Screen Shot and select one of the type of shots you’d like to take .Once the screenshot is taken it will be launched automatically into Preview where they can be cropped, manipulated, and saved per your requirement in your desired file format to desired location.
 |
| ScreenShot Timer in Preview |
All of the screenshot types are captured instantly except the screenshot “From Entire Screen” which causes a timer to be displayed in the center of the screen allowing you to stage all the windows and menus to be captured before the timer runs out.
Once the timer runs out, the screen is captured and launched instantly into Preview.
Note:- If you have multiple monitors connected, each monitors screen will be captured separately,For example, if you had 4 displays hooked up to your computer, It would create four screenshot files.
#4. Take Screenshot using the Terminal Command on Mac :
This option is for advance users who does not have any other option but terminal to take screenshot or print screen on Mac or a system administrator to take screenshot on a remote Mac. All the above mentioned types of screenshots can also be taken from Terminal. Terminal has screencapture command that can be used to capture screenshots, and is very useful for scripts. Here is the Syntax of the Screencapture command with all the flags that can be used with it.
 |
| Take a screenshot on Mac with Screen Capture Command |
screencapture [-SWCTMPcimswxto] file
DESCRIPTION
-c Force screen capture to go to the clipboard.
-C Capture the cursor as well as the screen. Only allowed in non-interactive modes.
-i Capture screen interactively, by selection or window. The control key will cause the screenshot to go to the clipboard. The space key will toggle between mouse selection and window selection modes. The escape key will cancel the interactive screen shot.
-m Only capture the main monitor, undefined if -i is set.
-M Open the taken picture in a new Mail message.
-o In window capture mode, do not capture the shadow of the window.
-P Open the taken picture in a Preview window.
-s Only allow mouse selection mode.
-S In window capture mode, capture the screen instead of the window.
-t <format> Image format to create, default is png (other options include pdf, jpg, tiff and other formats).
-T <seconds> Take the picture after a delay of <seconds>, default is 5.
-w Only allow window selection mode.
-W Start interaction in window selection mode.
-x Do not play sounds.
-a Do not capture attached windows.
-r Do not add screen dpi meta data to captured file.
files where to save the screen capture, 1 file per screen
screencapture -T 10 ~/Desktop/screenshot.png
Copy the Screen Shot to the Clipboard directly
The following command takes the screenshot of the entire screen and send it to the clipboard rather than saving onto the desktop.
screencapture -c
Take a Silent Screen Shot without any shutter sound
Try the following command in terminal.This will take the screenshot of the entire screen silently without any shutter sound and name it silentshot.jpg.
screencapture -x silentshot.jpg
What if you have to combine two commands and use more than one flag together. For example, if you have to take a silent screenshot of the entire screen in PDF format after a delay of 10 seconds and open the screenshot in Preview immediately after being taken, you will type the following command in terminal.
screencapture -xt pdf -T 10 -P
Customizing default Screenshots behaviors using the Terminal Command
No matter how you take the screenshots, take it from the terminal commands or take it using keyboard shortcuts they all have a default behaviors set by Mac OS X. For example, All the screenshots are saved in .PNG file format or whenever you take the screenshot from the keyboard shortcuts they are always saved to the Desktop by default.
You can use the terminal commands to change some of these behaviors of screenshots which could be very useful in writing script or developing an App. To get started, open up the Terminal app from Utilities folder and use one of the following commands.These commands must be followed by ” killall SystemUIServer “- command for the changes to take effect.
1. Change the Location to save screenshots
By default, your screenshots are saved to your desktop.If you are a blogger or a writer and you tend to take a lots of screenshots then this practice will make your desktop look messy and untidy. You would like to save your screenshots in a folder to another location. Use the following command to change the default location to save the screenshots.
defaults write com.apple.screencapture location [path of the folder]
killall SystemUIServer
For example,
defaults write com.apple.screencapture location ~/Pictures/MacScreenshots/
2. Change the Screenshot default File Format on Mac
All the screen shots are saved default in .PNG file format, but you can change the default formats to pdf,jpg, tiff, png, bmp or pict. Use the following command to change the default screenshot file type.
defaults write com.apple.screencapture type [type of file format]
killall SystemUIServer
For example,
defaults write com.apple.screencapture type pdf
3. Disable the shadow around the window
Whenever you take the screenshots of a single application window, OS X will append a small shadow around the border of the window. If you do not wish to have the border shadowed then try the following command.
defaults write com.apple.screencapture disable-shadow -bool true
killall SystemUIServer
4. Change the Default Filename prefix for screenshots
Screenshots taken by OS X are by default always named with prefix Screen Shot, like “Screen Shot 2016-04-05 at 05.25.27.” To change the default filename prefix , type the following command.
defaults write com.apple.screencapture name [Filename Prefix]
killall SystemUIServer
For example,
defaults write com.apple.screencapture name “MacScreenCapture”
If you enter “MacScreenCapture” as the [ Filename Prefix] variable (use double quotes with the prefix), your screenshots will now have filenames like “MacScreenCapture 2016-04-05 at 05.25.27.
How would you capture the screenshot of long web page?
Obviously, you will not be able to take the screenshot(Print Screen) of the full web page using Mac OS X Keyboard shortcuts or preview as they only capture whatever is shown to the screen whereas a long web page can not be fit to the screen and you will need to scroll it.But don’t worry taking screenshot of long web page is also possible with the help of third party tool.There are various paid and free tool. Snagit is one of the famous paid software compatible for both Mac and windows which can take the screenshots of a long web page. Again , I have never paid for such software as I can get my work done with the free one. Google Chrome has a free extension named Full Page Screen Capture that can capture the screenshot of the full long web page. If you don’t want to use Chrome then simply use Free Online Web Capture tool, where you just need to enter the URL of the web page you want to take the screenshot of and click Capture Web Page, it will take the Screenshot of the whole webpage into the format you select which can be downloaded.The best thing about this free online screenshot capture tool is that, it free and can be used anywhere.
Look at the screenshot of Web-Capture.net that I captured using same online tool.
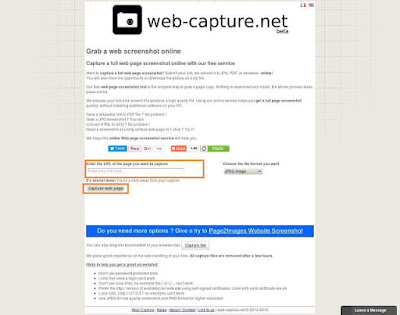 |
| Take screenshot of Long Web Page |
So that was all about taking the screenshot of Mac display or a section of the screen on Mac. If you have any other simple method to take screenshot or Print Screen on Mac or any the one I have missed, do let me know in the comment section below.


