Domain Name System (DNS ) is the global address book for internet just like the phone book in your cell phone. So when you have to call your friend you actually find his name in the address book and dial his name but it’s technically his phone number which is dialed and connects you to your friends or relatives, the same way each website also has an address on internet by which it is accessed and that address is known as IP address and typically written as 31.124.56.80 so if you want to open a website you can also type the IP address of that website in the browser and the browser will open it for you. Normally this IP address is always the IP address of the web server where the web pages are held or hosted. But remembering the IP address of any website is not easy so the concept of DNS came and it actually maintains the name and IP address of the entire website in the world and translates the web address in text format into IP address.
For more details read about DNS here.
So whenever we have to open any website let’s say http://www.yahoo.com we type the address of the website in the browser and the browser send the Website address to DNS Server to look for its IP address.DNS Server responds to the browser with the IP address ( 46.228.47.115 in case of www.yahoo.com) and then your browser makes a direct contact with the website http://www.yahoo.com using its IP address.
If your Internet Service Provider ‘s DNS server set on your computer goes down or does not respond due to any reason you will not be able to visit any pages if you type the website address in the browser like http://www.google.com but you can visit the same website easily by typing its IP address directly as 173.194.40.115 in case of www.google.com. Complex pages often require multiple DNS lookups before they start loading, so your computer may be performing hundreds of lookups a day.
If the DNS Server is down or have some issue you would see the following error messages.
1. Server not found
2. The webpage requested is not available
3. The webpage is not available
5. Webpage can not be displayed
6. Sorry,We could not find www.google.com.
Flush your DNS. Sometimes your DNS cache gets outdated and needs to be manually flushed. This can be done from the Command Prompt.
To open the Command Prompt, press ⊞ Win+R and type cmd.
Type ipconfig /flushdns. Wait for the command to process and then restart your computer.
Test the connection again. If the problem still persists, move on to the next step.
So in order to fix this problem change the DNS server address to a reliable DNS server.There are some Global Universal DNS Server which are ups and running all the time 24x7x365.They are free to use and are very fast.
The most commonly used Universal DNS server address are 4.2.2.2, 4.2.2.1. They are 6 DNS servers at 4.2.2.1 through 4.2.2.6.
You could also use Google’s Public DNS, which is a free and used as global Domain Name System (DNS) resolution service, that you can use as an alternative to your current DNS provider.
The Google Public DNS IP addresses (IPv4) are as follows:
- 8.8.8.8
- 8.8.4.4
The Google Public DNS IPv6 addresses are as follows:
- 2001:4860:4860::8888
- 2001:4860:4860::8844
You can use either address as your primary or secondary DNS server. You can specify both addresses, but do not specify one address as both primary and secondary.
Steps to Change DNS server settings on Windows 7
- Go to the Control Panel.
- Click Network and Internet > Network and Sharing Center > Change adapter settings.
- Select the connection for which you want to configure Google Public DNS. For example:
- To change the settings for an Ethernet connection, right-click Local Area Connection > Properties.
- To change the settings for a wireless connection, right-click Wireless Network Connection > Properties.
If you are prompted for an administrator password or confirmation, type the password or provide confirmation.
- Select the Networking tab. Under This connection uses the following items, select Internet Protocol Version 4 (TCP/IPv4) or Internet Protocol Version 6 (TCP/IPv6) and then click Properties.
 |
| How to set the universal DNS Server address |
5. Click Advanced and select the DNS tab. If there are any DNS server IP addresses listed there, write them down for future reference, and remove them from this window.
- Click OK.
 |
| How to set the universal DNS Server address |
 |
| How to set the universal DNS Server address |
- Select Use the following DNS server addresses. If there are any IP addresses listed in the Preferred DNS server or Alternate DNS server, write them down for future reference.
- Replace those addresses with the IP addresses of the Google DNS servers:
- For IPv4: 8.8.8.8 and/or 8.8.4.4.
- For IPv6: 2001:4860:4860::8888 and/or 2001:4860:4860::8844
- Restart the connection you selected in step 3.
- Repeat the procedure for additional network connections you want to change.
Steps to Change DNS server settings on Mac OS 10.5
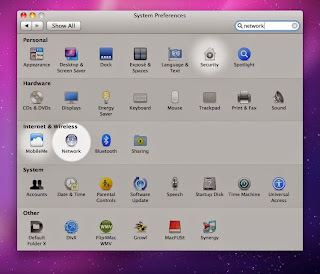
- Click Apple > System Preferences > Network.
 |
| How to set the universal DNS Server address |
2. If the lock icon in the lower left-hand corner of the window is locked, click the icon to make changes, and when prompted to authenticate, enter your password.
3. Select the connection for which you want to configure Google Public DNS. For example:
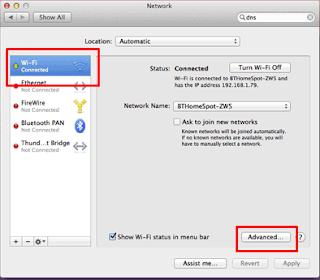
4. To change the settings for an Ethernet connection, select Built-In Ethernet, and click Advanced.
 |
| How to set the universal DNS Server address |
To change the settings for a wireless connection, select Airport, and click Advanced.
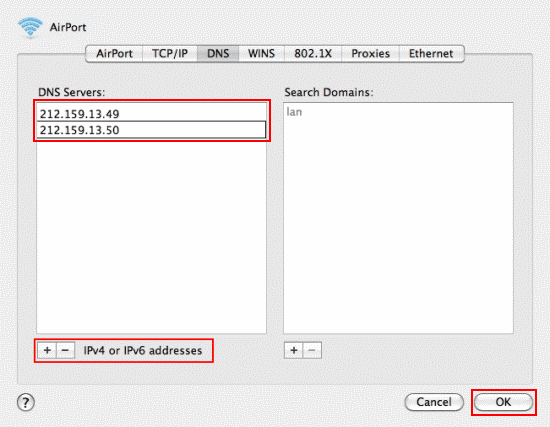
- Select the DNS tab.
- Click + to replace any listed addresses with, or add, the Google IP addresses at the top of the list:
- For IPv4: 8.8.8.8 and/or 8.8.4.4.
- For IPv6: 2001:4860:4860::8888 and/or 2001:4860:4860::8844
 |
| How to set the universal DNS Server address |
- Click Apply > OK.
- Repeat the procedure for additional network connections you want to change the DNS for.
After changing the DNS server address, restart the computer and your internet should work faster.


