You’re one step away from resolving all the glitches that come with the new update, MacOS Monterey.
Apple’s new software update MacOS Monterey was released on October 25, 2021. The update was unveiled at WWDC in June 2021. Monterey is relatively a minor update compared to its predecessor MacOS Big Sur. Even though, a small update, MacOS Monterey has various new features that boost the overall Mac experience tremendously.
Few notable features that come with MacOS Monterey are Universal Control, Airplay to Mac, Safari’s new tab bar design, Tab Groups, Spatial Audio, Voice Isolation, Wide Spectrum mode and Portrait Mode (FaceTime), SharePlay, Shared With You, Live Text, Visual Lookup, iCloud+, iCloud Private Relay, Hide My Email, Mail Privacy Protection, Mac recording indicator.
The Universal Control feature allows you to use a single mouse, trackpad, and keyboard to be utilized throughout several Macs. The Airplay to Mac feature lets you Airplay photos, movies, and games from iPad/iPhone to Mac and it can also be used as a speaker for Multiroom audio.

Safari’s new Tab Groups option
It helps you group open tabs so that it’s convenient to switch between various tasks which avoid closing tabs accidentally.
Tab Groups can be synced throughout your devices and can also be shared.
The Spatial Audio in FaceTime is impeccable and gives you the feel of a real-life conversation, Voice Isolation cancels any background noise to give you an interrupted facetime experience. Portrait Mode in Facetime allows you to blur the background and keep the focus on the subject just like the iPhone portrait mode feature.
SharePlay allows you to listen to music, watch TV shows and movies, and screen share with the person you’re on facetime within real-time.
Also Read: SharePlay Not Working In iOS 15? Try These Fixes

Live Text detects text in pictures on Mac which can be copy-pasted like formal typed text. The iCloud Private Relay feature hides IP addresses and browsing habits from external third parties.
The Mac recording indicator points out if any Mac application is utilizing the microphone.
Regardless of these extraordinary new features, the MacOS Monterey update has made the Mac run slower and has many users complaining about it. Other frustrating issues in performance you could be facing after the update are delayed app response and persistent freezing issues.
So, what could you do to avoid these issues and get your Mac back up and running as fast as a lightning bolt? There are a bunch of options you could try to fix these problems but before you proceed make sure you follow one vital step that is backing up your data in one piece.
It is always important to back up your data and store it safely in case you lose it while troubleshooting or fixing your Mac. You can always restore your backed-up data and get it all back in case something goes wrong.
The Time Machine feature allows you to make safe and scheduled backups on your Mac.
Also Read: [FIXED] ‘Not Enough Space for macOS Monterey’ Error
1# Start over
The first action you could take is restarting your mac if it has slowed down after upgrading to MacOS Monterey. This will help by shutting down all the apps running in the background which were consuming a lot of power and memory. This may help free up some space leading to stopping lags and correcting the slow operation of your Mac.
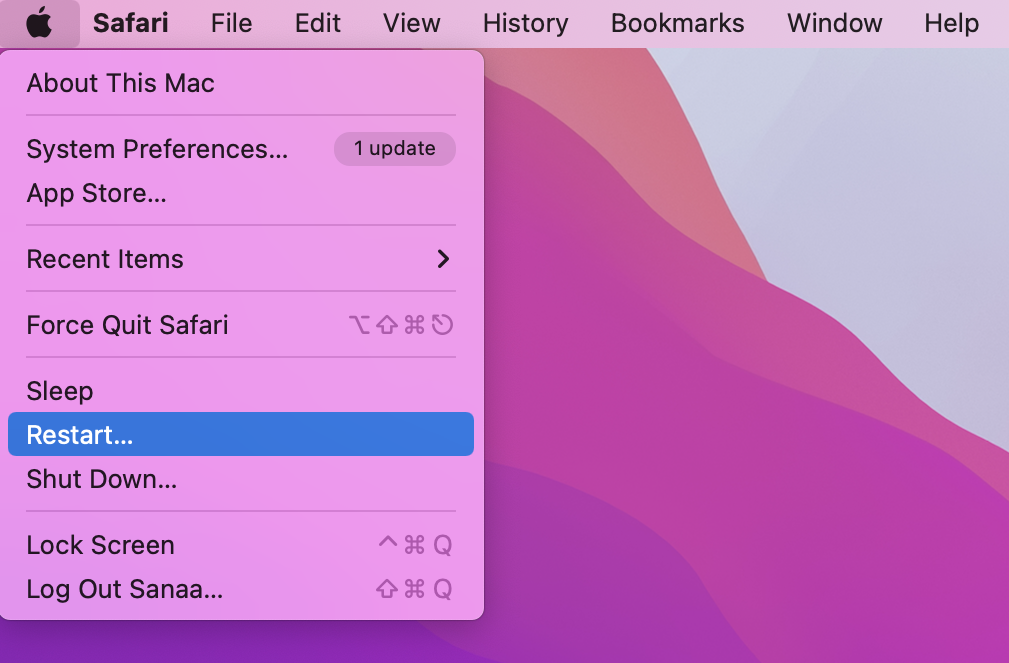
The following are a few easy steps to restart your Mac :
- Click on the Apple icon on the top left side of the screen and click on the restart option provided in the drop-down menu. This will lead to your Mac turning off and restarting.
- You could also try a Force Restart by just pressing and holding the power button for a few seconds until your Mac restarts again.
Also Read: [Fixed] No Manipulations With Clipboard Allowed Error On macOS Monterey
2# Shutdown background tasks and apps using Activity Monitor
Some applications tend to use a lot of processing power and memory which leads to your Mac running slow. By targeting the applications doing this, you can make your Mac run faster.
Activity Monitor displays useful information regarding the applications that are open and running on your Mac. It provides helpful data showing where your resources are being utilized the most. You can look at the list of apps and their corresponding details and decide which ones to shut down to save power and memory.
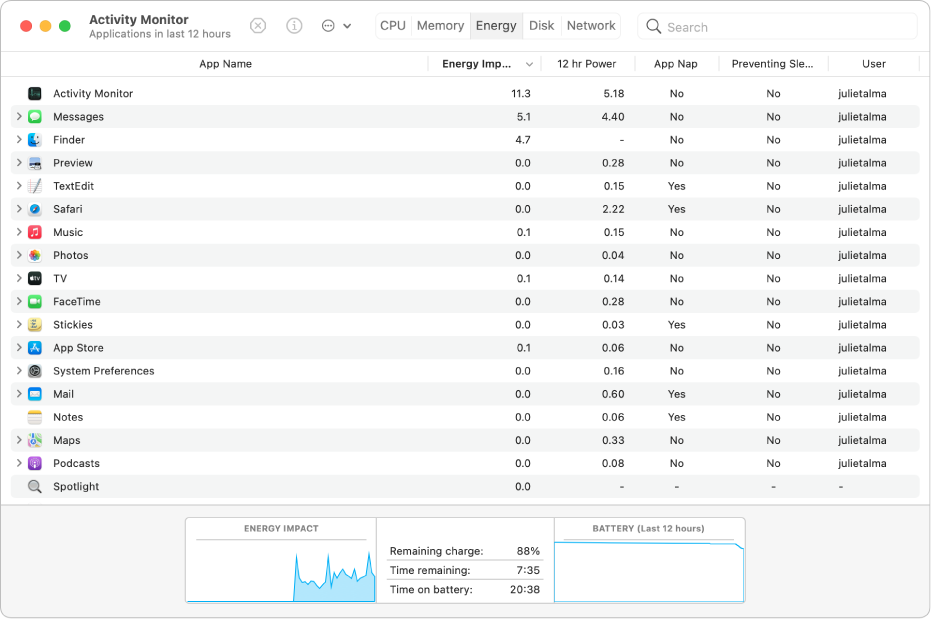
Here’s how you open Activity monitor and shut down the apps of your choice, it’s quite simple. Follow the steps mentioned below :
- Open Finder from the dock.
- Click on Applications on the sidebar present in Finder.
- You’ll find Utilities here, proceed to click on it.
- Then double-click on Activity Monitor to launch it.
There is an alternative method to open Activity Monitor.
Click on Spotlight Search present at the top right of your Mac or use the keyboard shortcut (Command + Space) and search by typing in Activity Monitor.
The amount of Memory/CPU each application is utilizing will be displayed in Activity Monitor, apps that are using an absurd amount like 60% or so can be shut down to speed up your Mac.
Also Read: Mac Not Restarting After Upgrading To macOS Monterey? Try These fixes
3# Update to the latest software version
MacOS Monterey has several bugs that need to be fixed to improve the overall processing of your Mac. To fix this, keep checking for new software updates by Apple that could have bug fixes for these issues.
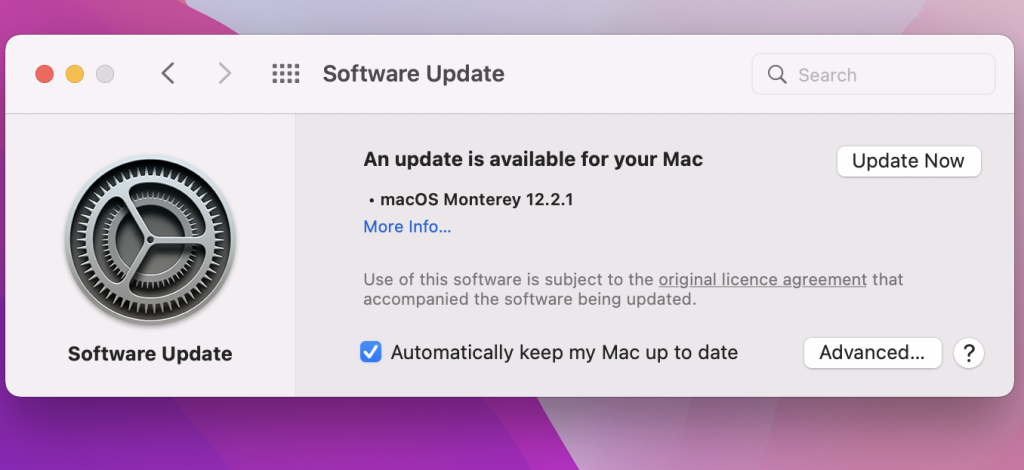
Follow these easy steps to check for the latest updates for your Mac :
- Click on the Apple icon found on the top left corner of your screen.
- Click on System Preferences from the options in the list.
- Proceed by choosing Software Update and allow it to scan for any available updates. This should take a few seconds.
- In case you see, “An update is available for your Mac” then click on Update Now.
This will begin the new update process and the up-to-the-minute update may fix some of the bugs and issues you were facing with your Mac, making it glitch lesser and run efficiently.
Also Read: How To Fix High CPU Usage After Upgrading To macOS Monterey?
4# Try turning off Transparency and Motion effects
Transparency is a cool feature on Mac that is essentially a type of visual effect that looks incredibly sophisticated by giving apps a sense of depth by making it appear translucent. This translucency shows the content behind the open window making it partially see-through. Though Transparency looks exceptional, it consumes a lot of processing time which in turn leads to your Mac running slow. This can be solved by turning off or reducing transparency and motion effects.
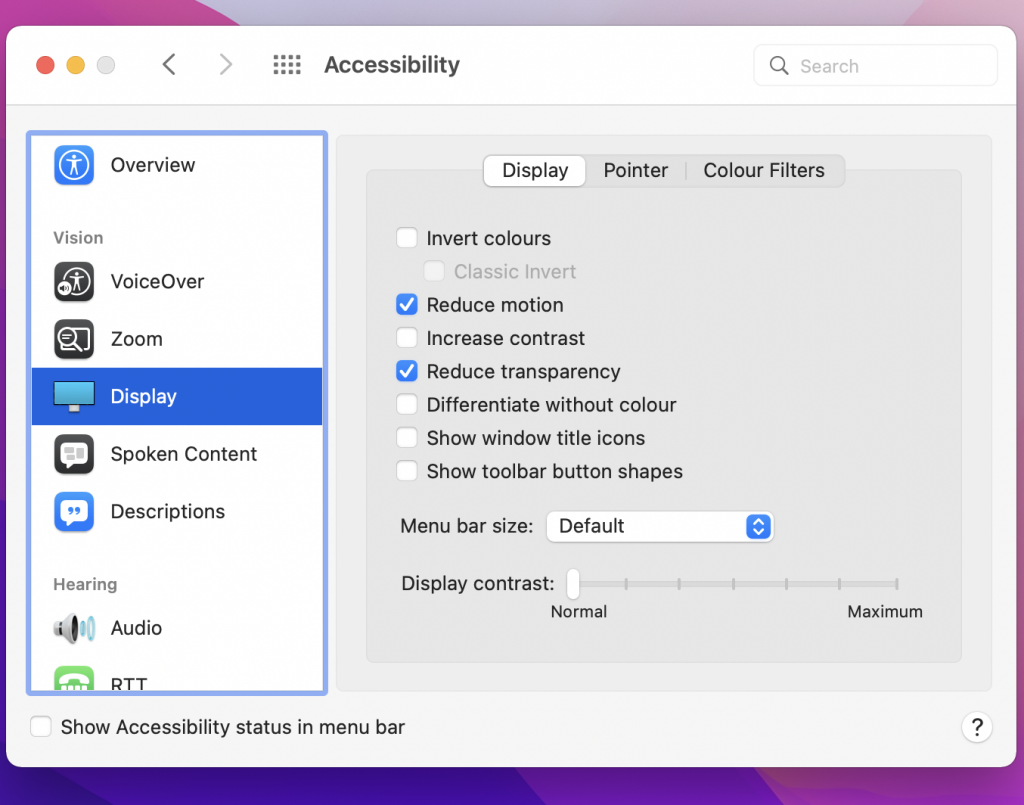
To reduce Transparency and Motion effects, follow the steps mentioned below :
- On the top left corner of your screen, you will find the Apple icon. Click on the icon.
- Select system preferences from the options in the drop-down menu
- Once the system preferences window opens, click on Accessibility.
- On the left panel of the Accessibility window, you’ll find Display. Proceed to click on display.
- Under Display, check the boxes present against Reduce Motion and Reduce Transparency.
By following the steps mentioned above, you should be able to save up some resources and speed up your Mac.
Also Read: Touch ID Not Working After Upgrading To macOS Monterey
5# Optimize your Mac’s storage space and get rid of unnecessary clutter.
According to Apple, it is advisable to have a minimum of 35GB of unoccupied disk space before the installation of MacOS Monterey. Although, if you’re running out of storage space, you could always free up some space by getting rid of useless clutter. Empty the trash, eliminate unwanted files and delete the duplicates.
Your Mac probably contains quite a lot of old, redundant, and bulky applications which are of no use anymore but are responsible for adding clutter to your Mac.
You can browse through all the files and applications and decide which ones you need and don’t anymore. Deleting them will free up a significant amount of space to avoid constant lags, glitches, and slowing down of your Mac.
Also Read: 4 Ways To Fix SideCar Unstable In MacOS Monterey
6# Assess your storage space
Lack of storage space is one of the most common and critical issues that slow down your Mac’s performance.
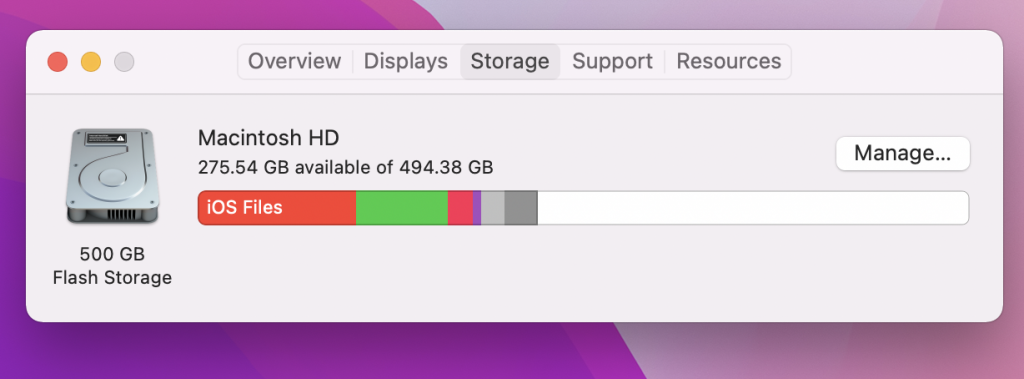
To check your Mac’s storage space, do the following steps :
- Click on the Apple Menu icon at the top left of your screen.
- Select About this Mac from the options in the drop-down menu.
- Proceed to select the Storage tab from the tabs displayed.
Now, you will be able to see the number of gigabytes available and the amount that has been consumed by files. The files and documents will be categorized into different colors each indicating the type of file it contains and the amount of memory it is taking up. The colorless white region is the available free storage space. Thereafter, you can either manually clean out the unnecessary files and documents or click on Manage. Manage gives you recommendations to store the excess data elsewhere. The recommendations include options like Store in iCloud, Optimize Storage, Empty Bin Automatically, and Reduce Clutter.
Take a look at the options provided and decide on how you would like to optimize storage on your Mac.
7# Clean up the clutter on your home screen
This is quite possibly the easiest fix to resolve bug issues and speed up the performance of your Mac. You simply need to eliminate the unnecessary clutter present on your home screen. Loads of performance are used by Widgets and Apps, it is essential to remove the unwanted widgets and app icons present on your home screen. Make sure to keep your home screen clean and minimal.
8# Clear up the cache
A cache is used to store some amount of app data which helps in increasing the speed of processes and apps but in case the files take up a lot of storage, this may lead to the gradual decrease of the system’s general performance.
It is recommended to avoid clearing the System cache as it could potentially muddle with the apps. Though it is advisable to clear the Browser Cache to free up some memory and pick up the performance of your Mac.
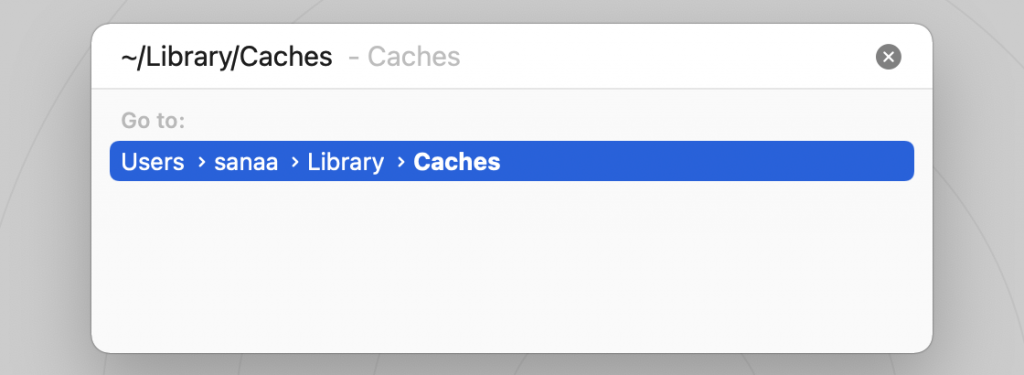
The steps to be followed to clear cache are mentioned below:
- Click on Finder on the dock at the bottom left of the screen.
- Click on Go at the top of the screen.
- Select Go to Folder from the drop-down menu.
- Type the following ~/Library/Caches in the space given.
- Some cache files will be shown, you will have to choose the files you don’t require anymore and delete them.
- You can refer to the screenshot above and try following the steps.
Wrapping Up
By following these tips and tricks you will be able to resolve issues such as your MacOS running slow, constantly freezing, glitches, bugs, and other issues you could be facing after updating to MacOS Monterey. Frequently keep checking for new software updates, this could solve all the hitches you’re coming across. Apple keeps improving your Mac’s performance, fixes bugs, and includes remarkable features with each new update they release.


