In this article, we will discuss several fixes that will help fix the Minecraft black screen issue on Windows 11.
Minecraft is a very popular sandbox game among users of all ages that does not need any introduction. This game is known to keep you occupied for hours without losing focus. If you want to know the process of playing this game on Oculus Quest 2, you can go through our dedicated guide.
However, the Minecraft game has a bad habit of throwing tantrums now and then. Users keep encountering several issues during the gameplay. One of the most common issues that users face is the black screen issue while playing the game. This pesky issue does not allow the users to start the Minecraft game and play it on Windows 11.
If you are someone who is afflicted by this weird issue and looking for ways to get rid of it, you are at the right place. In this article, we will walk you through the methods of fixing Minecraft black screen issues on Windows 11 PC. So let’s proceed to check them out one by one.
Also Read: How To Play Minecraft With Other People On The Non-Microsoft system?
How to fix Minecraft black screen issues on Windows 11?
Minecraft black screen issues can occur due to several reasons the most primary reason being third-party antivirus. Outdated drivers can also be another reason why you are seeing a black screen while playing the Minecraft game.
Following are the methods that can help you get rid of the black screen issue.
Check your antivirus
When you see a black screen in the Minecraft game, the first thing that you should do is to open the Antivirus software.
Third-party antivirus has a bad habit of blocking apps and that is the reason they are preventing you from playing the Minecraft game.
So, you should add the Minecraft app to the list of apps that you do not want to block. If it does any good, you are good to go. Otherwise, you should uninstall anti-virus and check if it helps you fix the black screen.
Also Read: How To Play Steam Games On Android TV
Reinstall Graphic Card Drivers
Follow the steps given here to reinstall graphic drivers:
- Use the Windows + X shortcut to open the quick access menu.
- Now choose Device Manager from the list of apps.
- In the Device Manager window, look for the Graphics Card driver and choose the Uninstall Device option from the context menu.
- Now click on the Remove driver software followed by Uninstall button in the pop-up window.
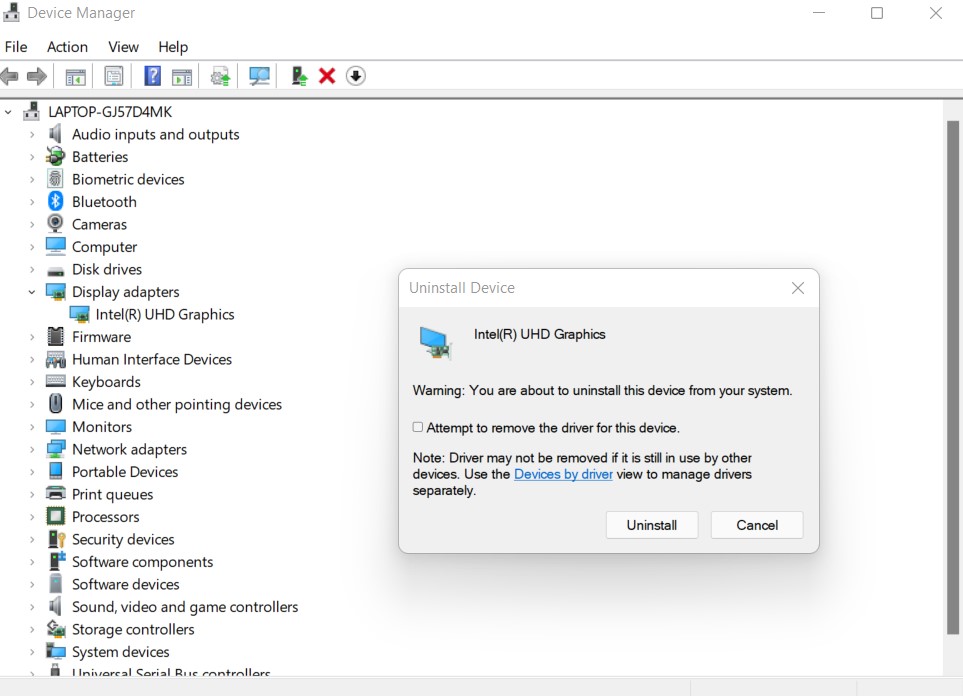
- Once the driver is uninstalled, you will have to restart your PC.
- During the reboot process, your PC will automatically detect the missing driver and install it.
- After the driver is installed, try playing the Minecraft game again and see if it helps.
Also Read: How To Play Minecraft On Oculus Quest 2
Turn off the 3D Display Mode feature
If your PC supports the 3D Display Mode feature, you should try disabling it to see if the black screen issue is solved. Here’s how to do it:
- Go to the Settings app using the Windows+I shortcut.
- Now go to the Settings section and click on Advanced display settings in the right pane.
- Now look for the 3D Display Mode option and turn off the switch for it.
Disable the SLI mode
Several users in the online forums have reported that the Minecraft black screen issue is caused when you use two graphics cards in the SLI mode. If you are not aware of this, several Windows users use two graphics cards to improve their gaming performance.
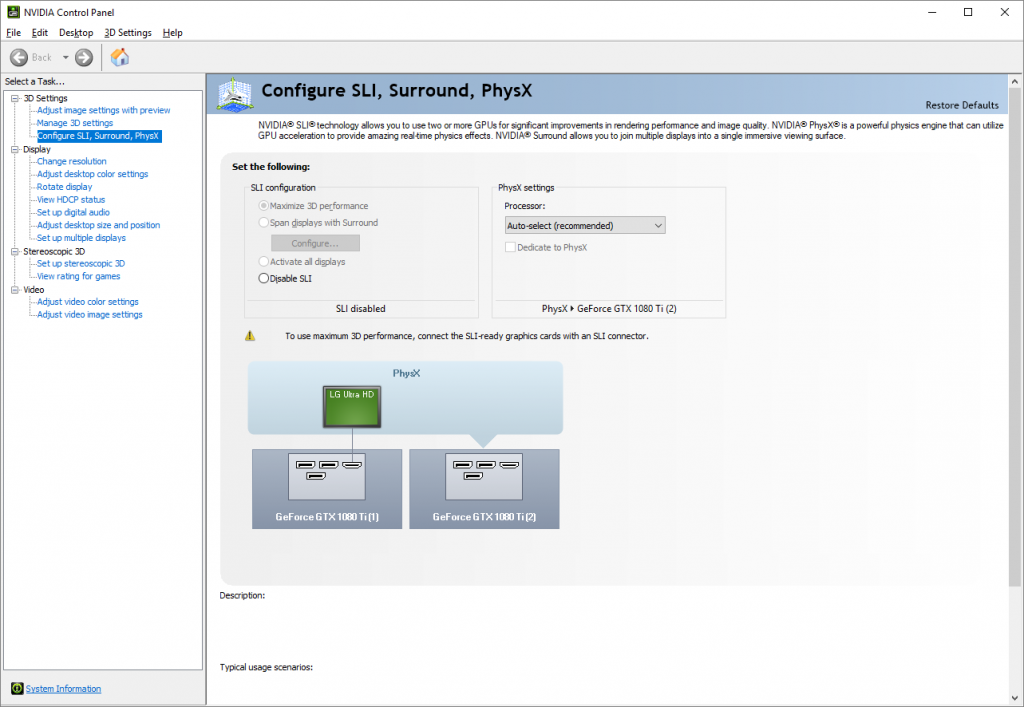
This workaround is beneficial but users can face issues like the black screen you’re facing now. So go ahead and disable the SLI mode to fix the black screen issue while playing the Minecraft game.
Turn off the Stereoscopic 3D feature
Another feature that has a bad reputation for causing issues like this one is the Stereoscopic 3D feature.
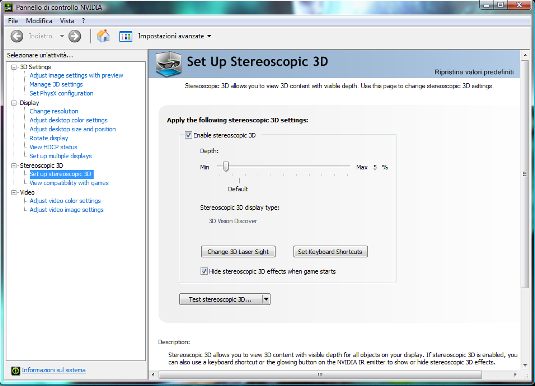
This Stereoscopic 3D feature is not supported by all graphic cards, and if your PC supports this, it is the culprit right now. So to get rid of the black screen issue, you should access the graphics card control panel like the Nvidia Control Panel installed on your PC. Now go ahead and disable the Stereoscopic 3D feature on your PC.
Now reboot your PC and launch the Minecraft game, hopefully, the issue will be fixed now.
Run the game in compatibility mode
- To run the Minecraft game in compatibility mode, look for the Minecraft.exe file and right-click the file, and choose the Properties option from the context menu.
- Now go to the Compatibility tab and tick the checkbox for Run this program in compatibility mode option.
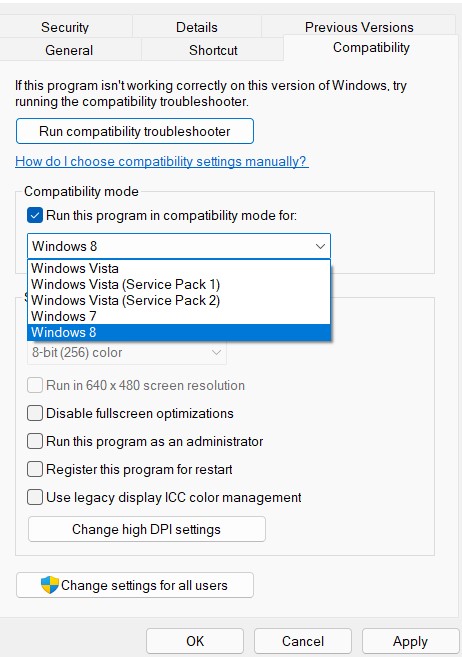
- Choose the version of Windows that you want and press the OK button.
- Now try playing the Minecraft game in compatibility mode, most probably you will not get the black screen in Netflix issue.
Also Read: 10 Best Upcoming Video Games 2022
Conclusion
There you go! We hope you can get rid of the Minecraft black screen issues on Windows 11. If you were unable to do so, you should try uninstalling the Minecraft game and proceed to a fresh installation. That’s it for now.
Also Read: How To Use Apple Arcade On Mac To Play Games


