The lock screen is the first thing you see when you start up your Windows 11 computer or when you lock it manually. It displays a background image and sometimes also includes useful information like the time, date, and notifications. But did you know that you can customize your lock screen background and even have it display a slideshow of multiple images?
The lock screen slideshow feature in Windows 11 allows you to set up a rotation of images to display on your lock screen, giving you a fresh visual experience every time you log in. You can choose your images or use a collection of curated images provided by Windows. On the other hand, if you prefer a more static lock screen background, you can also effortlessly disable the slideshow feature and set a single image instead.
In this article, we’ll guide you through the steps to enable or disable the lock screen slideshow feature in Windows 11. Whether you’re seeking to add some personal flair to your lock screen or keep it simple and streamlined, we’ve got you covered.
Also Read- How To Reset And Clear “Notifications From Apps And Other Senders” List In Windows 11
1. Modify Slideshow in the Lock screen using Reg File
To Enable Screen Slideshow:
For enabling Lock Screen Slideshow for all users, follow the steps below.
Step 1: First, you need to download the REG file by clicking on the attached link.
Step 2: Now, you need to save the file you download on your Desktop.

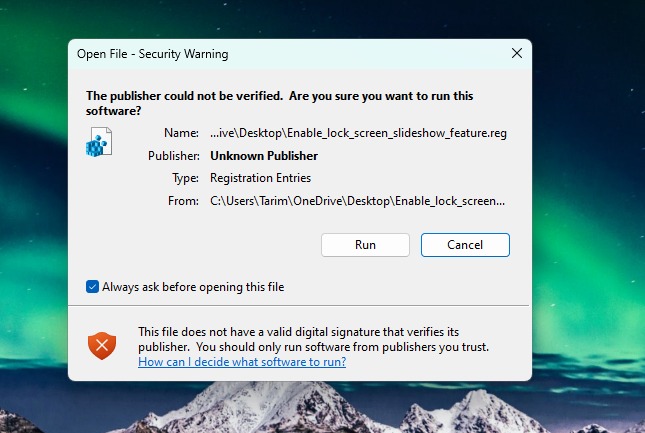
Step 4: After that, you need to double-click on the Reg file to unlock it. Later, after approving the merge, click on Run, select Yes to the User Account Control prompt, then select Yes and OK to complete the process. Once done, feel free to remove the downloaded .reg file.
Also Read- Remote Assistance With Quick Assist App In Windows 11- A Complete Guide
To Disable Screen Slideshow:
To disable, it, simply download the attached REG file. And follow the same procedure or steps given above for enabling the slideshow on your Lock screen.
Note: According to Microsoft, the Local Group Policy Editor can only be accessed in Windows 10/11 Pro, Enterprise, and Education editions. If you are using a different edition of Windows, you may not have access to this feature.
Also Read- How To Change Theme In Notepad App In Windows 11
2. Modify Slideshow in the Lock screen using Group Policy Editor
- First, you require to launch the Local Group Policy Editor. You can do it by typing “gpedit.msc” in the search box found in the taskbar.
- Once you’ve completed the previous step, proceed to the left-hand side of the editor and access the subsequent policy directory. After that select Computer Configuration then Administrative Templates and finally Control Panel > Personalization.
- Locate the “Prevent enabling lock screen slide show” policy in the right-hand pane of the Personalization section within the Local Group Policy Editor and double-click it to open the policy settings.
Enable the Lock Screen Slideshow:
To enable Lock Screen Slideshow for all users, select the Not Configured option, then tap on OK.
Disable the Lock Screen Slideshow:
To disable Lock Screen Slideshow for all users, select the Enabled option, then tap on OK.
That’s it! This is how you can Enable or Disable Lock Screen Slideshow in Windows 11.
Windows 11 has brought significant changes from its predecessor, Windows 10, but Microsoft is not stopping there. Continuously adding new features to Windows 11, one of the recent additions is Windows Spotlight. It offers a curated selection of daily wallpapers handpicked by Microsoft to display as your desktop background. If you’re unfamiliar with this feature and want to learn how to use it, you can go through the process given below for enabling Windows Spotlight on your Windows 11 PC.
Also Read- How To Change PowerShell Script Execution Policy In Windows 11
Set Windows Spotlight for your lock screen

If you’re a Windows 11 user and want to add some zing to your desktop background, you might like to try out the Windows Spotlight feature. Nonetheless, before you enable it, make sure your PC is up to date. If your current build number falls below 22000.706, you must navigate to the Windows Update section and initiate the downloading process for the most recent updates.
You can furthermore set Windows Spotlight for your lock screen, although this should be the default setting. To check your settings for the lock screen, follow these few simple steps:
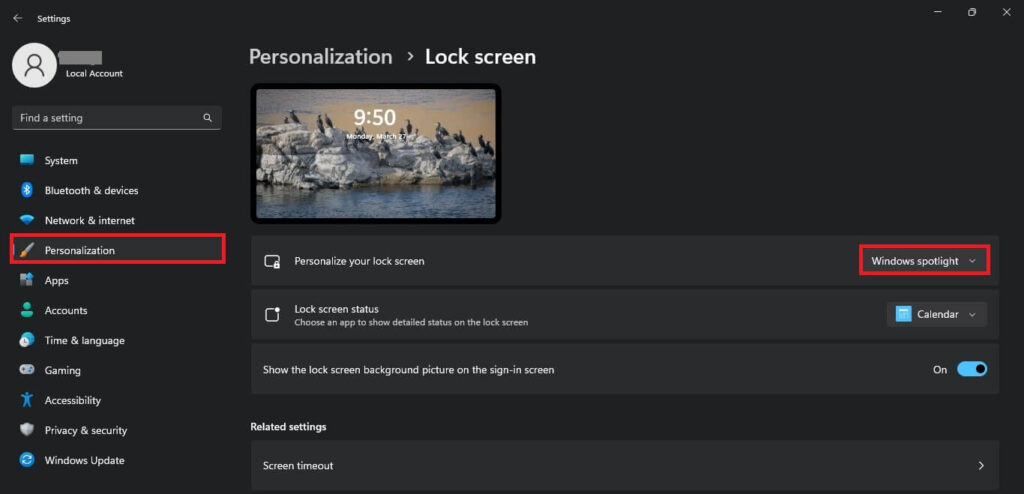
- First, you need to open the Settings app. Then, navigate to Personalization on the side menu, then select Lock screen.
- On the Lock screen, you will notice the Personalize your lock screen option. Tap on the drop-down menu, you will see Windows Spotlight, Picture, and Slideshows options.
- Finally, select Windows Spotlight and you are good to go!
After completing these steps, you’ll witness the latest Windows Spotlight wallpaper on your desktop along with a new icon. It authorizes you to tell Microsoft whether you fancy the image and see where it was taken. Further, if you want to disable this feature or modify your desktop background, go back to the same page and choose a different background.
Also Read- How To See Seconds For Windows 11 Clock


