


 Header Through Cloudflare")


Managing your clipboard efficiently can significantly enhance your productivity, especially when dealing with multiple copy-paste tasks. Windows 11 offers a feature called Clipboard History, which allows you to access and manage your recent clipboard items. Whether you want to enable this feature to streamline your workflow or disable it for privacy reasons, this comprehensive tutorial will guide you through the process of enabling or disabling Clipboard History in Windows 11.
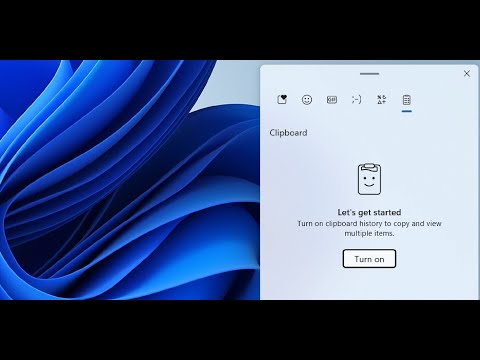
Table of Contents
- What is Clipboard History?
- Benefits of Using Clipboard History
- How to Enable Clipboard History in Windows 11
- How to Disable Clipboard History in Windows 11
- Managing Clipboard Data
- Privacy Considerations
- Frequently Asked Questions (FAQs)
- Conclusion
What is Clipboard History?
Clipboard History is a feature in Windows 11 that stores a list of the items you’ve copied to your clipboard. This includes text snippets, images, and other types of data. With Clipboard History enabled, you can access these items even after copying something new, making it easier to reuse previously copied content without the need to recopy it.
Benefits of Using Clipboard History
- Enhanced Productivity: Quickly access multiple clipboard items without the need to recopy them.
- Ease of Use: Simplifies the process of managing and organizing copied data.
- Flexibility: Supports various data types, including text, images, and more.
- Synchronization: Optionally syncs your clipboard across multiple devices using your Microsoft account.
Also Read- How To Check NVMe SSD Disk Drive Temperature In Windows 11
How to Enable Clipboard History in Windows 11
Enabling Clipboard History in Windows 11 is a straightforward process. Follow these steps to activate the feature:
Step 1: Open Settings
- Press
Win + Ion your keyboard to open the Settings app. - Alternatively, click on the Start button and select the Settings icon (gear-shaped).
Step 2: Navigate to System Settings
- In the Settings window, click on System from the left-hand sidebar.
- Scroll down and select Clipboard from the list of options.
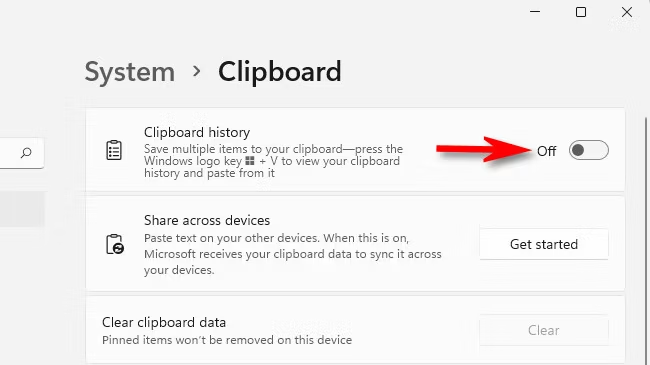
Step 3: Enable Clipboard History
- In the Clipboard settings, you’ll see an option labeled Clipboard history.
- Toggle the switch to On to enable Clipboard History.
Step 4: Optional – Enable Clipboard Sync
- If you want to sync your clipboard across multiple Windows devices, toggle the Sync across devices option.
- Choose between Automatically sync text that I copy or Never based on your preference.
Step 5: Using Clipboard History
- Press
Win + Vto open the Clipboard History panel. - A list of your recently copied items will appear. Click on any item to paste it into your current application.
Also Read- How To Enable Or Disable Administrator Protection For Admin Approval Mode In Windows 11
How to Disable Clipboard History in Windows 11
If you prefer not to use Clipboard History, disabling it is equally simple. Here’s how:
Step 1: Open Settings
- Press
Win + Ito launch the Settings app. - Alternatively, access Settings through the Start menu.
Step 2: Navigate to System Settings
- In the Settings window, select System from the sidebar.
- Click on Clipboard to access Clipboard settings.
Step 3: Disable Clipboard History
- In the Clipboard settings, locate the Clipboard history option.
- Toggle the switch to Off to disable Clipboard History.
Step 4: Clear Clipboard Data (Optional)
- To remove all previously stored clipboard items, scroll down to the Clear clipboard data section.
- Click the Clear button to delete all history.
Managing Clipboard Data
Once Clipboard History is enabled, managing your clipboard data becomes effortless. Here are some tips:
- Pin Important Items: In the Clipboard History panel (
Win + V), hover over an item and click the Pin icon to keep it permanently available. - Delete Specific Items: Hover over an item and click the X icon to remove it from history.
- Clear All Data: Use the Clear button in the Clipboard settings to erase all clipboard history at once.
Privacy Considerations
While Clipboard History offers significant productivity benefits, it’s essential to be aware of privacy implications:
- Sensitive Information: Be cautious when copying sensitive data like passwords or personal information, as it can be accessed through Clipboard History.
- Disable Syncing: If you’re concerned about data being shared across devices, disable the Sync across devices feature.
- Regularly Clear Clipboard: Periodically clear your clipboard history to remove any unwanted or sensitive items.
Also Read- How To Change Game Installation Options In Microsoft Store And Xbox App on Windows 11
Frequently Asked Questions (FAQs)
1. Can I recover deleted clipboard items?
Once you clear your clipboard history, the items are permanently deleted and cannot be recovered. Be sure to save important data elsewhere before clearing.
2. Does Clipboard History work with all applications?
Most applications support Clipboard History, but some security-focused apps may restrict clipboard access for privacy reasons.
3. How many items can Clipboard History store?
By default, Clipboard History can store up to 25 items. Older items are automatically removed as new ones are added.
4. Is Clipboard History available on all Windows 11 editions?
Yes, Clipboard History is available on all editions of Windows 11, including Home, Pro, and Enterprise.
Conclusion
Clipboard History in Windows 11 is a powerful feature that can significantly enhance your productivity by allowing you to manage and reuse multiple clipboard items effortlessly. Whether you choose to enable it for its convenience and efficiency or disable it for privacy and simplicity, understanding how to manage Clipboard History ensures that you can tailor your Windows experience to your specific needs.
By following this tutorial, you can easily enable or disable Clipboard History and make the most of its features to streamline your daily tasks. Embrace the flexibility Clipboard History offers and transform the way you handle copy-paste operations in Windows 11!


