The Voice Memos app has been a part of iOS since the iPhone’s inception, and it allows you to record small voice notes and reminders, as well as longer audio such as interviews.
Despite their intended usage, there was no way to improve the quality of these recordings until recently without exporting the audio file to another programme. However, starting with iOS 14, you may use the Voice Memos app to enhance an iPhone voice memo with a single tap.
Any modifications are completely reversible, and you can hear them right away. You may also go back and turn to Enhance on or off at any time.
The option to enhance audio recordings produced in the Voice Memos app is one of the modest changes made by Apple in iOS 14 that aims to improve the quality of your recordings. It accomplishes this by employing machine learning to eliminate potentially objectionable sounds like background noise and echoes.
Consider it the audio counterpart of the Photos app’s magic wand button, which improves the image’s quality. The effect won’t always be dramatic, and it might not even be ideal for what you’re recording, but it’s worth a shot, and you can quickly delete it if you don’t like it.
Also Read: 12 Google Map Tricks For Easy Navigation
Here’s how to make your voice memos even better.
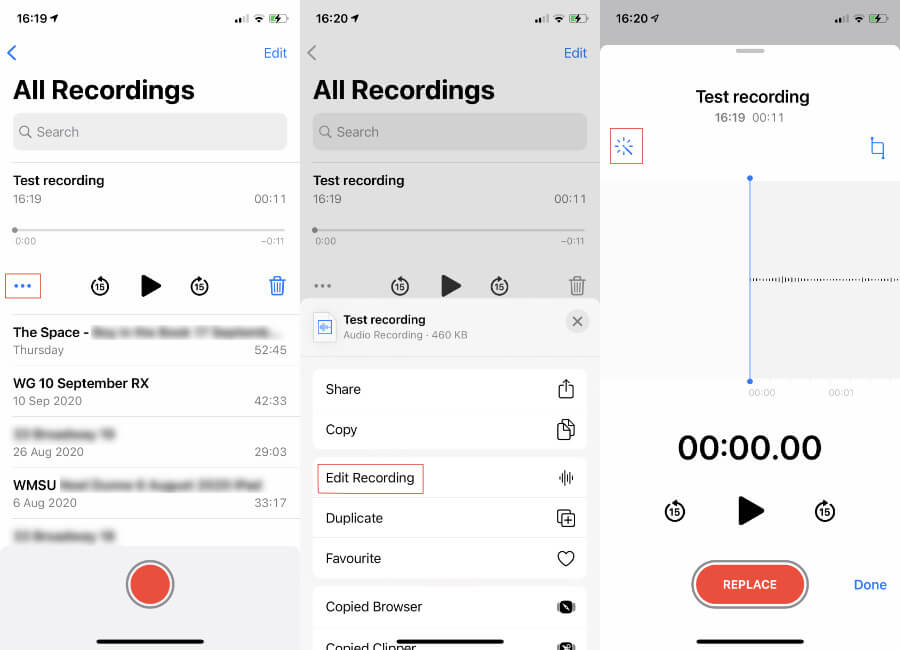
- On your iOS device, open the Voice Memos app.
- Make a new audio memo or tap on an existing one.
- At the bottom left of the selected recording, tap the ellipsis (three dots) icon.
- From the Actions menu, choose Edit Recording.
- In the upper left corner of the screen, tap the icon.
- Click Done.

You will generally hear a difference if you now tap the Play icon in the recording’s entry in the list. Your outcomes will differ, and they may differ dramatically.
Enhance Recording attempts to filter out anything you don’t want to hear while keeping everything you do want to hear using Machine Learning. As a result, it can eliminate or at least decrease sounds like background noise.
Similarly, it will make every effort to eliminate room reverberation. That’s the faint echo you can’t hear in the room but which is faithfully recorded when it bounces off the walls and into the microphone.
You will see a significant improvement, but don’t believe us when we say that. You may not notice any difference at all as often as you hear a big difference.
The worst-case scenario is that you don’t like what you hear. In that scenario, you’re in luck because this functionality has one additional component: an undo.
You may go back to an improved recording at any time and erase the enhancements, unlike with a conventional undo, where you might have to remember to pick it right now.
Also Read: How To Use Emoji As Apple ID Picture
What is going on with improve audio?
The ease with which you may add and remove it, as well as the fact that you don’t have to wait for the audio to be evaluated, makes Enhance Recording appear to be a filter. It’s like to smearing a gauzy hue over a photograph and then erasing it later.
When you share the audio, the improved recording is delivered unless the Enhance Recording icon is highlighted. It is not necessary for your receiver to have Enhanced Recording, iOS 14, or Voice Memo.
Also read: How To Send ‘Soundmojis’ On Facebook Messenger
Voice Memo Enhancements: How to Get Rid of Them
- On your iOS device, open the Voice Memos app.
- Choose an existing recording to work with.
- At the bottom left of the selected recording, tap the ellipsis (three dots) icon.
- From the Actions menu, choose Edit Recording.
- To deselect it, tap the magic wand icon in the upper left corner of the screen.
- Tap Done.
When all of the following processes are completed, the audio will sound exactly like the original recording.
How to Recover Voice Memos on iPhone and iPad That Have Been Accidentally Deleted

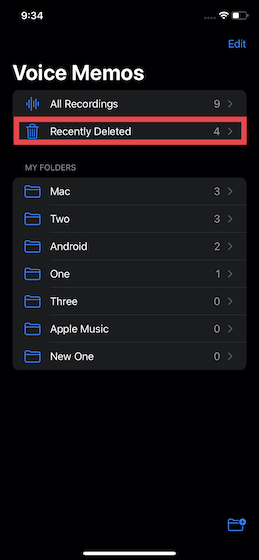
The Voice Memos software saves all of your deleted recordings in a separate folder called “Recently Deleted.” As a result, any mistakenly deleted memos on your iPhone can be simply recovered.
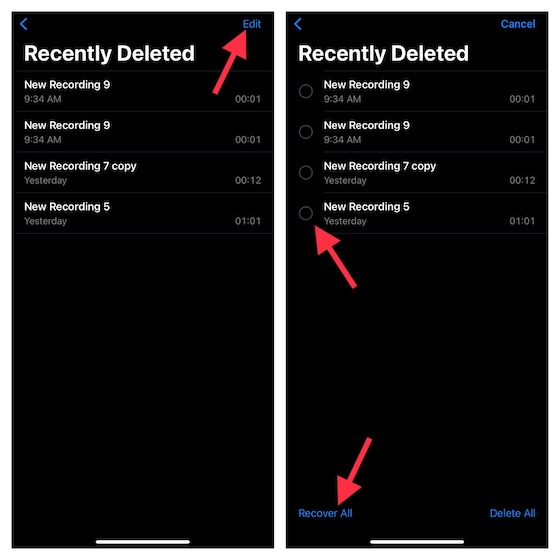
- Launch the Voice Memos app on your phone or tablet. Then go to the main screen and pick the Recently Deleted folder from the drop-down menu.

2. Now, go to the upper right corner of the screen and click Edit. Then, select the desired recording and press the Recover option. If you wish to retrieve all of your deleted memos, go to the bottom left corner and hit “Recover All.”
On iPhone and iPad, you can separate the audio from the voice memo.
If you ever want to be a little more creative with your voice recordings or want to use the audio with more flexibility, the Voice Memos app on your iPhone can help you out.
- Open the Voice Memos app and hit the More icon after selecting a specific recording.
- Select “Separate Audio” from the pop-up menu by scrolling down. Then, in the Files app, select the location where you wish to save the audio. That’s all there is to it.
Trimming Voice Memo
- Open your device’s Voice Memos app and select the memo you wish to reduce. Now, hit the three blue dots symbol and select “Edit Recording” from the pop-up menu.
2.Tap the trim button in the audio waveform’s top right corner.
- Over the audio waveform, yellow handles with arrows will appear on either end of the memo. Drag the yellow arrow on the left to the exact location where you want the memo to begin if you want to cut it from the beginning. Drag the yellow arrow on the right to where the memo needs to end to cut the recording from the end. Then select Trim -> Save.
4. Be careful to touch Done at the end to confirm the changes.
Final comments
That concludes our tutorial on how to edit and improve your voice memos on the iPhone and iPad. As I previously stated, the Voice Memos app has considerably improved since iOS 15 introduced some handy editing capabilities. While I like the enhancements, there are a few additional features I’d want to see in the app sooner rather than later. First and foremost, I wish we had more control over noise reduction via a slider (pretty much in the tune of the playback speed slider). Second, I’d like the Voice Memos app to be more tightly connected with third-party programmes so that audio can be smoothly imported and exported to GarageBand or other audio editing software.


