iOS enable Live Captions is a great feature added. A variety of new accessibility capabilities have been made available by Apple for the iPhone, Apple Watch, and Mac, including a tool for universal live captioning, enhanced modes for visual and auditory detection, and iOS access to WatchOS apps. As upgrades trickle out to other platforms, the new capabilities will be available “later this year.”
The most extensively used tool is likely to be live captioning, which is already highly popular with tools like Ava, which recently raised $10 million to broaden its capabilities.

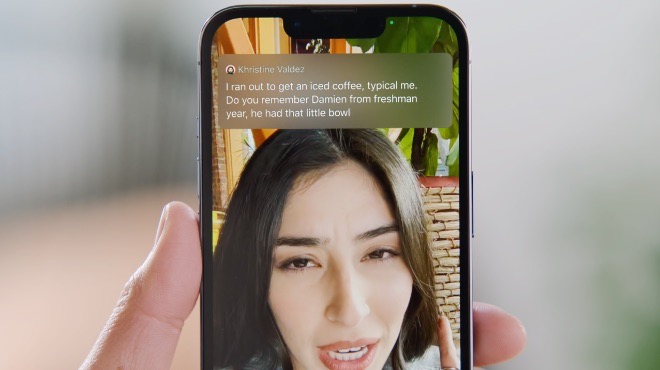
Apple’s technology will serve a similar purpose to Ava’s, effectively enabling real-time captioning of whatever spoken content a user encounters, from podcasts and videos to FaceTime and other chats. A unique interface with a speaker-specific scrolling transcript will be added to FaceTime in particular.
The captions can be rapidly turned on and off, or the pane in which they display extended or contracted, using the standard accessibility settings. And since everything takes place utilizing the device’s integrated Machine Learning acceleration hardware, it works even when connectivity is intermittent or nonexistent and there is no privacy concern.
The Apple iPhone and other products from the corporation have improved significantly in the past several years in terms of accessibility features. To offer a better user experience for everyone, the company is continuously adding new features to iOS and iPadOS. Read on to enable Live Captions.
How Do Live Captions Work?
Before WWDC ’22 and in honor of Global Accessibility Awareness Day in May, Apple unveiled its plans for a few new features that would be included in an upcoming release of iOS. A few months later, we discovered that these new accessibility capabilities wouldn’t be included in a “point” release but would be released simultaneously with iOS 16 and iPadOS 16.
Live captions are one of the fascinating elements that this blog article has to offer. This feature is intended for iPhone and iPad users who are hard of hearing or deaf, as you might have guessed. When activated, a caption box that displays whatever media or material is playing on your iPhone or iPad will show at the top of your screen.
In this step-by-step tutorial, we’ll walk you through the process of turning on Live Captions on your Apple iPhone running the most recent version of iOS 16. Learn to enable Live Captions.
Using Live Captions on an iPhone or iPad
Live Captions is not turned on by default, like most accessibility features in iOS, iPadOS, and macOS. Instead, if you want to use the feature, you have to explicitly enable it. Here’s how to utilize Live Captions on an iPad or iPhone:

- Your iPhone or iPad should now be in the Settings app.
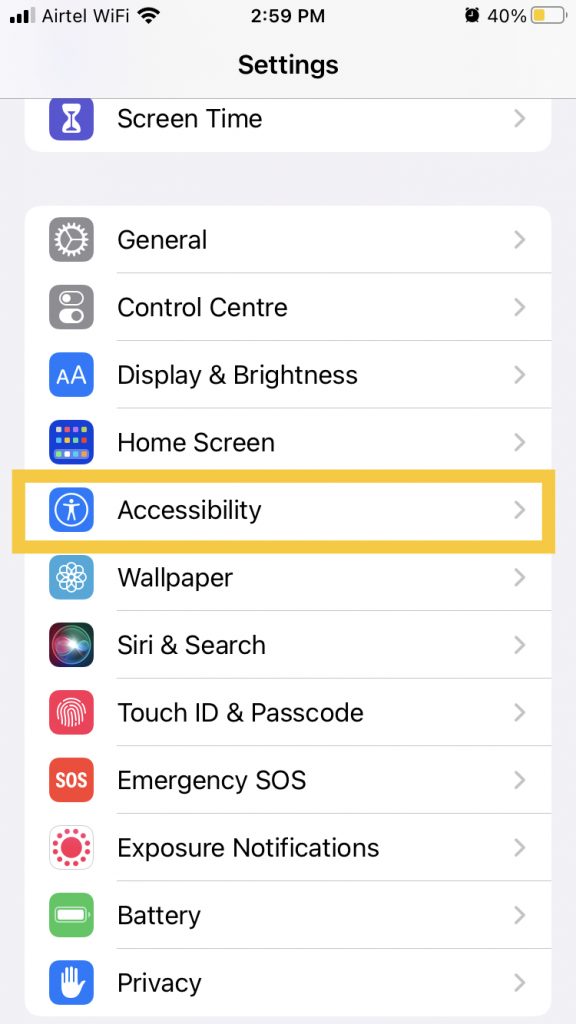
- Tap Accessibility after scrolling down.
- When you get to the Hearing section, scroll down.
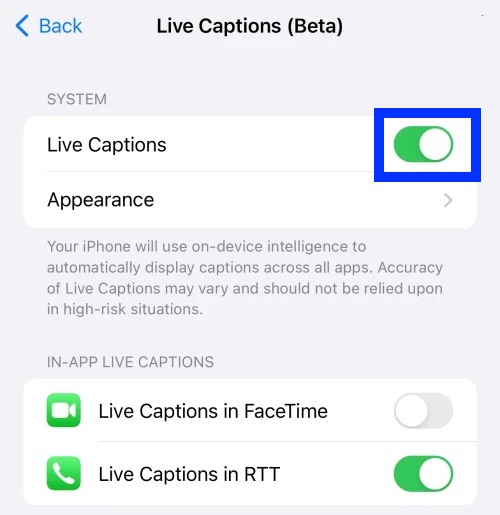
- Click “Live Captions” (Beta).
- Turn the toggle next to Live Captions under System to the On position.
- You can also make the following available if necessary:

- Using FaceTime’s live captions
- RTT Live Captions
7. A dialogue box will appear at the bottom when activated.
When your iPhone or iPad detects voices starting to speak, including your own, it will start transcribing the information so you can read it. This prompt is called the Live Captions prompt.
You can access four separate buttons from the dialogue window: Hide, Pause, Microphone, and Expand.
All of them perform as expected, and the microphone is functional for individuals who want to have their speech transcribed. Additionally, the Expand button makes the Live Captions box into a full-screen window in case you missed something mentioned. The dialogue box can then be shrunk back to its original size by tapping the same button. That’s how you enable Live Captions.
What happens when you start Live Captions?
A floating widget appears on the screen when the Live Captions switch is turned on. You can move the device on the screen and even stop live captioning. Also, You can also turn on the microphone to get live captions of a real-world conversation.
You can even shrink it to a floating button that rests in any spot you choose when you’re not using it. Since it is still in beta, not much is known about how well and fully it works, but when we tried it on a couple of random YouTube videos and real-world conversations, the results weren’t too bad.
Customize the Look of Live Captions
In addition to continuing to create accessibility features, Apple is also, when practical, implementing some customization for various functionalities. This category of features that can be altered includes Live Captions. It is because you can alter how the dialogue box displays on the screen. Here’s how to change Live Captions’ appearance:
- Your iPhone or iPad should now be in the Settings app.
- Tap Accessibility after scrolling down.
- When you get to the Hearing section, scroll down.
- Click “Live Captions” (Beta).
- Click on Appearance.
- Go over and alter the following choices:
- Bold Text
- Size Text
- Text Color
- Background Color
- Idle Opacity (Reduces the Live Captions button’s visibility when inactive).
7. To save your changes, use the Back button in the top left corner.
8. Close the Settings application.
Since you aren’t given a preview of how the box will look, it could take some tweaking to get everything just perfect. As of this writing, Apple has just issued the first public beta versions of iOS 16 and iPad OS 16, so perhaps a preview will be included in a later iteration. But while experimenting with how the captions are displayed, you’re better off allowing Live Captions than hiding the dialogue box.
Hence, that’s all about enabling the Live Captions feature.


