Disable “Show More Options” Context Menu In Windows 11.
As more people get their hands on Windows 11, a few are nostalgic, while others are openly outraged with Microsoft’s actions. The fact that the former right-click menu is now buried under Show more Options appears to be a UI decision that annoys a lot of users.
One may say that the new context menu contributes to Windows 11’s uniformity. The fact that each program had its own context menu items in Windows 10 produced a jumble, resulting in screen-long context menus.
While the new Windows 11 context menu has a cleaner appearance, it’s clear why many people find it perplexing. When you right-click on the desktop, for example, common choices like Refresh and New (new folders) are completely absent in Windows 11 desktop.
To see them, first, click Show More Options, and then select the standard context menu that we’re all accustomed to.
Also Read: How To Remove Fingerprint Recognition Sign-in In Windows 11
How to Turn Off Windows 11’s ‘Show More Options’ Menu
If you’re among those who are perplexed by Microsoft’s decision and wish to return to Windows 10’s previous behavior, the great news is that it is possible.
You can take one of two techniques to replace the original context menu and reject the current version:
- Folder Explorer Options allows you to revert to the classic appearance of File Explorer. –This action will restore File Explorer to its previous appearance and feel. While this will damage the context menu and remove the Show more choices option, it will also restore the Windows 10 appearance to everything else.
- To get the full context menu, disable the ‘Show More Options’ context. – The most efficient option right now is to make a series of changes to the Overrides registry cluster if you’re not frightened of doing some registry alterations. This ensures that the standard right-click context menu is always shown, irrespective of the action you’re performing.
Revert File Explorer to its previous appearance.

- By hitting the Windows key + E, you may access File Explorer.
- Once within File Explorer, click the action button in the upper-right corner of the screen using the ribbon menu at the top.
- Select Options from the context menu that has just been shown.
- Click the View tab from the ribbon menu that appears once you’re finally within the Folder Options menu.
- Then, in a separate procedure, scroll down through the Advanced settings choices and click the box linked with Launch folder options.
- To make the changes take effect, click Apply, then restart your computer.
Note: When you restart your Windows 11 machine, you’ll see that File Explorer has returned to the previous UI. When you right-click, the classic context menu design appears. If you wish to go back to the previous ‘Show More Options’ context menu, reverse-engineer the procedures above and disable the Launch folder windows tick in a different process.
Also Read: How To Add Finger To Fingerprint Recognition In Windows 11
Using Command Prompt, disable the ‘Show More Options’ context menu.
By altering the registry, you can quickly restore the entire context menu on Windows 11 and eliminate the “Show More” option. However, because the procedure is a little convoluted, we’ve prepared a command line that you can use to quickly disable the Display More option on Windows 11.
Take the following steps:
Note – Open Command Prompt alone; this command will not function in PowerShell or Windows Terminal.

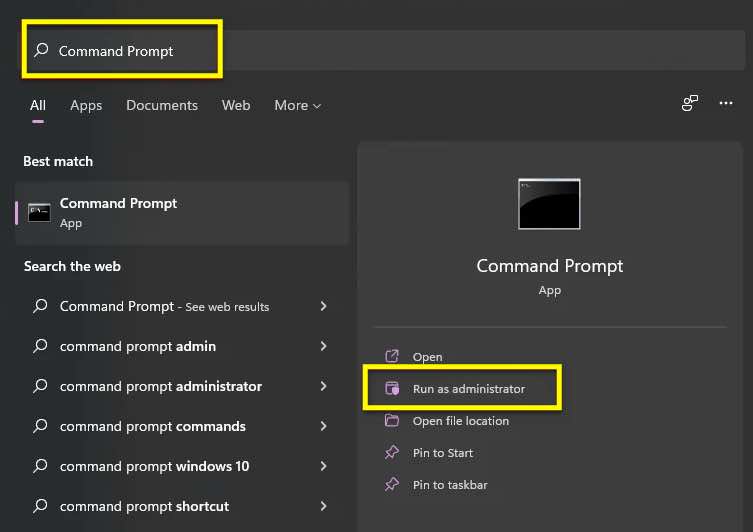
- Open the Start Menu and type “Command Prompt” into the search box.
- Under Command Line, select “Run as Administrator.”
- When the Command Prompt window opens, type the following command and hit Enter:-
reg add HKCU\Software\Classes\CLSID\{86ca1aa0-34aa-4e8b-a509-50c905bae2a2}\InprocServer32 /ve /d “” /f
4. Restart PC.
Also Read: Set Up Facial Recognition Sign-in For Account In Windows 11
Using a third-party programme, disable the ‘Show More Options’ option.
You may also use third-party software to activate the complete context menu. It will make adjustments to your PC with ease. That way, you won’t have to worry about any registry keys becoming corrupted, and you’ll save time. We’ll use WinAero Tweaker for this, so follow these steps:-
To begin, go to the official site and download the WinAero Tweaker for Windows 11 from there.
2. After you’ve downloaded the software. It should compress into a “.zip” file. To unzip these files, follow this procedure.
3. Once the application has been extracted from the zip file. You may install WinAero Tweaker by simply running the setup file.
4. After the software has been installed, open it using the shortcut file that was generated on your desktop.
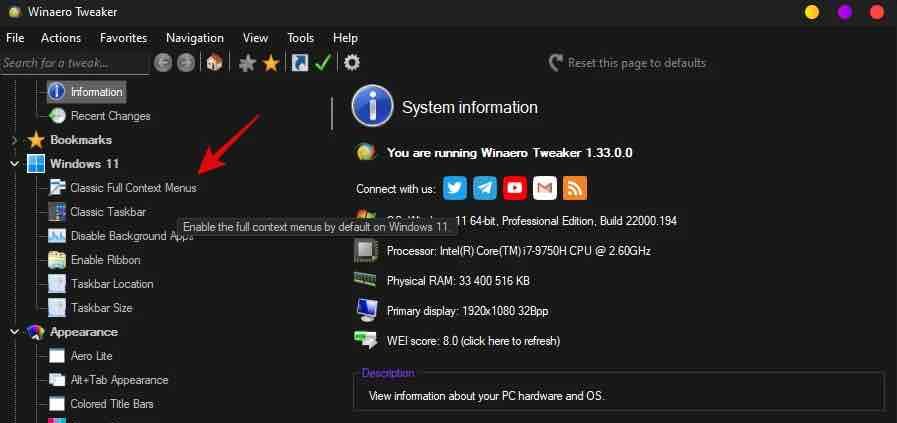
5. Now, go to the “Windows 11” section of the WinAero Tweaker when it has been opened.
6. Select “Classic Full Context Menus”.

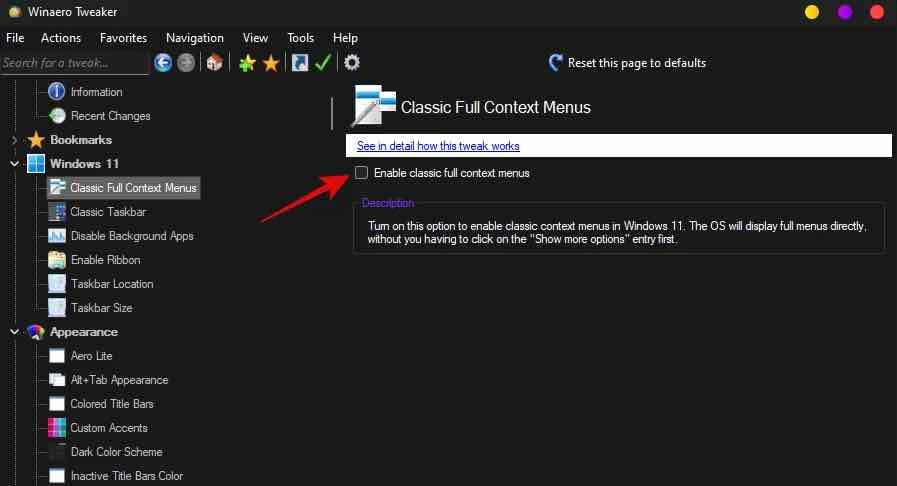
7. You should now see the option “Enable traditional full context menus” in the right pane.

8. After you’ve checked that option, click the “Restart Explorer” option that displays after you’ve done so.
That’s all, your Windows 11 should now have old complete context menus.
Closing Comments
This concludes our look at how to remove ‘Show additional choices’ from the right-click menu in Windows 11. We attempted to guide you through each step in detail, and we believe that one of the ways suggested in this post worked for you.
Also Read: How To Show Clock on Taskbars on All Displays in Windows 11


