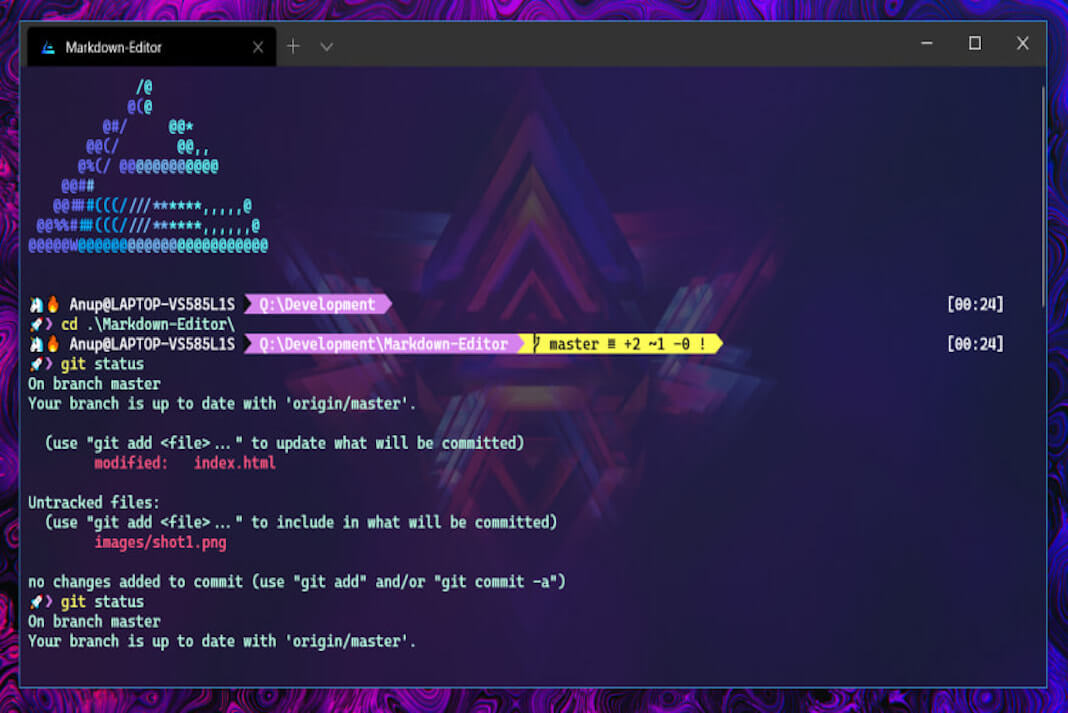
This article will assist developers and anybody who uses Windows Terminal to communicate with the shell, whether PowerShell or WSL, in customizing Terminal, which will soon be the default command-line interface in Windows 11.
The Windows Terminal is a contemporary, speedy, efficient, powerful, and productive terminal software for command-line tools and shells such as Command Prompt, PowerShell, and WSL users.
Also Read: How To Customize The Taskbar In Windows 11?
Let us begin with the installation of Windows Terminal
- From the Microsoft Store, download and install Windows Terminal. When we release new builds with automatic upgrades, you’ll always be on the most recent version.
- Alternative Approach (Via Chocolately) – choco install microsoft-windows-terminal
Set Up Windows Terminal
From adding an acrylic effect to using the Caskaydia typeface on the command prompt, we offer thorough instructions on how to modify Windows Terminal. We’ve included PowerShell and Ubuntu instructions (WSL).
Applying the acrylic effect to a Windows 11 terminal
- To begin, go to the Microsoft Store and update Windows Terminal to the most recent version.
- Then launch Windows Terminal and navigate to Settings.
- Go to “Windows PowerShell” on the left sidebar, then to “Profiles” and then to “Appearance.”
- Scroll down and enable the ” Acrylic ” option. You may also change the opacity of the acrylic in the bottom right. Initially, you can check and kept it at 70%, but you may change it to any figure you like. Finally, press the “Save” button to save your changes. You have finished the first step in configuring Windows Terminal.
- Repeat the procedure for CMD, WSL, and any other shells you use on your Windows PC. This will give Windows Terminal an acrylic look.
Adding Caskaydia Cove font to Windows Terminal

- After you’ve applied the “Acrylic” effect, you’ll need to install fonts that are compatible with Oh My Posh. Install Caskaydia Cove Nerd Font, which is compatible with this third-party customising tool.
- After obtaining the font, unzip it with a programme like 7Zip or WinZip and install all fonts. You may choose all fonts, right-click on them, and choose Show advanced options. -> Make this option available to all users.
- Next, open Windows Terminal and navigate to the Settings menu. As before, navigate to the “Windows PowerShell” area in the left pane and select “Appearance.”
- Select the fonts you have just downloaded to use with the Oh My Posh prompt here. You can choose font ” Caskaydia Cove Nerd Font “. Now press the “Save” button.
- You can Repeat this process for all shells you use on Windows 11 including WSL / Ubuntu.
Also Read: How To Enable And Customize Safari Reader Mode On iPhone And iPad
Configure PowerShell in Windows Terminal with Oh My Posh
- After you’ve applied the acrylic effect and a matching font, it’s time to add the Oh My Posh prompt. To accomplish this, launch Windows Terminal with administrative privileges. After clicking the Windows key, navigate to Terminal and select the “Open as administrator” option in the right pane.
- To set the Oh My Posh prompt, open a PowerShell window and enter the command below. Please share this. To authorize the installation, hit “A” and then Enter. Install the oh-my-posh -Scope CurrentUser module
- Then execute the following command to import the Oh My Posh profile. To begin the installation, hit “A” and then “Enter” when requested. Import-module o-o-o-osh
- After and then, you must configure terminal icons. Simply execute the command below and wait for the setup to finish. Before performing this command, ensure that you are using Windows Terminal with administrator privileges.Install-Module -Name Terminal-Icons -Repository PSGallery
Now, execute the following command to see whether everything is working properly. This will open a new prompt.
oh-my-posh –init –shell pwsh –config ~ / jandedobbeleer.omp.json | Expression call
6. Everything is good for the time being, but you must make Oh My Posh your custom default prompt. Run the following command to accomplish this. It will provide you with a route that you must write it down or copy into Notepad.
$ PROFILE
7. The file “Microsoft.PowerShell profile.ps1” may then be found by following this route. Open it in Notepad then add the lines below, then save the file. The Notepad file can now be closed.
Set-PoshPrompt -Theme jandedobbeleer import-module-terminal name-icons
8. If the ps1 file does not already exist, it is simple to create. Create a text document by right-clicking the WindowsPowerShell folder and selecting Create “-> Text Document “.
9. Change the name to Microsoft.PowerShell_profile.ps1. Ensure that there is no extension at the end. txt The filename must conclude with.ps1.
10. Now, open the file in Notepad, insert the two lines below, and save it. You may now exit Notepad.
Set-PoshPrompt -Theme jandedobbeleer import-module-terminal name-icons
11. So, To reload the profile and return to the PowerShell window and enter the following command.
… $ PROFILE
12. Finally, shut and reopen the Windows Terminal. Oh My Posh has now been set as the default prompt in PowerShell. PowerShell on Windows Terminal looks stunning, thanks to the acrylic effect, new fonts, icons, glyphs, and the Oh My Posh prompt.

Final Comments
These are all the various methods on how you can use icons, glyphs, and an acrylic effect to personalize the Windows terminal and make it look more complex and attractive.
Also Read: How To Install WordPress On Windows 11


