Clean disk on Windows 11
It doesn’t matter whether you use an SSD or a traditional disc to store your files, the C drive always runs out of space. Many types and a lot of files are saving to system partition C all the time, so it’s going to get full at some point. A lot of people want to know if there’s a way to clean up the C drive on a computer with Windows 11. Yes, that’s correct. Windows 11 has Disk Cleanup, which is a built-in tool like in the past. Here, I’ll show you how to run Disk Cleanup in Windows 11 with a wizard and command, so you can do it yourself. In Windows 11, if you can’t get back a lot of space after you clean up the C drive, you should add more space to C drive from D or another drive.
Windows 11
Use the Disk Cleanup Wizard to get rid of files that you don’t need. Storage Sense can also be used to make the process easier or set up a timer.
It takes time for system files and cached files, as well as other unnecessary files, to build up on your computer and clog up the space on the back of your computer.
Sometimes, if it has been a long time since you’ve cleared anything up or you’re running low on space, it’s better to get rid of these unnecessary files first.
Besides, giving your computer some space in terms of storage can also help it last longer and run better.
Thus, Disk Cleanup is a built-in app in Windows that helps you get rid of these unnecessary files. Disk Cleanup also gives you a list of the files that are no longer needed and can be safely removed from your computer.
Also read:4 Ways To Find Your IP Address On Windows 11 PC
On Windows 11, access Disk Cleanup via the Start Menu.
Later, the “Disk Cleanup” option is on each drive’s “Properties” window. However, it has now been removed. You can now get to the Disk Cleanup wizard through the Start Menu or the “Run” tool.
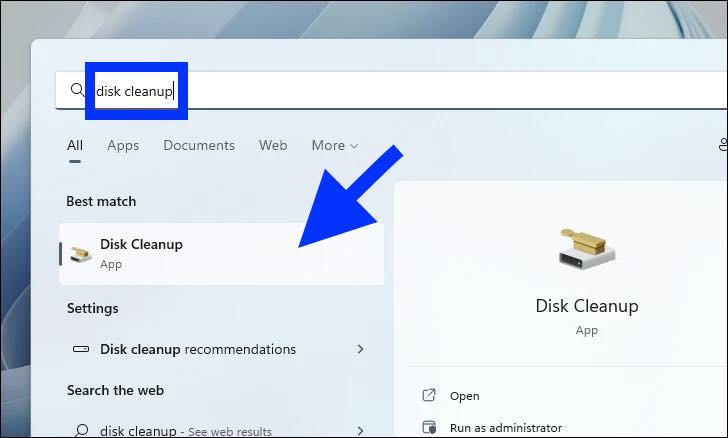
- To run the Disk Cleanup this way, go to the Start Menu and type Disk Cleanup into the search box. Search for “Disk Cleanup.” Then, from the results, click on the “Disk Cleanup” tile to start the process.

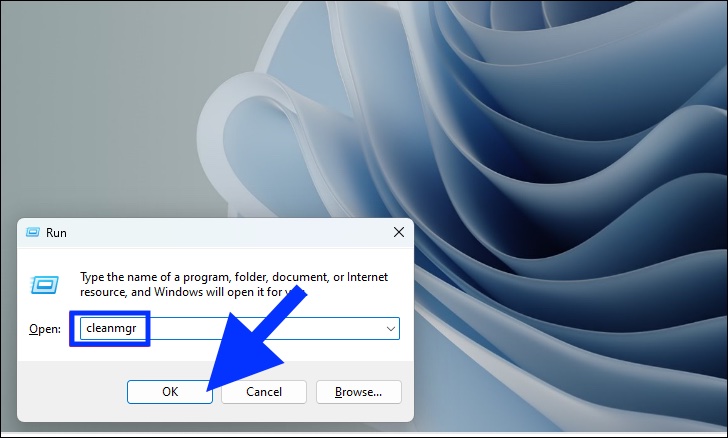
- To start the Disk Cleanup wizard, you can also use the Run utility to start it. To do so, press the Windows+R keys together on your keyboard to bring up the Run utility. Then, type cleanmgr into the text box and hit Enter on your keyboard. This will start the process.

- Finally, on the Disk Clean up wizard window. Click the drop-down menu to see a list of all the storage drives that you have. Then, click on the drive you want to clean up.

- Click on the “OK” button to let Windows know which files can be deleted. Windows will then show you which files can be deleted.
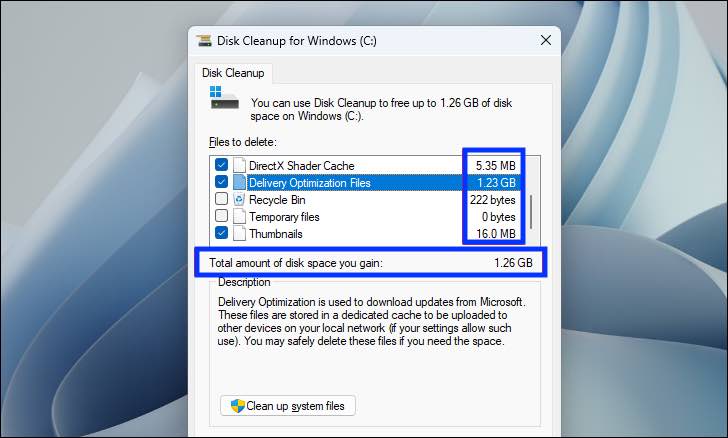
- Then, a new disc cleanup window will appear on your screen. It would be by default that some of the categories of the files would be chosen. Clean up all the files on the list by scrolling down and clicking on the checkboxes next to each one.
- Windows will also show how much space each type of file takes up on the screen. As you choose more categories. Youwill get to know how much space you will free up by deleting the file.
- Once you have chosen the category of files you want to delete, click the “OK” button to move on. This will show you a message on your screen.
- Next, click the “Delete Files” button to remove all of the files you’ve chosen from your computer.
Also read:How To Clean Install Windows 11
Using the Disk Cleanup, for Clean disk on Windows 11 you have now removed all of the unnecessary files from your computer. So you can start over.
The Final words
Putting a link to Storage Settings instead of the Disk Cleanup button is another step in the process of getting rid of the Disk Cleanup tool. If you don’t like Microsoft’s version of Disk Cleanup. There is a third-party option that works just as well and people can use who like Disk Cleanup better than Microsoft’s version.


