It is very important to keep your Windows up-to-date. If you don’t update Windows regularly, the operating system may run into serious problems. So, in this article, we will be discussing how to check for updates on Windows 11/10.
Updating Windows improves its overall performance. Additionally, it fixes minor software bugs and adds new features. An outdated or older version of Windows can lead to serious problems. So, it is advised to keep your operating system up-to-date. If you want to update your Windows 11 but don’t know how to do that, don’t worry. We’ve got your back. In this article, we will discuss how to check for updates on Windows 11/10.
Also Read: Remove “System Requirements Not Met” Watermark Windows 11
How to check for updates on Windows 11?
(in a nutshell)
- Open the settings(Windows + I)
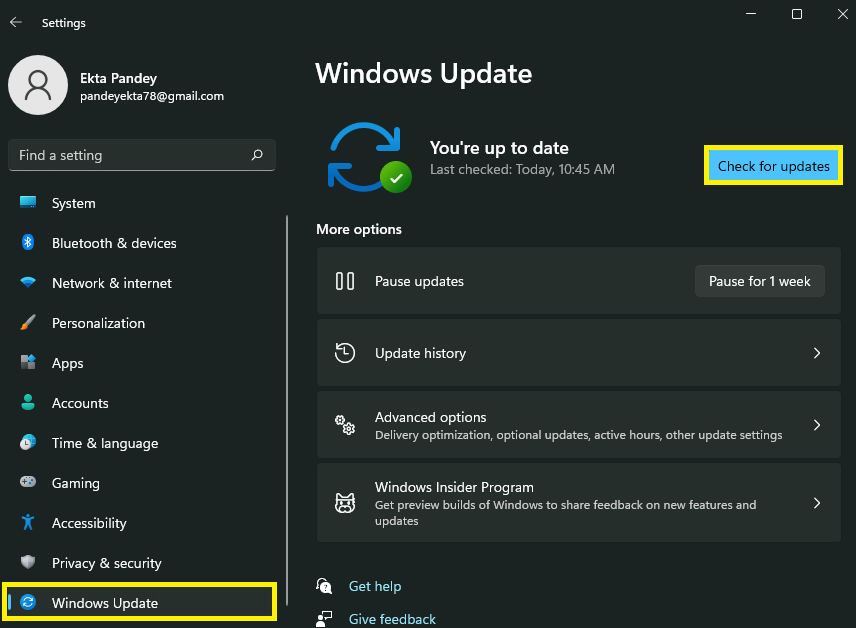
- Click on Windows Update on the left.
- Tap Check for updates on the right.
Now, we will be looking at the steps to check for updates on Windows 11 in detail. So, keep on reading.
- Firstly, open the System Settings. You can do this by opening the start menu (click on the Windows icon on the taskbar). Now, tap Settings. Alternatively, you can just press Windows + I key combination on your keyboard to launch the Settings.
2. Now, Click on the Windows Update option on the left side as shown below in the screenshot.

3. Now, simply click on the Check for updates button on the right side and you are good to go.
So, this is how you can check for Windows updates on windows 11.
After checking for the Windows update, click download and install to have the update on your PC. You will be asked to restart your PC after the update. Go ahead and do that.
If there are no pending updates available, the system will show the You’re up to date message on the top next to the check for updates option.
Also Read: How To Set Up Microsoft Family App On Windows 11
How to check for updates on Windows 10?
In this snippet, we have discussed the various steps for checking for updates on Windows 10. So, below is how to do it:
- First of all, go to System Settings. You can do this by pressing the Windows + I key combination on your PC.
Alternatively, go to the Start menu by clicking on the Windows icon on the taskbar. Then, tap the settings icon.
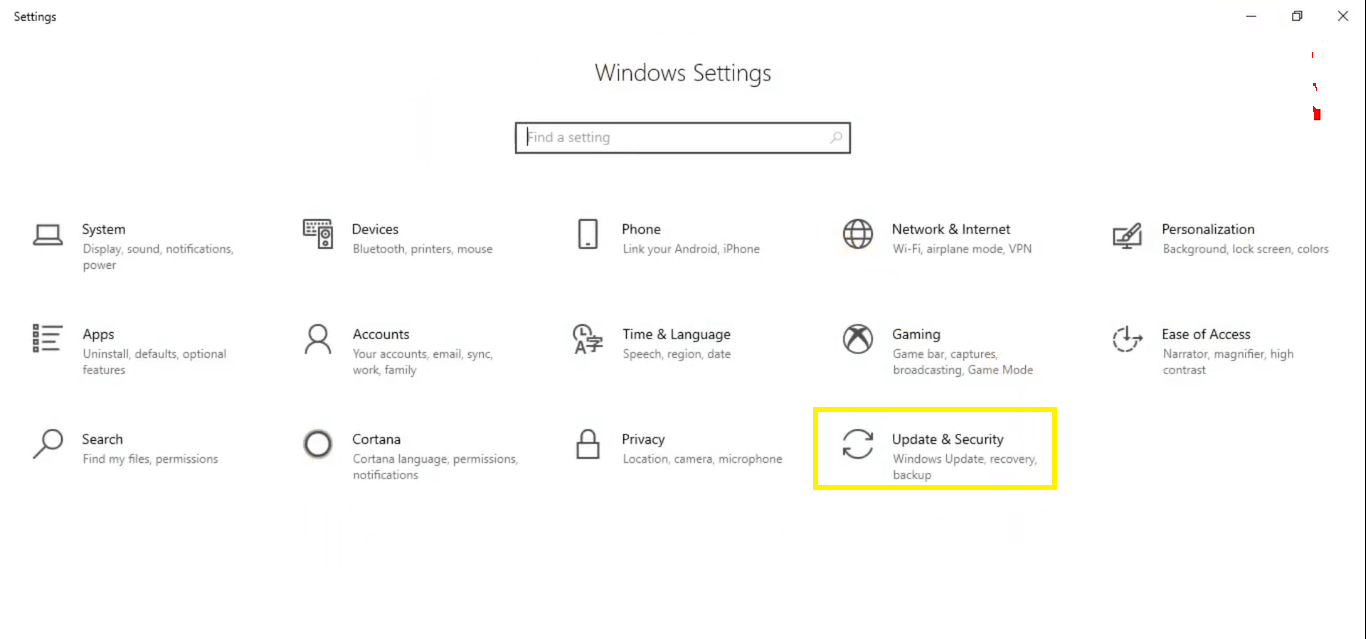
2. Secondly, On the Windows settings menu, tap the Update & Security option at the bottom as shown below in the screenshot.

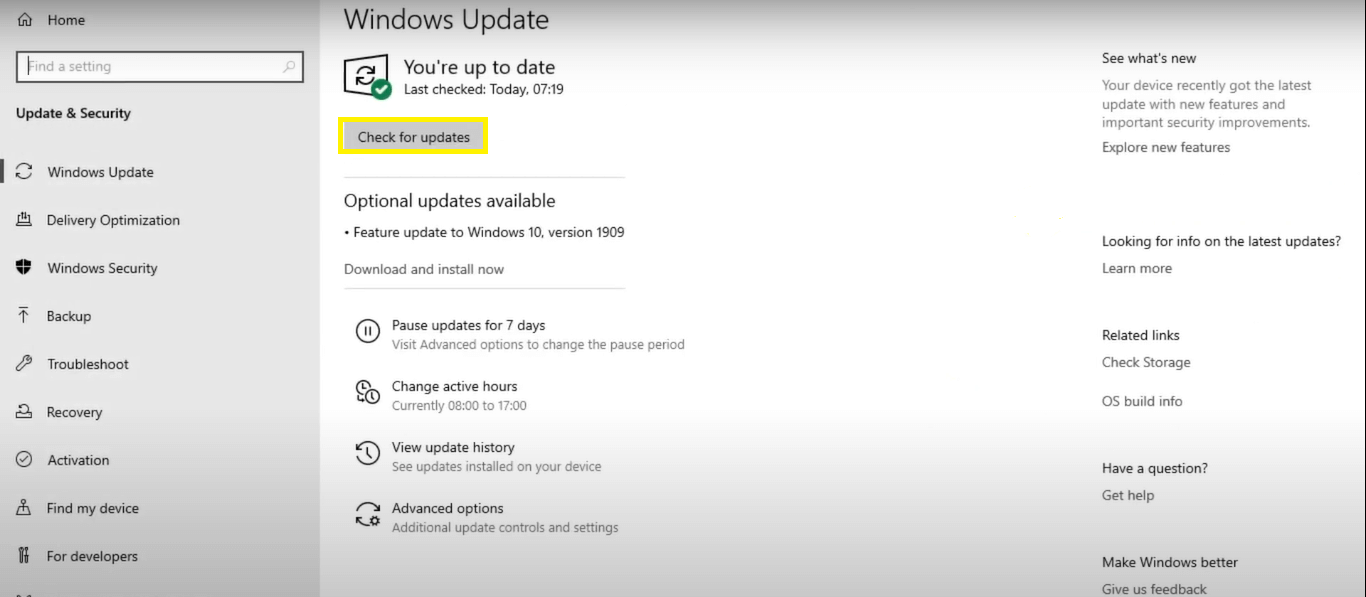
3. Now, now click on the Check for updates option to see if there are any pending updates. If there are no pending updates, it will show You’re up to date on the top.

In case there are any pending updates, your system will start downloading them automatically. After the successful download of the update, you will be asked to restart your PC.
So, this is how you can check for updates on Windows 10.
Also Read: Set Up Parental Control On Windows 11- An Ultimate Guide!
How to update from Windows 10 to 11?
Before upgrading from Windows 10 to 11, you must check the system requirements. There are minimum hardware requirements needed to be met if you want to upgrade your PC to Windows 11.
Where can I check the system requirements for Windows 11?
You can check the system requirements for downloading and installing Windows 11 on your device by visiting Microsoft’s official website.
After making sure that your device meets the minimum hardware requirements, proceed with the steps given below:
- Press Windows+I hotkey on your to open the settings on your PC.
- Now, click on the Update & Security option at the bottom.
- Then, click on check for updates.
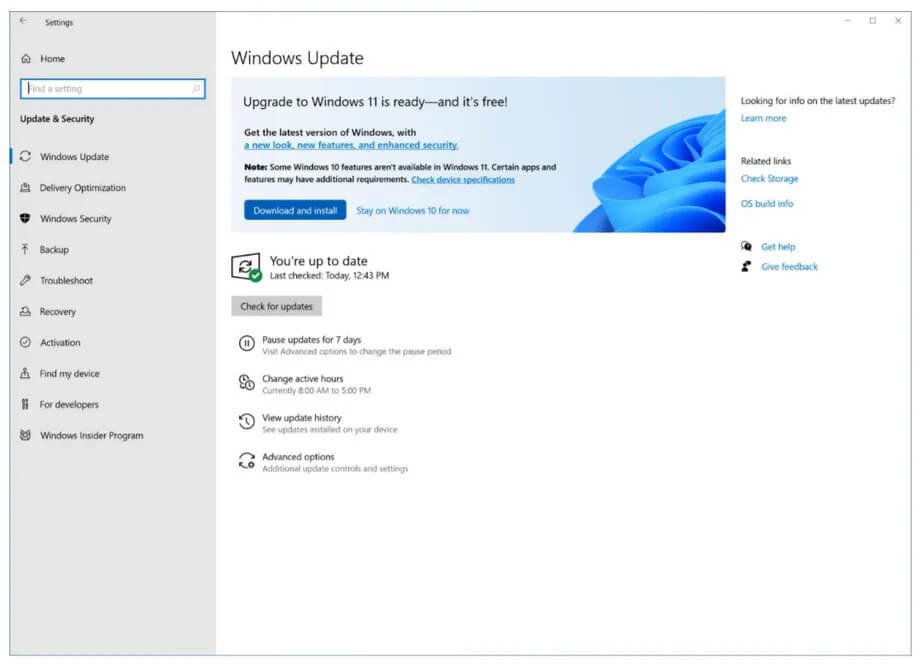
- Now, the Windows 11 upgrade option will appear on the screen. ( see the screenshot below).
- Click on Download and install.

6. Now, follow the on-screen instruction to upgrade your Windows 10 PC to Windows 11.
Windows update stuck downloading/installing?
Now, let us discuss the various fixes for Windows updates stuck on downloading/installing:
1. Restart your PC
The most cliched fix for such errors is to restart your PC. But,it indeed works. All you need to do is to head to the start menu. Then, click on the power button and tap Restart.
In case you don’t have access to the restart option, you can perform a hard reset by pressing the power button of the PC until the PC shuts down. But before doing this, make sure that the update is indeed stuck.
2. Run Windows Troubleshooter
Another fix is to run the Windows troubleshooter. This tool helps in spotting and repairing various system bugs. If you don’t know how to run a Windows 11, don’t worry!
Read this complete guide on How To Run Troubleshooters In Windows 11.
3. System Restore
You can also get over the specifies problem by doing system restore:
- Go to the Start menu( click the Windows icon on the taskbar).
- Search and open the Control panel.
- Click on System.
- Then, tap System Protection>System Restore.
- Then, follow the on-screen instructions to perform the system restore.
Wrapping Up
So, that’s all for now. This is how you can check for updates on Windows 11/10. Additionally, steps to check for updates on Windows 10 are also mentioned in this article. Moreover, this piece also guides you on how to upgrade from Windows 10 to Windows 11. In the last, we have discussed some ways to fix Windows updates stuck on downloading or installing. So, go ahead and perform these steps. In case you have trouble doing this, do let us know in the comment area. We would love to help you.


