Are you facing Hard Drive missing after Windows 11 update issue? Look no further. In this article, I have put down some real fixes that will help you fix this problem with your Windows 11 PC.
Upgrading to Windows 11 is becoming a nightmare for users with each passing day. Windows 11 users keep getting stuck in one or the other error due to corrupt files, hardware incompatibility, incorrect settings, or old drivers. Besides, buggy Windows 11 software updates are also creating trouble in the proper functioning of the PC. Likewise, several Windows 11 users are reporting their missing hard drive after they have installed Windows 11 on their system.
Also Read: External Hard Drive Not Showing Up On Mac? Try These Fixes

This weird error on the most advanced iteration of Windows can be due to plenty of reasons. Some random hardware and software issues can be the culprit here. If the error is due to software, it can be eradicated by tweaking a few settings on your PC. This means you don’t have to visit a repair center to get it fixed.
To help fix the hard drive missing after Windows 11 update issue, we have listed some troubleshooting methods that have proved useful for many Windows 11 users struggling with this issue. So let’s not waste time and get started!
Also Read: How To Fix Android Apps Not Working On Windows 11
Uninstall the recently installed update
- Open Settings App using the Windows+I shortcut.
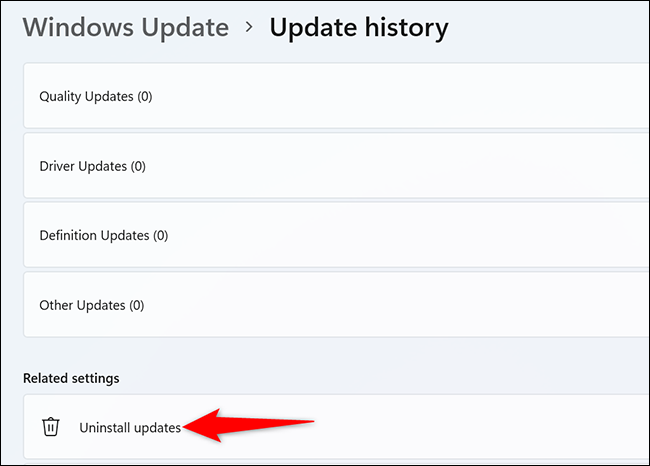
- Now open the Update History tab from the Windows left pane and click Uninstall update option
- A pop-up will appear on the screen, press the Yes button to confirm your action.

- After the un-installation is complete, see if the hard drive is back on your Windows 11 PC.
If so, this means there is a bug in the recent update so you should wait until Microsoft fixes the issue by releasing another update for it.
Also Read: How To Convert Old Hard Drive And SSD Into An External Drive?
Reinstall drives on your Windows 11 PC
- Launch the Search Menu on Windows 11 PC using the Windows + S shortcut key.
- Now type Device Manager and click the first search result to launch the Device Manager Settings.
- To see the drives present currently in the system, you need to look for the Disk Drives tab and double click it to expand it.
- Now right click on the drives listed here and choose the ‘Uninstall drive’ option from the context menu.

- A dialog box will appear to confirm the action. Press the Uninstall button here to confirm uninstalling the problematic drive.
- Now restart your Windows 11 PC and you will see that Windows will automatically detect the hard drives on your PC.
Update the drivers
- Open the Windows 11 Start menu by using the Windows + S shortcut key.
- Now type Device Manager in the search bar and choose the first search result to launch the Device Manager Settings.
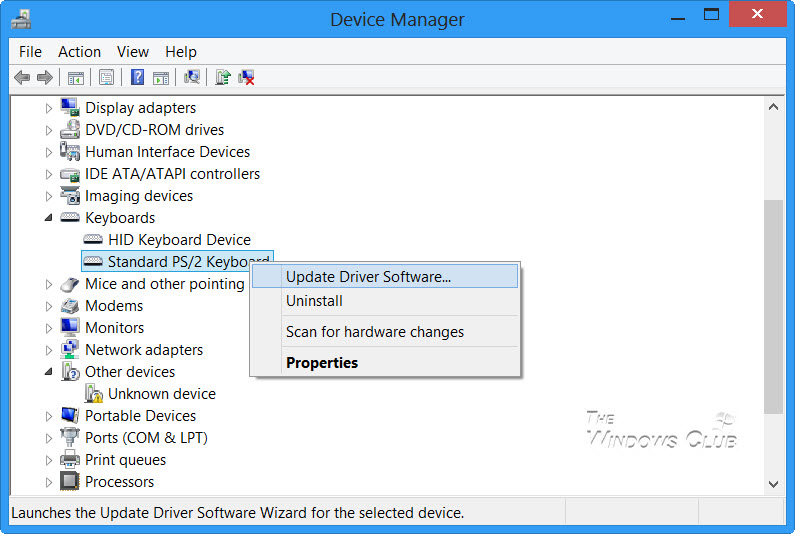
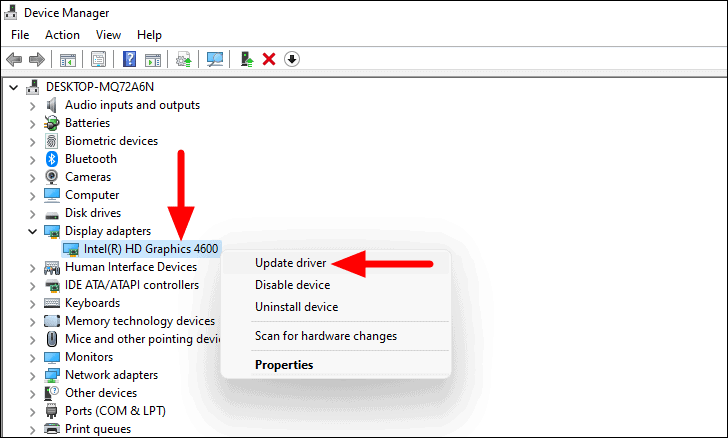
- Now look for Drivers and right-click on it.
- Choose the Update driver option from the context menu.

- If you want Windows to automatically search and install the drivers for your PC, choose the Search automatically option.
- If Windows could not fetch the newer version of the driver, you should visit your manufacturer’s website to download and install the latest version of the driver.
- Even though this process is time-consuming it will help you to install the new driver successfully.
Use Windows Terminal to run SFC scan
- Use Windows + S shortcut to bring up the Windows 11 Search menu.
- Now search for Windows Terminal and right-click the first result and choose the Run as Administrator option.
- The UAC (User Account Control) pop-up will appear on the screen. Choose the YES option here.

- Press the ‘Ctrl + Shift + 2’ keys together to switch to the Command Prompt screen.
- Now you need to type this command given below followed by ‘Enter key’. This will run an SFC scan on your Windows 11 PC.
sfc /scannow
Now the System File Checker of your Windows 11 PC will look for corrupt system files and replace them if they are found. Hence this process will take some time and you need to wait until the scan is completed. If any corrupt file is causing the issue, running an SFC scan will surely fix it.
Tweak Power Management settings of external drives
- Open the device management settings as explained in methods 2 and 3.
- Now go to the top menu and click on View and choose the ‘Show hidden devices’ option.
- Next, scroll and open the Universal Serial Bus controllers option.
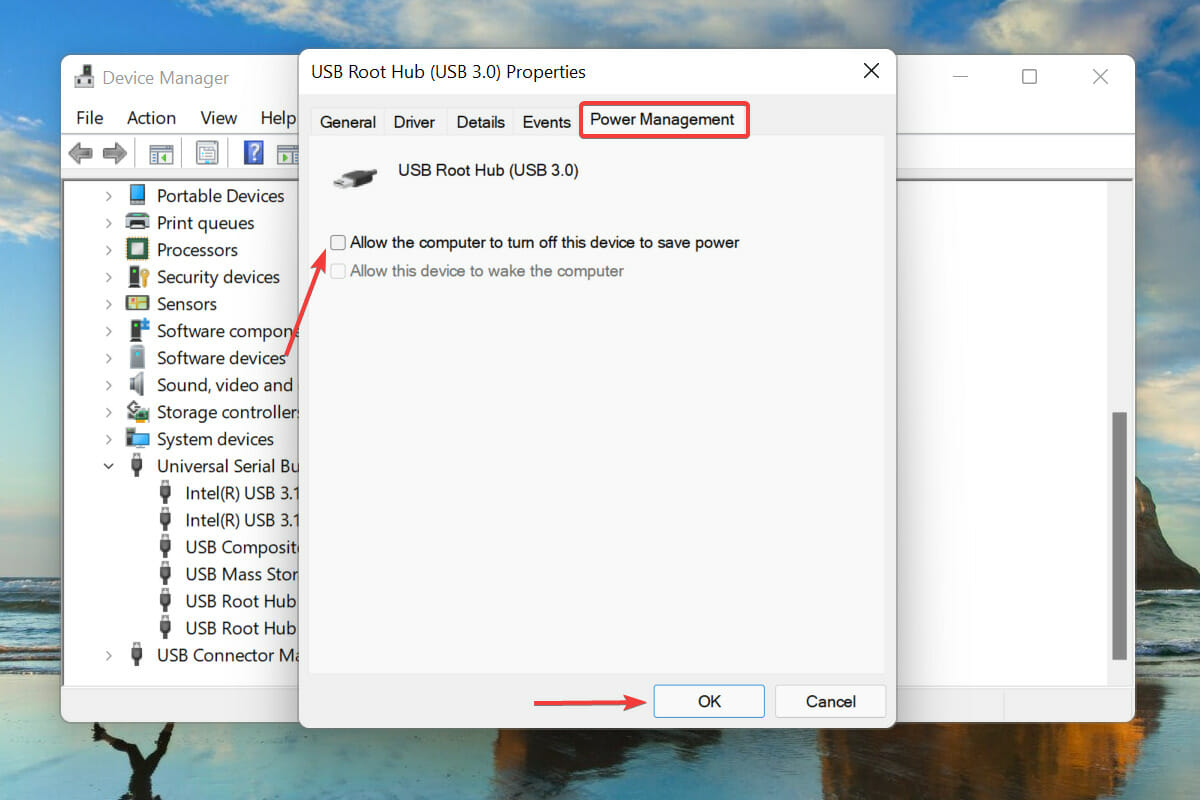
- Now right-click the USB Root Hub device and choose properties.
- Go to the Power Management tab and remove the tick in the checkbox for the ‘Allow the computer to turn off the device to save power option.

- Now press the OK button.
- Now you need to change the power management settings for all the USB ports of your PC.
Conclusion
These are all the tweaks that you need to make to your Windows 11 PC to fix the hard drive missing after Windows 11 update issue. If the error still persists, it is most likely a hardware issue. You need to schedule an appointment with the repair store to fix this issue with the hard drive of your Windows 11 PC.
Also Read: Bluetooth Not Working In Windows 11? Try These Fixes


