Hello, gamers! As we all know, Steam is an awesome gaming platform. You can download, play, create as well as discuss games there. Unfortunately, the user experience with Steam is not always pleasant. If you are facing issues like Steam running slow or the games lagging, you are at the right place. In this article, You will learn about various ways to fix Steam running slow 2022.
Steam is a prominent name in the PC gaming marketplace. With this, you can download and play the latest PC games. A cherry on the top is that is it extremely easy to use. Unfortunately, if you are having a rough experience with the gaming client (particularly, Steam running slow or the games lagging), you are not alone. So, let us discuss the various ways to fix the Steam running Slow/ lagging games issue 2022.
How to fix Steam Running slow 2022?
- Close Unnecessary Programs
- Clear Steam’s browser cache and cookies
- Clear Steam’s download cache
- Turn off auto proxy settings
- Repair Steam
- Repair corrupted files
- Reinstall Steam
- Update the drivers of your device
There may be various reasons behind Steam running slow or the issue of the lagging game. One of the major reasons behind such issues is the enormous amount of cache data. The Steam client works with its in-built Steam browser. So, the accumulation of Steam’s browser data and cookies is also a culprit. Now, let us discuss the various ways to fix Steam running slow on Windows 11 2022. One of them is sure to fix your problem.
1. Close Unnecessary programs and processes
Running multiple applications simultaneously as well as background processes can make Steam run slower. So, the first fix you should try is to close all the unnecessary applications as well as the background process.
Closing unnecessary applications are quite easy. So, let us discuss how to close unnecessary background processes on Windows 11/10:
- Press Ctrl+Alt+Delete on your keyboard to launch Task Manager.
2. Now, under the Processes tab, close all the unnecessary processes by clicking on them and then tapping End Task as shown below in the screenshot.
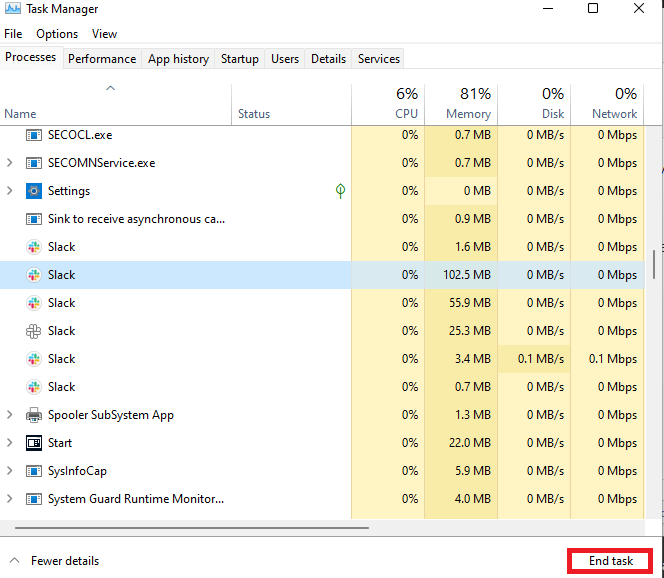
Now, restart Steam and see if the issue has been fixed. In case the problem persists, kindly move on to the next solutions given below.
Also Read: Unable To Join Multiplayer Game Session On steam? Try These Fixes
2. Clear Steam’s browser cache and cookies
The Steam application includes a browser that allows the users to browse the Steam Store. It eventually leads to the accumulation of browser cache and cookies. So, another way to fix the Steam running slow issue is to clear browser cache and cookies. Below is how to do it:
- Launch Steam on your device.
- Click on the Steam option on the top-left corner.
3. Choose Settings from the resultant window.

4. Tap the Web Browse option on the resultant window as shown below in the screenshot.
5. Click on Delete Web Browser cache.
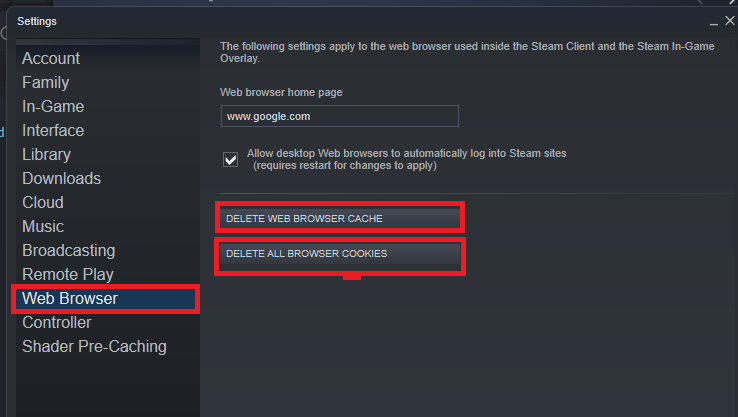
6. Tap Ok.
7. Now, tap Clear All browser cookies and again tap OK.
Now, the issue of the Steam client running slow or the Steam games lagging should be fixed. In case it continues, do try the other solutions given below.
3. Clear Steam Download cache
Author major reason behind the specified issue is the excessive amount of download cache. As you download games on Steam, it adds to the download cache making the app run slower. Ultimately, it affects the game performance on your PC.
So, it is advised to clear Steam’s download cache. Below is how to do it:
- Launch Steam application on your PC.
- Click on the Steam option on the top-left corner.
- Now, choose Settings from the resultant window.
- Then, tap Downloads on the left side of the resultant window as shown below in the screenshot.
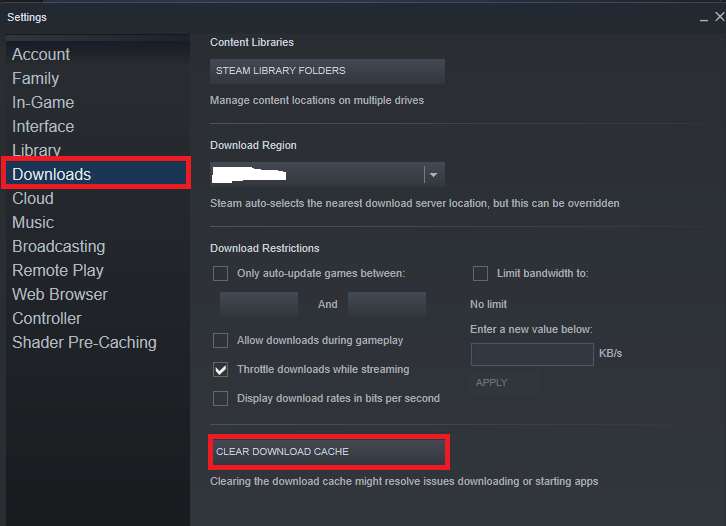
5. Next, Click on the Clear Download cache option at the bottom( see screenshot).
6. Further, Tap OK to confirm.

7. Restart Steam. You may be asked to log in again.
So, it is one of the best ways to fix the Steam client running slow issue. In case you are still struggling with the problem, do try the next solutions given below.
4. Turn off auto proxy settings
This method has indeed worked for various affected users. Keeping auto-proxy enabled may also lead to problems like the one you are facing right now. Below is how to disable auto proxy on your PC:
- Open the Settings on your PC( Windows +I key combination).
- Click on Network & Internet on the left side.
- Turn off the toggle next to Automatically detect settings.
- Unde Manual Proxy setup, User a proxy server option must be turned off.
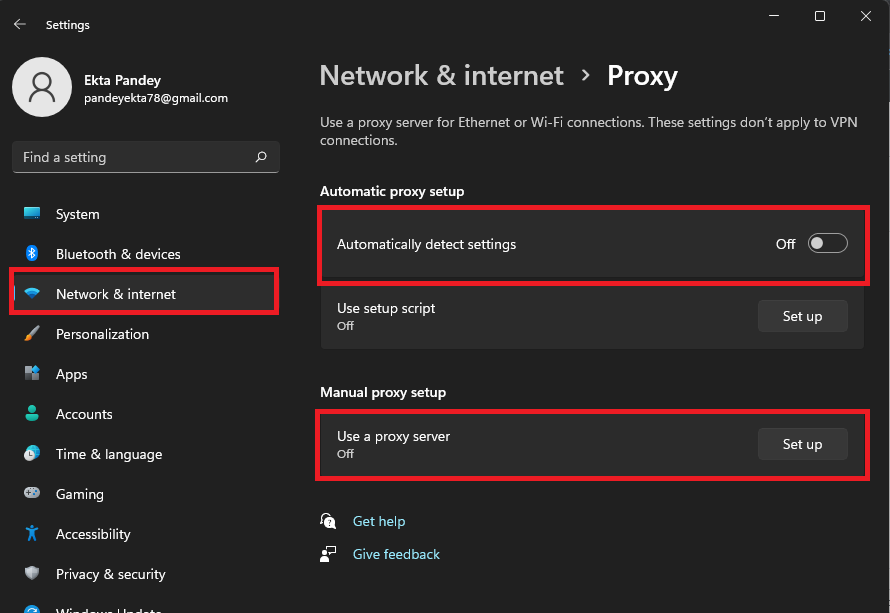
[ A proxy server acts as a client between the client and a website(let’s say). So, instead of direct communication with the site, the client will have to request the proxy server first. In short, turning on proxy increases the steps involved in communication between the client and the site. It has the potential to slow down the speed of your internet.]
5. Repair Steam Service
Now, it is one of the best ways to fix the issue. Corrupted or missing steam files may also be the reason behind Steam running slow. So, you need to repair the Stream service. Below is how to do it:
- Press Windows + R to open the run dialog box.
- Now, enter the following path in the dialogue box.
C:\Program Files (x86)\Steam\bin\steamservice.exe /repair
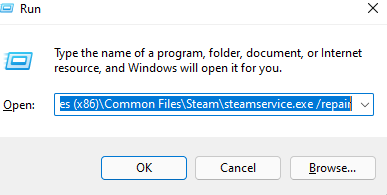
3. Press Ctrl+Shift+Enter. ( This is done to access the service with admin privileges. You can repair the Steam service only as an administrator.)
4. Wait for a few minutes until the process is completed.

[ Note: This path can differ according to the location of the Steamservice.exe file on your PC. So, this path is not working for you, you will need to copy the path of the mentioned file from the Windows (C:)]. Steps to do this are given below:
- Open the Files Explorer.
- Go to Windows (C:) drive.
- Tap Program Files (x86).
- In the search box on the top-right, enter Steamservice.exe.
- Right-click on the resultant file and tap Copy as path.
- Enter the path in the Run dialog box, give a space, put a slash(/) following but the term repair. ]
In the end, restart steam to see if the problem has been fixed now.
6. Repair Corrupted files
Now, if a particular game is slow or not loading on Steam, there is a great way to fix that. All you need to do is:
- Launch Steam.
- Go to Library.

3. Right-click on the game that is slow.
4. Choose Properties.
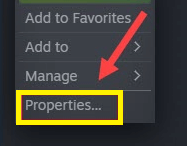
5. Under the Local files tab, Click on Verify integrity of files.
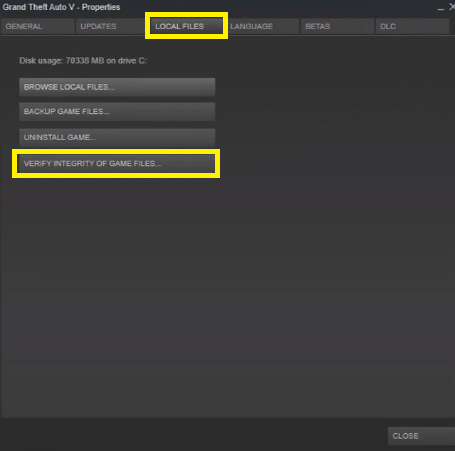
6. Wait for a few minutes.
This option automatically repairs any corrupted or missing game files.
7. Reinstall Steam
If none of the methods seems to work, try reinstalling the Steam client. All you need to do is:
- Go to the start menu.
- Search STeam in the search bar on the top.
- Click on Uninstall on the right side.
- Again, click on the Steam application and tap yes.
Now, after successful installation, reinstall it. The problem of Steam running slow on Windows 11/10 must be fixed now.
8. Update the Drivers of your device
Outdated or older versions of drivers can make your PC slower. It can ultimately lead to problems like the one you are facing. There is nothing more annoying than a slow computer. So, if you want your PC as well as the various apps on it to run smoother, it is essential to the drivers up-to-date.
To update the drivers on your PC, kindly check out our detailed guide on How To Update Drivers In Windows 11
CONCLUSION
So, that’s all for now. These are the best ways to fix Steam running slow or the game lagging issue. Try these fixes in no specific order. One of them is sure to fix your problem. However, if you face any problems while performing the steps mentioned in this article, do let us know in the comment section. We would love to help you.


