Windows is open the most popular operating system worldwide and Microsoft has recently released the latest version of Windows.
Windows 11 boasts of a modern interface and very useful apps owing to which users are quickly upgrading to Windows 11. Sadly, Windows users face several issues and errors after switching to Windows 11 and unresponsive Windows 11 File Explorer is one of them.

As you might be aware that File Explorer is one of the most essential components of Windows as it provides a graphical user interface to the users. So without it, users will have no way to interact with Windows 11.
Fortunately, this issue can be fixed easily! In this article, we have presented three troubleshooting methods to fix the unresponsive and crashing Files Explorer in Windows 11. Let’s go through them one by one.
Also Read: How To Install Dolby Atmos In Windows 11?
Use Command Prompt to Fix File Explorer not responding Issue
In this method, you are required to delete the registry file using the Command Prompt. Let’s see how to do it but first access the Command Prompt without the traditional way:
Note: This method will be helpful when the Task Bar in Windows 11 is not responsive.
- First and Foremost, press the ‘Alt+Ctrl+Del’ keys to access the Windows 11 Security Screen. Choose the ‘Task Manager’ option from amongst the ones given on the Screen.
- When you’re in the Task Manager window, click the More Details button in the bottom left to expand the Task Manager window.
- Now click the ‘File’ option on the top to expand the file tab in the file manager. Now choose the ‘Run New Task’ option from the overlay menu.
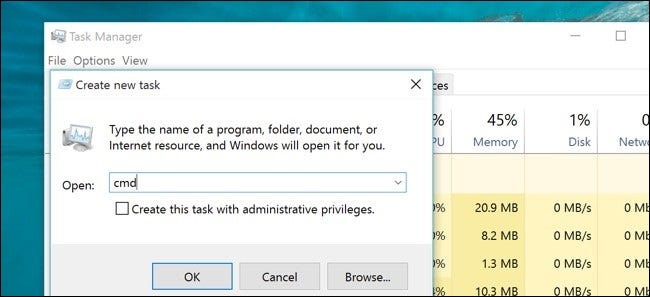
- Next type ‘cmd’ in the new overlay window on the screen in the Text Box next to ‘Open:’ and press the OK button.

- You’ll see that the Command Prompt will open on the screen.
- Now you need to copy-paste the following command in the Windows 11 Command Prompt and press the Enter key.reg delete HKCU\SOFTWARE\Microsoft\Windows\CurrentVersion\IrisService /f && shutdown -r -t 0
- This will restart your Windows 11 PC and you’ll see that the File Explorer issue has been fixed now.
Also Read: How To Split Screen In Windows 11 For Multitasking?
Run an SFC Scan to Fix Windows File Explorer
File System Scanner or SFC will scan your Windows 11 PC and look for errors in your System Files and PC and restore it to good condition.
- For running the SFC scan on your Windows 11 PC, you will need to access the Command Prompt again. For this use the ‘Ctrl+Alt+Del’ button so that the security screen opens on your computer.
- Now follow the steps given the above method to open the Command Prompt on your Windows 11 PC.
- Here you need to type ‘coding in the text box next to the ‘Open:’ field in the create task field and enable the ‘Create this task with administrative privileges’ option. After this press the OK button.
- You’ll see the ‘User Access Control’ pop-up on the screen. Choose the ‘Yes’ option to launch the Command Prompt in Administrator Mode.
- Next, you need to type the following command in the command prompt and press the enter key.
- Then, type ‘sfc /scannow’

- This will run the scan on your Windows 11 PC. Keep in mind that it will take some time to complete the SFC scan on your system.
- When you are notified that the SFC scan is completed, just press the Windows key to access the Start menu on your Windows 11. Click the ‘power’ icon in the menu and choose the Restart option here.
Note: If your Taskbar is not responsive, just use the ‘Alt+F4’ shortcut key to access the Shutdown windows in Windows 11.
- Now use the Down Arrow key on your Windows 11 keyboard to access the Restart option. Finally hit the enter key to restart your Windows 11 PC.
- Wait for some time until your system restarts. You’ll see that the unresponsive File Explorer in Windows 11 due to file corruption has been fixed now.
Also Read: How To Install Windows 11 On An Unsupported CPU?
Uninstall a Recent Update to Fix the issue with Windows File Explorer
If you’re experiencing issues in File Explorer after you’ve recently installed updates, then it’s best to roll back the update to resolve this problem.
- Press the Windows key and choose the Settings option from the Start menu. You can also access the Settings App by pressing the Windows+I key.
- Choose the ‘Windows Update’ option from the left side panel of Windows 11 Settings. Now click the ‘More options’ to expand the menu and choose ‘Update History’ from the left panel.
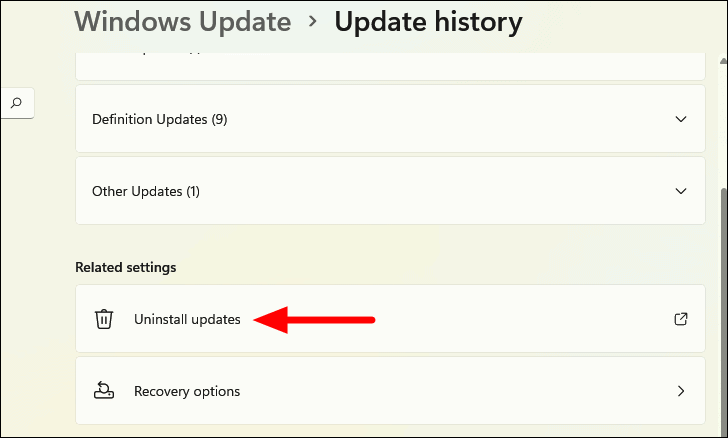
- Scroll down and choose the ‘Uninstall updates’ option to open the Windows 11 Control Panel.

- Look for the newest installed update and press the ‘Uninstall’ button.
- Click the ‘Yes’ button in the alert that will appear on the Windows 11 screen.
- When the update is uninstalled, restart your Windows 11 PC. Hopefully, any issue with File Explorer is resolved.
Read: How To Check If Your PC Can Upgrade To Windows 11?
Conclusion
These are the three tried and tested ways to fix the unresponsive File Explorer error in Windows 11. This is a very common issue and can be resolved easily. Need more help to troubleshoot issues in Windows 11? Let us know in the comments below.


