Whenever a new operating system or its beta version is launched by Apple, everyone is excited and eager to upgrade to the new version for a change but at the same time its also critical to some business or to some professional or could be frustrating for personal use also as some of your important software may not work which leads to downgrade to previous version of OS X. It may become unstable or annoying for you by running slower than before. It is always recommended to check the reviews and compatibility report for the new OS X version on the internet before you upgrade. These information can be found few months later from the date, OS X is released so give your Mac some time before you upgrade, do not make haste. Also do not depend on the minimum hardware requirement because they are just a benchmark. You may need to upgrade your memory from 2 GB to 4 GB if you are planning to upgrade to OS X El Capitan. Apple does not provide any tool for downgrading your OS X, you will need to do a clean installation in order to downgrade to any previous version.
Why would you Downgrade Mac OSX El Capitan?
Here is a list of affected software on compatibility issue with El Capitan which could also be found on Apple’s support website – https://discussions.apple.com/docs/DOC-8801 or the respective software developer’s website.
- Sound and Music: Logic Pro X 10.2.1, Melodyne 4, MOTU, UAD and some other professional sound engineering application does not work properly as it may crash or could not detect its supporting hardware.
- Application: Microsoft Office 2011 and Microsoft Office 2016 crashes.
- Sound Mixing and Processing: Pro tools from Avid Technologies still has known issue with EL Capitan ( http://avid.force.com/pkb/articles/en_US/compatibility/Mac-OS-X-10-11-El-Capitan-support-for-Media-Composer-Pro-Tools-Sibelius-EUCON-and-ISIS).
- Musical Instruments: Software and drivers for hardware like KOMPLETE, MASCHINE (MK1), AUDIO KONTROL 1, TRAKTOR KONTROL S4 (MK1) from Native Intruments are also affected.
As of writing, Steinberg (Cubase, Nuendo, Wavelab), EastWest (Play), Avid (Pro Tools), Slate Digital, Gobbler and others are still advising customers to stay put on Yosemite.
Which OS X version would you downgrade to?
You may want to downgrade from OS X El Capitan to OSX Mavericks because it is found that El Capitan and Yosemite ( OS X 10.10) are both slow. Yosemite and El Capitan was created on a SSD drive which are faster than normal disc spinning type drives. So they work better and faster if you have an internal SSD hard drive.If you’re using disc spinning type drive then Mavericks( OS X 10.9) should be your best choice.
In order to downgrade from El Capitan to Mavericks or any prior version of OS X, the first thing you need to do is to get a copy of the installation file of the version you are downgrading to or check if you have a Time Machine backup of that version. If you do not have a Time Machine backup or the Installation file then you will have to download the required version from App store.
Starting from OS X 10.9 Mavericks you can not download or buy it from App store as Apple has completely removed the links of the prior version of OS X from its website or App Store but if necessary you could request one from Apple by contacting them. If your Mac ran OS X Mavericks at any point in the past, you can re-download it from the Mac App Store’s Purchased tab.If you can not get the OS X Mavericks from anywhere then you still have an option to buy the license for Mountain Lion as Apple still lets you buy license codes for Mountain Lion(OS X 10.8) , Lion ( OS X 10.7) and Snow Leopard ( OS X 10.6). Once you buy the license you will receive a redemption code from Apple within 24 hours by email.Go to featured tab in App store on your Mac and select the link redeem on the right hand side under the Quick Links > enter the redemption code and then Apple ID and password, and it will allow you to download the Mountain Lion.
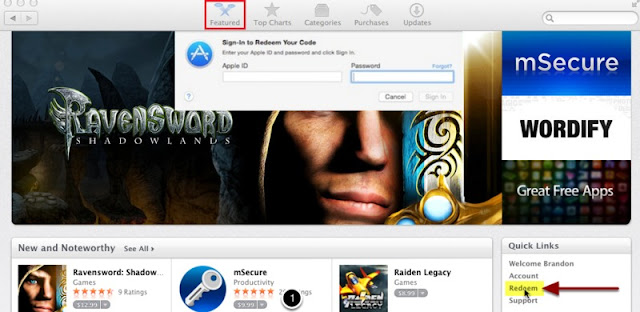 |
| Redeem the License code for mountain Lion to download it from App Store |
Mountain Lion OS X 10.8 is a great operating system from Apple. It’s the last version of OS X that supports some video conversion applications and it runs very fast so downgrading from El Capitan to Mountain Lion is the best option for me.
Important Information before downgrading from El Capitan to Mountain Lion:
It is also worth noting that you cannot simply revert Mac OS X El Capitan back to a prior version and keep all of your files. When Mac OS X updates to the latest version El Capitan, it also updates the file structure in apps like iPhoto, iTunes, Calendar, Mail and so on. Apple doesn’t create any system that enables you to roll back these files structure to an earlier version and keep all these files, so you will need to take back up of these files separately. Downgrading will include erasing of the entire hard drive including recovery partition of the current OS X version and then installation of the older OS X version and creation of its recovery partition by OS X.
There are three major methods of downgrading from OS X El Capitan to Mountain Lion.
Disclaimer: Installing/downgrading any operating system carries the risk of data loss. Always keep a fully functional, independent backup of your data. (Note: Hawkdive is not responsible for any data loss.)
Method 1: Downgrade OS X El Capitan via Time Machine
- Shut down your Mac and Go to the Recovery Mode by restarting the Mac and then holding down Command + R until you see the Apple Logo. You can also hold down Option/Alt and then choose the Recovery option.
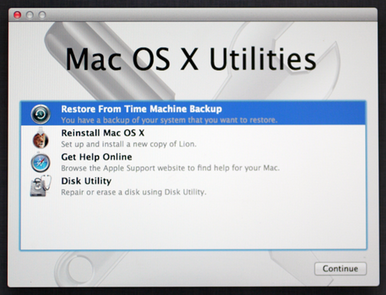
- At the OS X Utilities menu, Select “Restore From Time Machine Backup”
- Connect your Time Machine backup drive that contains the most recent Mountain Lion backup then click “Continue”
- At the “Select a Backup Source” screen, choose the Time Machine volume used for the Mountain Lion backup and click Continue
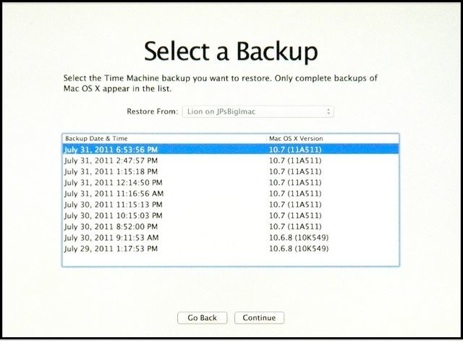
- Under “Backup Date & Time”, select the most recent backup made from OS X Mountain Lion– double-check the OS X Version menu to make sure it’s “10.8.5” (or whatever 10.8.x you had previously), then click Continue again.

Downgrade from OSX El Capitan to Mountain Lion - Choose the Destination drive (the El Capitan volume you want to downgrade) to restore the OS X Mountain Lion backup to – this will erase OS X El Capitan and revert back to Mavericks on that drive, be sure you backed up all files created between the most recent backup date and now or you will lose them – click on “Restore” to begin the downgrade process
Method 2: Downgrade from OS X El Capitan using internet Recovery
This is another easier method of downgrading your Mac OS X. Starting from 2010, Apple introduced its Internet Recovery service. Some computers that came with OS X Snow Leopard and earlier installed can also use the OS X Internet Recovery feature after applying a firmware update – Computers that can be upgraded to use OS X Internet Recovery. Internet recovery reinstall the OS X version that was originally shipped with the computer. For example, if the Mac shipped with OS X Mavericks but is now running OS X Yosemite, then OS X Mavericks would be the version that reinstalls through the Internet Recovery installation process.If your MacBook originally came with Mac OS X 10.8 Mountain Lion then internet recovery will install the Mountain Lion not El Capitan or Yosemite.
This version of OS X downloading through internet recovery isn’t associated with your Apple ID so you may use a new Apple ID if you have forgotten your old one.
Steps to perform Internet Recovery
- Shut down your Mac and Turn it back on. Immediately after hearing the Mac boot chime, hold down Command+Option+R – you will see a spinning globe appear as the system downloads the recovery tools from Apple.

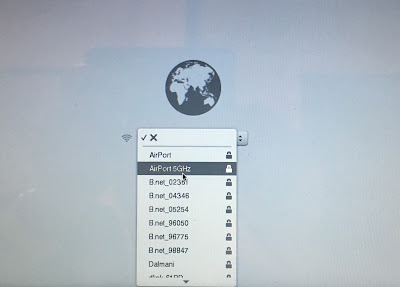
Downgrade from OSX El Capitan to Mountain Lion through Internet Recovery - Note : If your Mac can access any saved networks from current OS X, it will join the Wi-Fi network automatically otherwise you would see an option to join a WI-FI network.

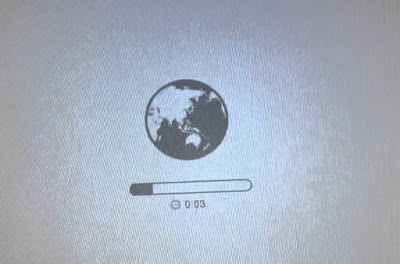
Downgrade from OSX El Capitan to Mountain Lion through Internet Recovery - When you see a spinning globe icon, it can take a while, a progress bar appears as the recovery functions are downloaded.

Downgrade from OSX El Capitan to Mountain Lion through Internet Recovery - When finished downloading, you’ll see the similar “OS X Utilities” screen, choose “Reinstall OS X” to begin the re-installation process. Select the destination as Macintosh HD and complete the re-installation (or installation) of OS X as usual.
Note:- You’ll notice the version of OS X that can be reinstalled this way is shown in the icon or listed under the “Reinstall OS X” option. For Macs that do not currently have an operating system found or installed, the option will show as “Install OS X” rather than “Reinstall OS X”.
Method 3: Downgrade from OSX El Capitan to Mountain Lion using a Bootable USB installer drive
This is a bit complex method for downgrading from EL Capitan to Mountain Lion as this process include – creating a bootable installer media, erasing the complete hard drive ,and then reintalling the Mountain lion from USB installer drive. In order to make a bootable USB intaller disk the first thing you need to do is to get a copy of the installation file of Mountain Lion.If your Mac ran OS X Mountain Lion at any point in the past or if you have previously purchased it, you can download it again from the Mac App Store and create a bootable USB flash drive with it. You may already have this if you’ve done an install before. Open the Applications folder and check for the Install Mac OS X Mountain Lion folder.
Here’s how you can download and obtain a soft copy of Mountain Lion.
- Launch App Store, and go to the Purchases tab.
- Look for OS X Mountain Lion, hold down the Option key and click Download.

Downgrade from OSX El Capitan to Mountain Lion - Enter your Apple ID and password if asked.This may take up between 10 and 60 minutes, depending on your Internet connection speed.

Download Mountain Lion to create bootable USB Install Media
If you have never downloaded Mountain Lion from App Store or never ran it on your Mac then you will need to purchase the license code for Mountain Lion and then redeem it as mentioned above in this article. The alternate option to purchase the Mountain Lion is to borrow the installation file of Mountain Lion from any of your friends who have it and then create the install media with the same file.
Steps to create bootable USB installer
Once you have got the Installation file of Mountain Lion then you can use any blank USB flash drive or other removable media to make it a bootable USB installer of OS X. Make sure the Flash drive or removable media has minimum 8 GB of available free space. Do not start the installation process when your download finishes as it will not run on the current version of OS X because the current version is higher than Mountain Lion.
1. Create bootable OS X Mountain Lion manually
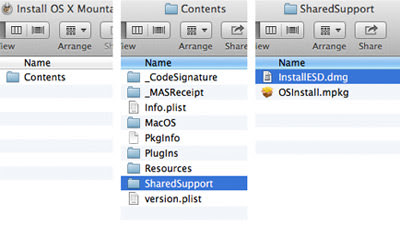
- Once your download is done, go to Finder > Applications. Look for the file called “Install OS X Mountain Lion”, right-click and select Show Package Contents.

Create bootable OS X Mountain Lion manually - Navigate to Contents > SharedSupport, then look for the filename “InstallESD.dmg”

Create bootable OS X Mountain Lion manually to downgrade El Capitan - Double-click InstallESD.dmg to open/mount it on your Desktop. This may take a minute or two.

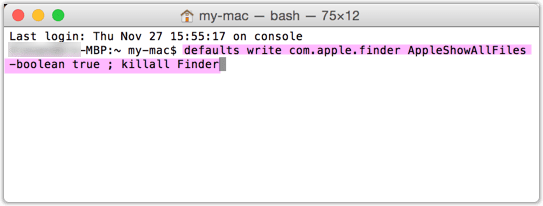
Downgrade from OSX El Capitan to Mountain Lion - Now make invisible file visible to see the BaseSystem.dmg inside the InstallESD.dmg.Run the following command ” defaults write com.apple.Finder AppleShowAllFiles TRUE” and “killall Finder” to show all files.

Show All hidden Files and Folders - Now open mounted InstallESD folder from Desktop and mount BaseSystem.dmg file under it.

Downgrade from OSX El Capitan to Mountain Lion - Attach a USB/external drive and open disk utility to format the USB/external drive to Mac OS Extended (Journaled).
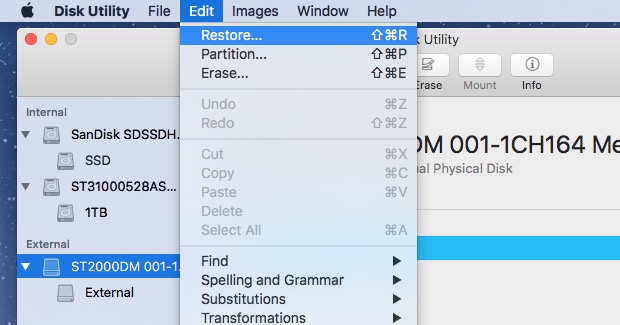
- Now click on the newly formatted USB/external drive and go to the edit menu on top menu bar and select Restore.

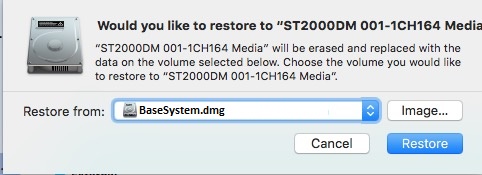
Restore Image from Disk Utility in El Capitan to make bootable USB - In the new window select the image BaseSystem.dmg under Restore from and click “Restore”.This will make USB/external drive bootable installer.

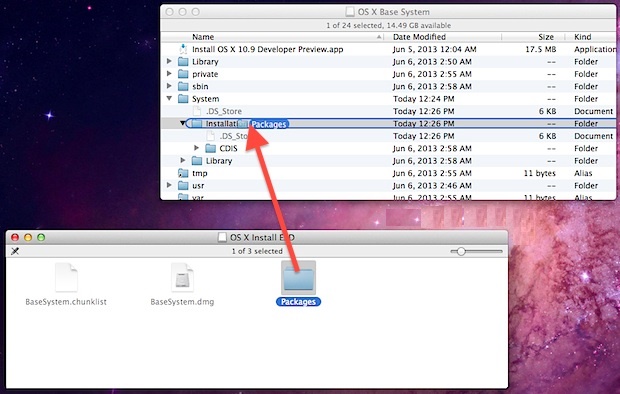
Restore Image from Disk Utility in El Capitan to make bootable USB - Just one last change to fix the bootable installer – open the newly created bootable disk and go to the System/Installation/ folder and delete the alias named Package.And now from the previously mounted InstallESD.dmg copy over the Packages folder to System/Installation/ folder in newly created USB/external drive.

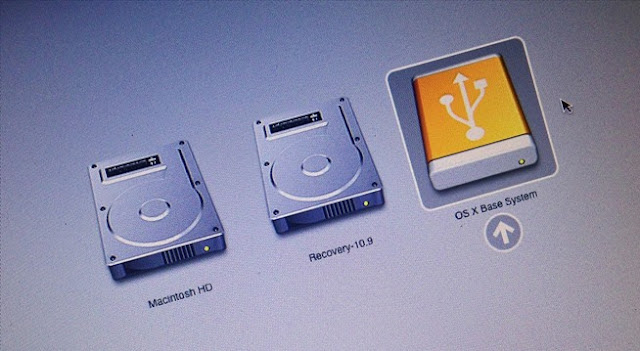
Fix the Bootable USB / External Disk Installer for Mountain Lion - Now while the USB/external bootable drive is connected shutdown the computer and turn it back on and immediately press and hold Option/Alt key and choose OS X Base System to start the installation process of Mountain Lion.

Downgrade from OSX El Capitan to Mountain Lion using bootable USB installer - First of all you need to erase the existing OS X El Capitan and then install the OS X from utilities menu.
2. Create bootable OS X Mountain Lion with DiskMaker X
DiskMaker X (formerly Lion DiskMaker) is an application built with AppleScript that you can use with many versions of OS X to build a bootable USB thumb drive, an external Firewire or Thunderbolt drive from OS X installer program (the one you download from the App Store). As soon as you launch the application, it tries to find the OS X Install program with Spotlight.Then, it proposes to build a bootable install disk and make it look as nice as possible. It’s the easiest way to build an OS X Installer in a few clicks! Then you can use the Install drive to fully re-install the OS on a freshly formatted drive, or install it on your many Macs without re-downloading the full installer.
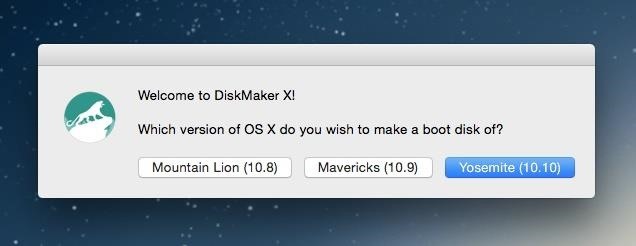 |
| Downgrade from OSX El Capitan to Mountain Lion |


