In today’s world, where technology is progressing rapidly, creating a personal AI Animated Character has become easier than ever. An Animated Character is a digital illustration of oneself that is produced utilizing artificial intelligence mechanisms and approaches. From gaming to social media to virtual assistants, AI Characters are being used in diverse areas to enrich user experiences. However, for a novice, creating your own AI Animated character with voice may seem like an intimidating task. Fret not, for we’ve got you covered with an all-inclusive guide that will make the procedure of constructing your very own AI Animated Character as effortless as pie, without causing you any headaches or confusion.
But before diving directly into the steps, let’s look at some of the efficient things that you can do by creating your own AI Animated Character with a voice.
Also Read- How To Use ChatGPT On Your Apple Watch
Endless Possibilities With the Personal AI Animated Character that Can Also Talk…
Creating your own AI Animated character with a voice can offer a wide range of possibilities, including:
- Personalized greetings: You can create a character that welcomes visitors to your website or social media page with a personalized message, providing a more engaging and memorable experience for your audience.
- Interactive customer service: An AI Animated character with a voice can help customers navigate your website or answer frequently asked questions, freeing up your human customer service representatives to handle more complex inquiries.
- Educational content: You can create an animated character to deliver educational content in a fun and engaging way, making learning more accessible and enjoyable.
- Brand ambassador: Your AI animated character can serve as the face of your brand, representing your company’s values and personality, and building brand recognition and loyalty.
These are some of the instances that we are able to mention other than these you can use the AI Animated Character with a video for entertainment purposes as well. For instance, cartoons, video games, etc.
In this article, we will guide you through the process of creating your own AI Animated character with voice, breaking down the steps into manageable chunks, and providing tips and resources to help you along the way. Whether you are a student, a hobbyist, or an aspiring professional, this article will give you a solid foundation to create upon as you explore the exciting world of AI Animated characters.
Before we dive into the main steps. Let’s gather the tools we need for this task.
#1. Get the Necessary Tools
Here is a list of tools we need. In addition to that, the tools we are gonna be using are all free so anyone can easily follow this guide without the need to purchase any costly tools.
- Discord
- Midjourney
- ChatGPT
- ElevenLabs
- D-ID
Step 1: Create AI Animated Character
To create AI Animated Character, we are going to utilize Midjourney Bot. Midjourney Bot is a cutting-edge tool that transforms the art of image creation. Further, it harnesses the capability of Artificial Intelligence and Machine Learning to divert your ideas into awe-inspiring visuals. With Midjourney, you can simply describe your vision utilizing text prompts and parameters, and watch as it brings it to life with a stunning array of unique images. Its advanced algorithm is trained on a vast database of image data, allowing it to effortlessly adapt real art styles and seamlessly blend them into any combination of elements that you desire.
Moreover, Midjourney is an autonomous research lab that has created an AI program with the same name. This program generates images from textual descriptions, identical to other AI image generators such as OpenAI’s DALL-E and Stable Diffusion, which have gained popularity recently. However, Midjourney differentiates itself from its competitors by offering a more dreamy, artistic style to its induced images. This unique aesthetic is likely to appeal to those in science-fiction literature or artwork that require a gothic atmosphere.
Additionally, Midjourney operates solely on the Discord platform. To use the program, you must join the Midjourney Discord server and utilize the bot to create AI-generated artwork. This is done entirely by entering a text-based prompt that describes the desired image.
Also Read- How To Build Your Own AI Chatbot With ChatGPT API
Jot down a prompt
First, you need to think of a character you want to create. Such as:
- Gender
- Kind and color of a dress
- Accessories
- Personality / Attributes
- Format (For instance, realistic, semi-realistic)
After that, you need to make a prompt combining everything you want your character to look like.
In my case, I created a prompt as follows: "a half-body image of a lady wearing a royal blue suit with medium-length hair, semi-realistic, confident, smart"
Join Midjourney Bot on Discord
Now, you need to head to Discord and get a Midjourney server. To do that, follow these steps
Step 1. Go to Discord, and log in to the website, You can also download it for free. If you don’t have an account on Discord, you can simply create one for free.
Step 2. Now, head to the Midjourney website. There, you will see the option to Join the Beta, click on it.
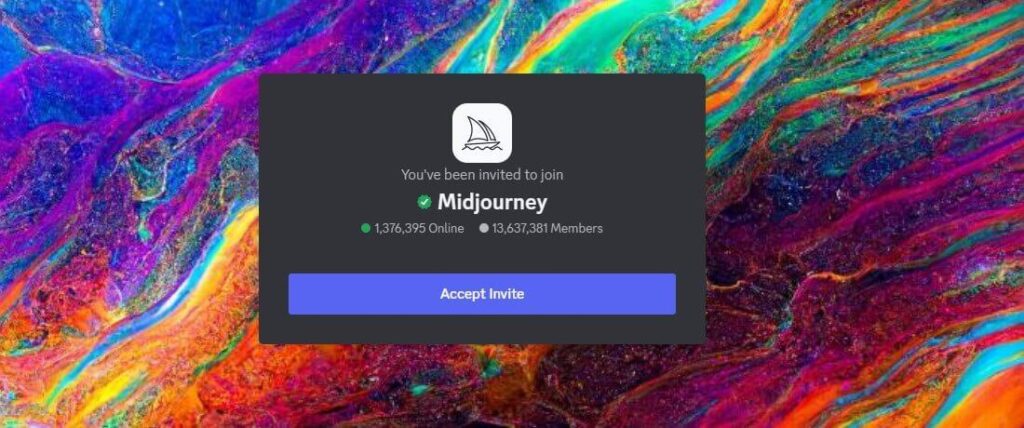
As you have previously login to discord you just have to Accept Invite and you are good to go.
Step 4: Now that you have joined the Midjourney server on Discord. On the Left pane, you will Newcomer Rooms. In its sub-section, you will see various newbies channels just go to one of them.
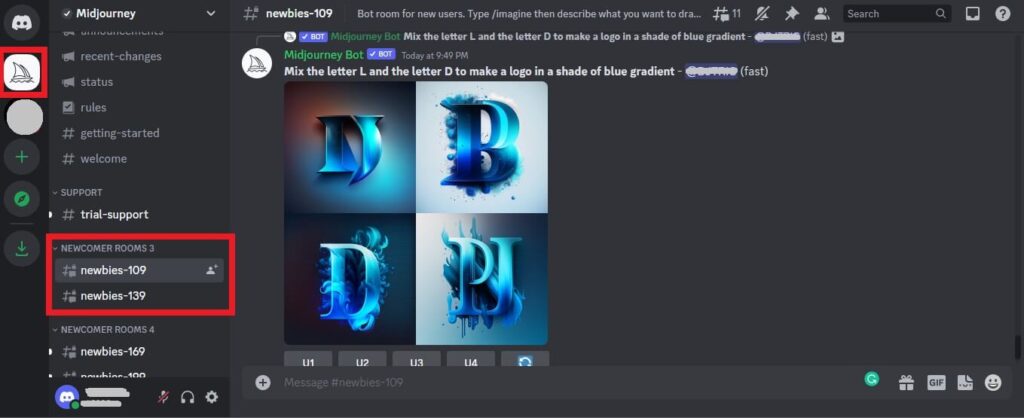
Enter your Prompt into the Text Box
Step 6: Now in the text box jot down /imagine and tap the spacebar it will automatically add the prompt box beside it.
Finally, type the prompt you created in that box and hit enter.

Step 7: After you enter the prompt you will see the notification message saying that it is working on your prompt. Now, wait for at least 60 seconds to get your results. After your results are ready Midjourney mentions your name with the results. You can see the results in the illustration below of the prompt I entered.
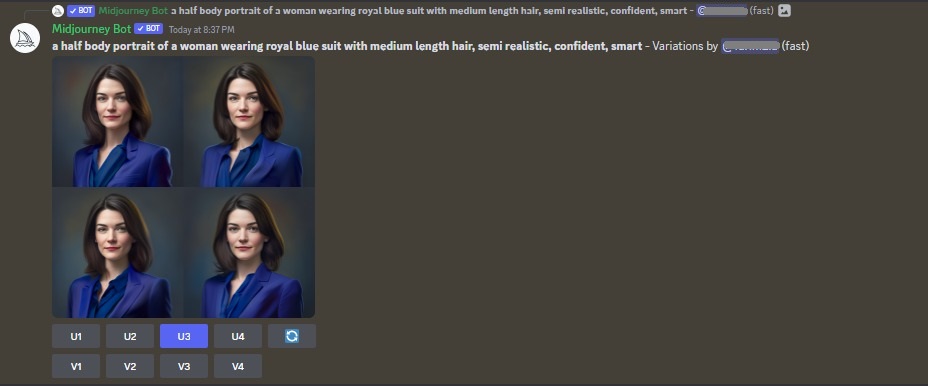
Step 8: As you can see it has created a character as I asked in the prompt. Now, you see various options under the picture. You need to select which picture you like most and click accordingly. I wanted to upscale the third one so I clicked on U3 as you can see in the illustration above.
After upscaling the third picture these are the results you will get. (See the illustration below)

Now, if you are not happy with the picture that it generated you can scroll above or just rewrite the prompt again, do a few changes, and pick the one that you want to use in your video or other projects.
Generate Variations
You can also Generate variations by simply clicking on the photo of the Upscaled picture. Right-click on it and tap on Copy image address.
Now back on the text box type /imagine + spacebar and paste the link address. After that, copy the prompt and paste it with the pasted address link and do the changes as you like, and hit enter.
Download the Photo
To download it, simply click on the photo that you want to select. Under the photo, you will see the option to see in the browser click on it and the picture will open in the browser with the High Definition (HD) version. Now right-click on the photo and tap on Save image as… to download it.
Also Read- How To Use ChatGPT In Excel
Step 2: Jot Down Your Script using ChatGPT
Give your avatar a voice that will make it truly come alive! This step is as easy as pie – all you need is a professional speech. You can either conjure one up yourself or enlist the help of ChatGPT with their free plan.
ChatGPT is not an unfamiliar tool to us now. It has earned a substantial following and credit among internet users who are seeking info or looking for replies to their queries. As a consequence, it has become a go-to citation for instantaneous and steadfast facts on an expansive span of subjects.
This is how you can do it:
First, Go to ChatGPT and write the script according to the profession of your created character. In my case, my character is Victoria Jarding, a Senior Professor at Maple Leaf University.
Let’s ask ChatGPT to write a script for the speech that she will be giving for the Summer program, in 2023.
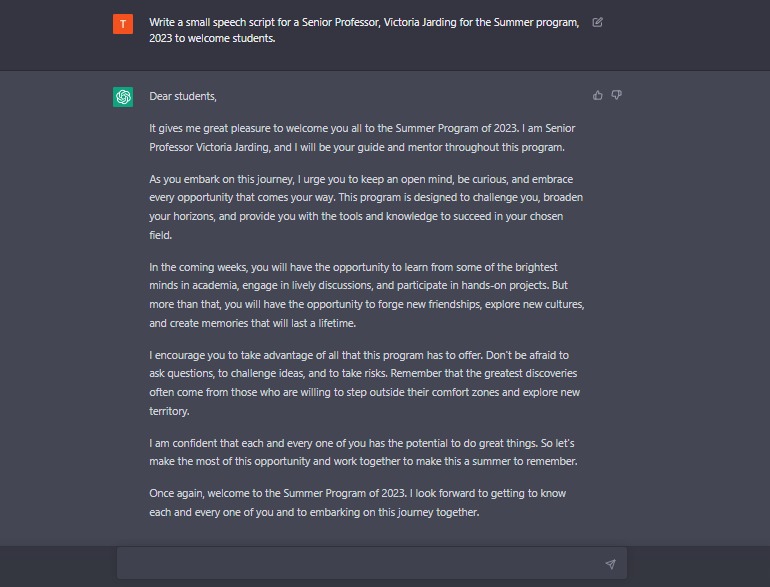
See, how easily you get the script written by ChatGPT in a matter of few seconds. Let’s move on to our next step which will convert our script into a voiceover.
Tip: After you get your script from ChatGPT. It is crucial to save or copy it somewhere safe beforehand.
Also Read- How To Use ChatGPT With Siri On iPhone
Step 4: Convert Text-to-Speech with ElevenLabs
ElevenLabs is an AI tool that forges realistic voices based on a given text. To use ElevenLabs, equip it with a text script, and it will generate a natural and realistic voice. Further, you can get started with ElevenLabs by using some free credits. To generate the voice for your AI avatar, we are going to provide ElevenLabs with the script that we generated utilizing ChatGPT. ElevenLabs creates a voiceover that adheres to the screenplay using cutting-edge deep-learning algorithms.
To do that, first, you need to head to the ElevenLabs website. There, you will see Get Started Free, click on it, and create an account.
Once the account is created. From the options given above click on Speech Synthesis, simply click on that option.
Now, on the Speech Synthesis page, on the text box paste the script that you generated earlier from ChatGPT.
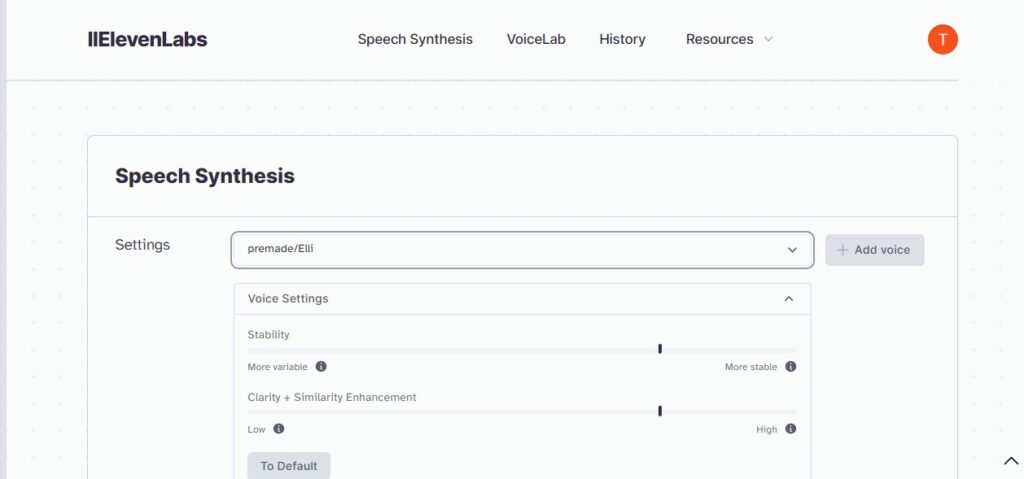
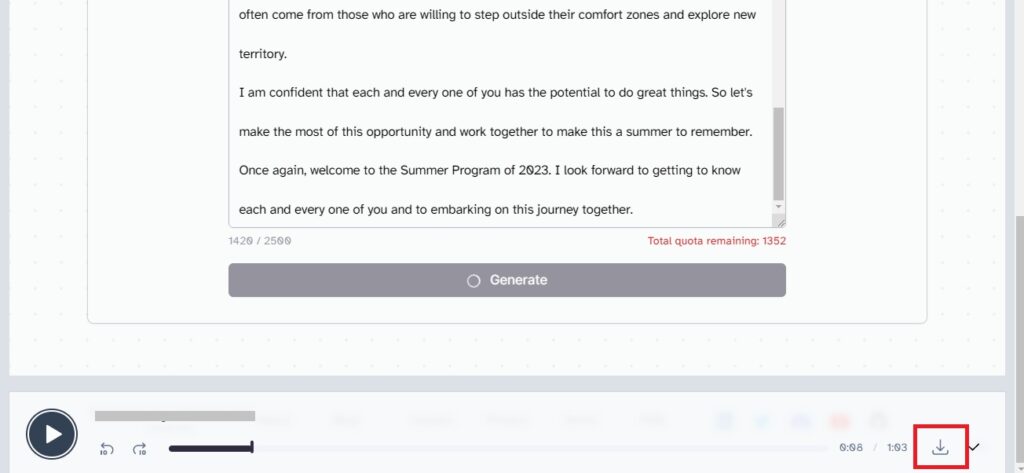
Then, from the settings choose the voice that you prefer corresponding to your character. In my case, I have selected Elli to do my voiceover. You can also Add Voice from the Voice Lab > Add Voice > Design Voice. Further, you can customize the voice based on accent, gender, and age.
After selecting all your preferred settings, click on Generate. You will then see the pop-up menu from where you can pause and download the video. if you are satisfied with the voice. Click on the Download option.
Step 5: Integrating your AI Character picture and generated voice using D-ID
D-ID is an AI tool that merges an image with a voice to create a realistic video of a person speaking. To operate D-ID, feed it with an image and a voice, and it will generate a video of the person in the image speaking with the given voice. You can get initiated with D-ID by utilizing some free credits. Nonetheless, it is the most convenient tool and works wonderfully with no effort.
D-ID uses sophisticated AI algorithms and processes to generate naturalistic videos of people communicating based on images and voices. The tool can be utilized for a broad scope of applications, such as producing personalized video messages, generating avatars for virtual assistants, or enriching video conferencing experiences.
To create a personal AI Animated Character, provide D-ID with your personal AI Animated Character picture and the voice generated utilizing ElevenLabs. D-ID uses advanced computer vision and NLP techniques to create a video of your AI Animated Character speaking with a realistic voice.
Now, let’s move on to the detailed steps to achieve this.
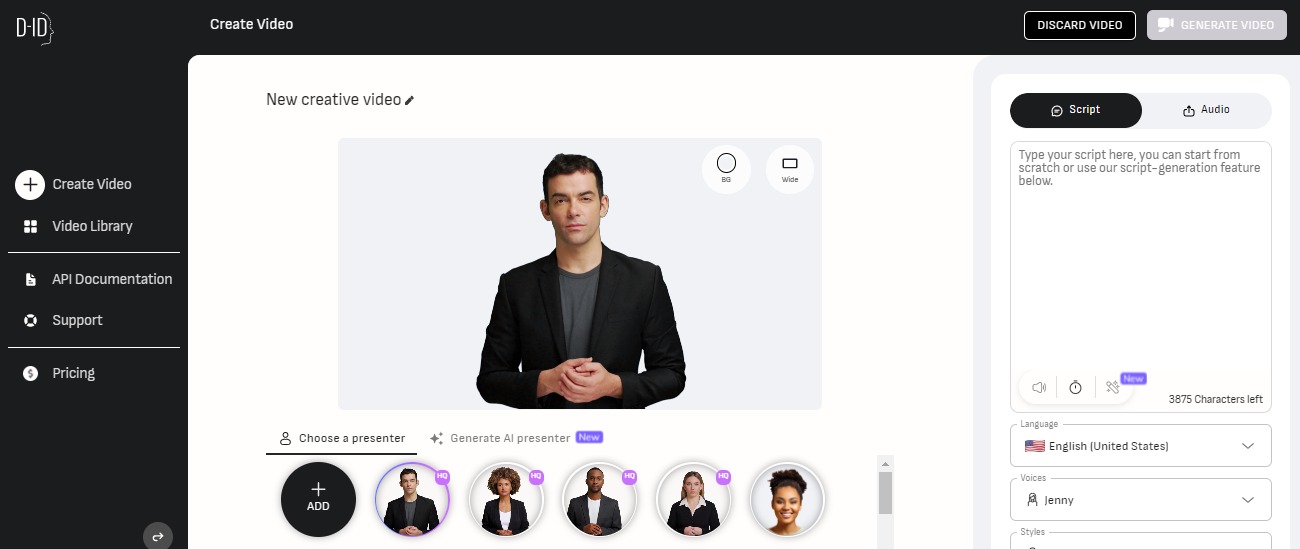
First, you need to head to the D-ID webpage and sign up for a Free Trial. After that, you will notice a Create Video option in the side panel. Click on it.
Now, in the Choose a presenter option click on +Add and then add your AI Animated Character.
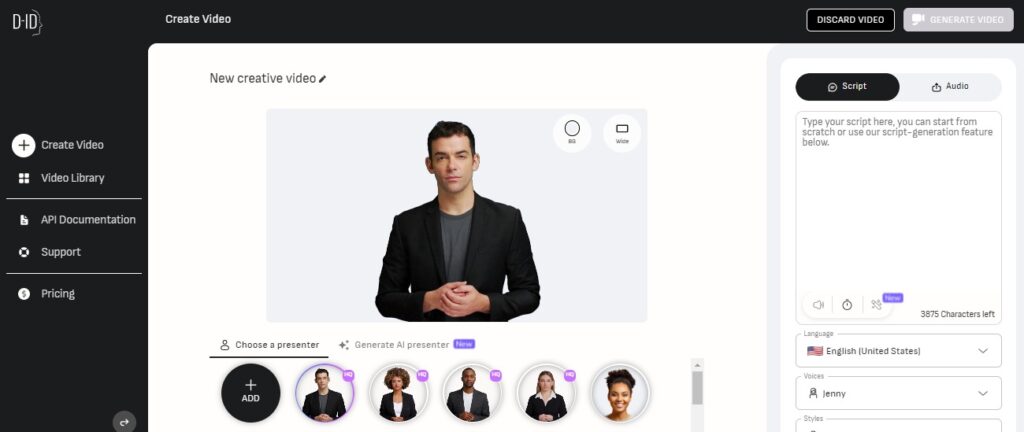
After your picture is uploaded. You will see two options on the right-side panel. The script and the audio option. Click on the Audio option. Then it will ask you to upload your voice. Add the audio that you created and download using ElevenLab.
Finally, the Generate Video option on top will activate. Click on the Generate option. Your video will then be generated within a few minutes depending on the size of your video. It will then be saved in your video library of D-ID. Thus, you can easily find it from the Library in D-ID and download it from there. Do not forget to watch the video that we have created.
Challenges You Could face as a Novice when making your own AI Animated Character
I found that creating an AI Animated character with a voice required complex programming and design skills, which were challenging for me as I lacked a background in these areas. Then, with the help of several sources and a lot of research, I get my hands on some of the efficient tools that were free and helped me in my journey to create the character and saved ample time. This is what advanced tech is supposed to do!
As we know, technology has advanced a lot and for basic characters like these, we can opt for free tools as it does not need loads of programming and coding.
Another challenge I faced while creating the AI Animated character occurred when I tried other text-to-image generators like Dall.e and BlueWillow. In Dall.e the image generated were kind of funny looking and not up to my satisfaction. As for BlueWillow, it is the same as Midjourney but the interface of it is much more complicated and does not have many options for instance to Upscale it. Overall it is more difficult to use than the Midjourney bot.
Further, the only issue I faced using Midjourney was you have to look for your mentioned prompt in the sea of prompts as there are millions of people generating text-to-photos. And there is no other way to generate photos separately for free for instance in Direct messages but you have to pay for it after some time.
Despite these challenges, I found creating my own AI Animated character with a voice to be a rewarding and compelling experience. I created a second Video attached following this paragraph, with the help of another amazing tool called Descript. Here is the Video. I will share the full steps in one of our next YouTube videos.
Conclusion
May the fruits of this labor bring you great joy! I trust that you relish the opportunity to experiment with AI. Above all, I encourage you to harness this power to create innovative projects that will not only satisfy you but also financial gain. So, let your imagination run wild and seize the potential that AI has to offer!
Also Read- ChatGPT, Google Bard, Microsoft Bing- How They Are Similar But Yet Different


