In this article, we are going to discuss how to change the folder icon or picture in windows 11. Well, they look great, but with time appear boring, isn’t it? You would have tried to cut the boredom by customizing your device by changing the themes and fonts. But you can take this customization to a whole new level by changing the default Windows icons and making your PC look unique and better sorted. In this guide, we will take you through why you should change your icons and how you should change your icons. So, let’s begin.
Contents
- Why you should change Windows 11 folder icons
- Changing Standard Folder icons
- Changing Desktop icons
- Change Hard drive icons
- Shortcut icons
- Conclusion
Also Read: How To Check For Updates On Windows 11/10?
Why you should change Windows 11 folder icons?
Customization can be done for many different purposes. A few of them include:
- Give your PC a personal spin
- Make your environment look catchy and trendy
- Make your system more user-friendly
- Highlight the importance of a particular icon by making it look unique
- To locate an important icon immediately from a huge crowd of icons
Also Read: Backup And Restore Wi-Fi Network Profiles In Windows 11
2. Change Standard Folder icons
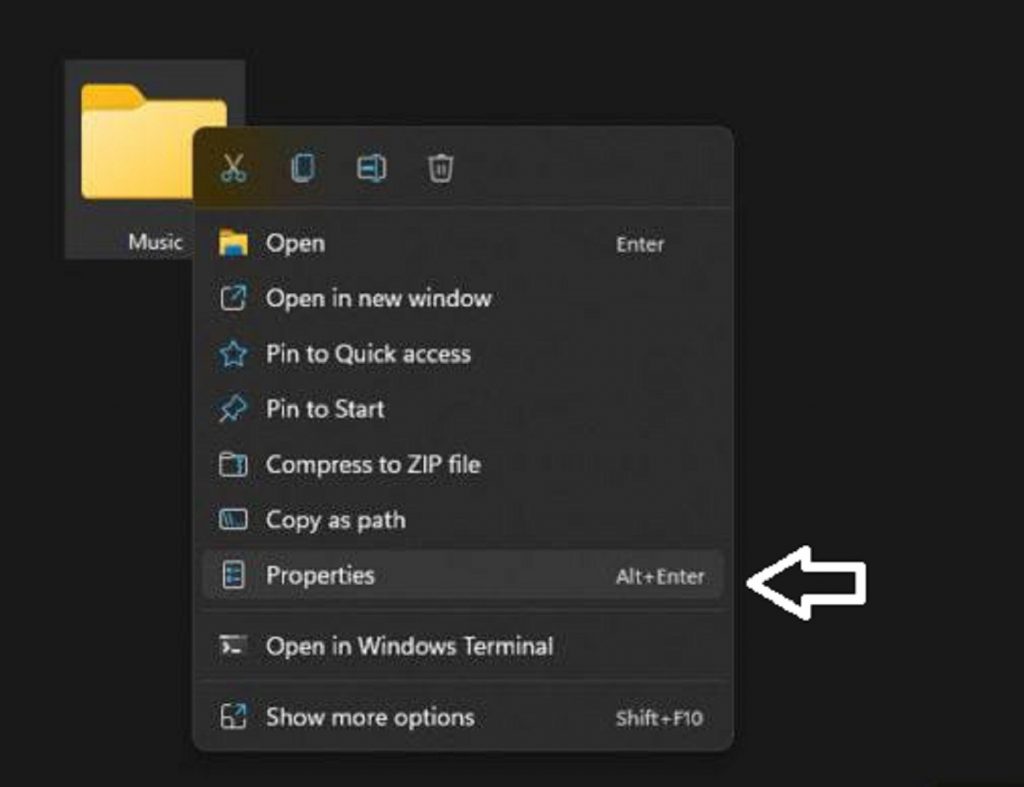
The icon for regular folders, as shown in the screenshot below, can be changed using the folder’s settings window.
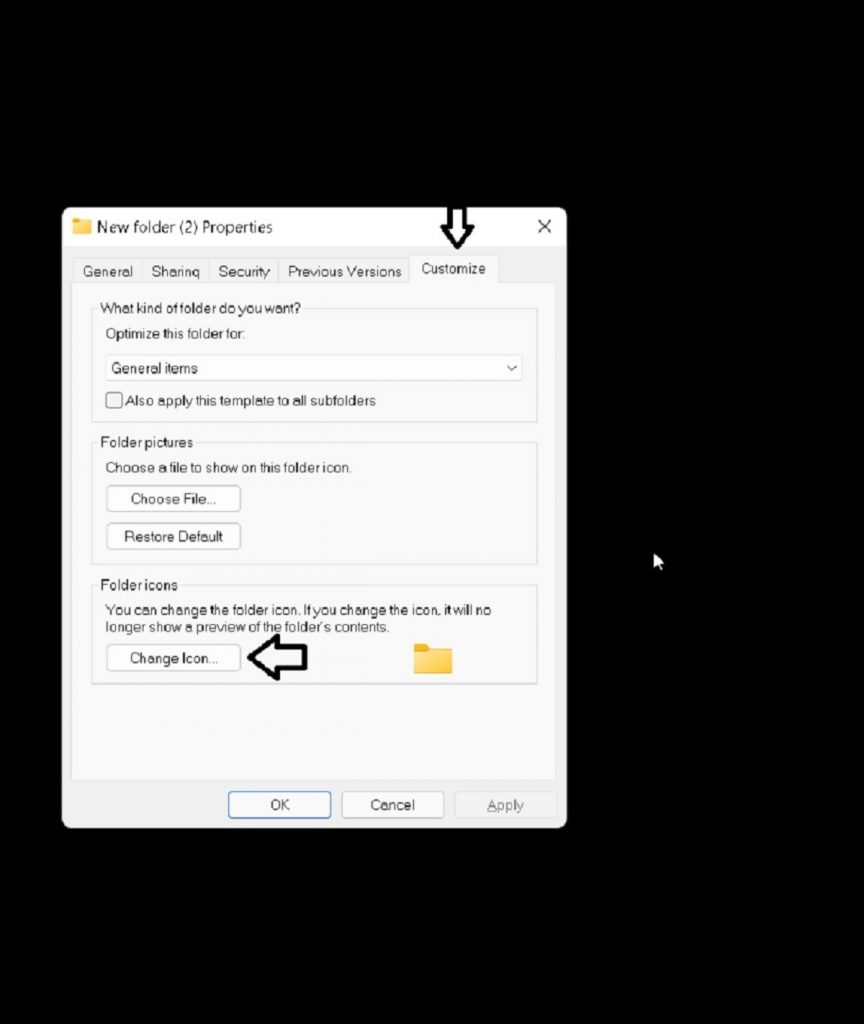
- Select Properties from the menu.

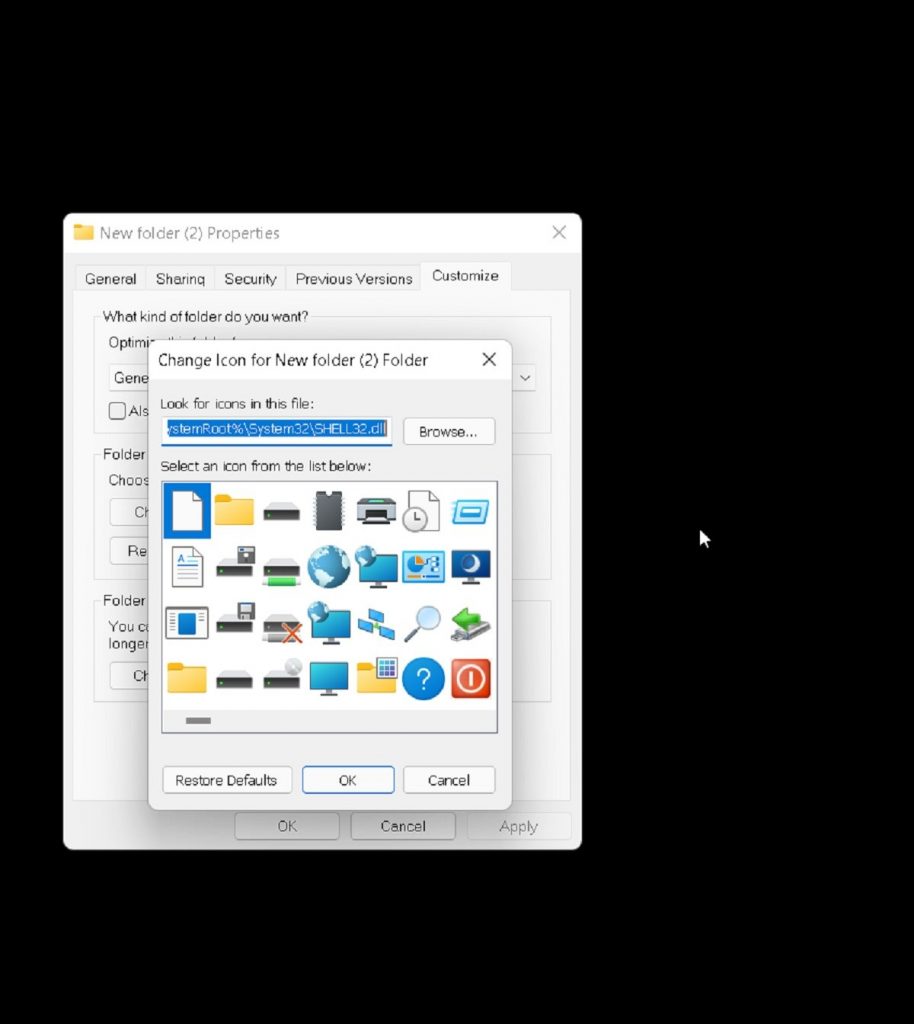
- Select Change Icon from the bottom of the Customize tab.

- Scroll through the list to find the icon you want to use. When you’ve made your decision, click OK on a selection.

- On the Properties window, click OK once more to save the changes and return to the folder in File Explorer.
- The new folder icon is instantly reflected. If it isn’t, force it to change by clicking the refresh button near the file path at the top of File Explorer.
Also Read: Top 11 Fixes For 0xc0000142 Error Windows 11/10
3. Changing Desktop icons
Go to Settings to change the desktop icon folders for the Recycle Bin and other special folders.
- Go to the Settings menu. The WIN+i.
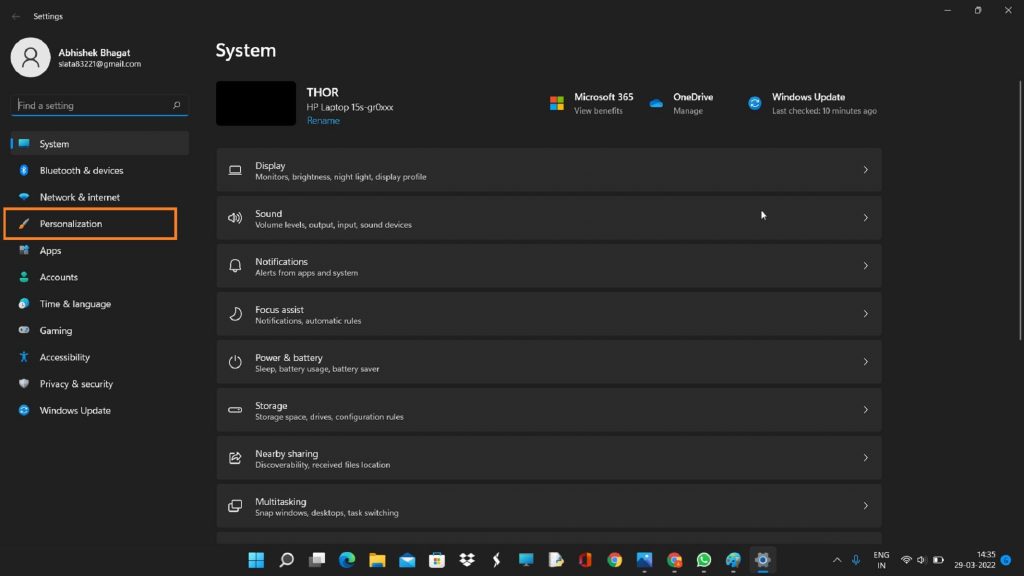
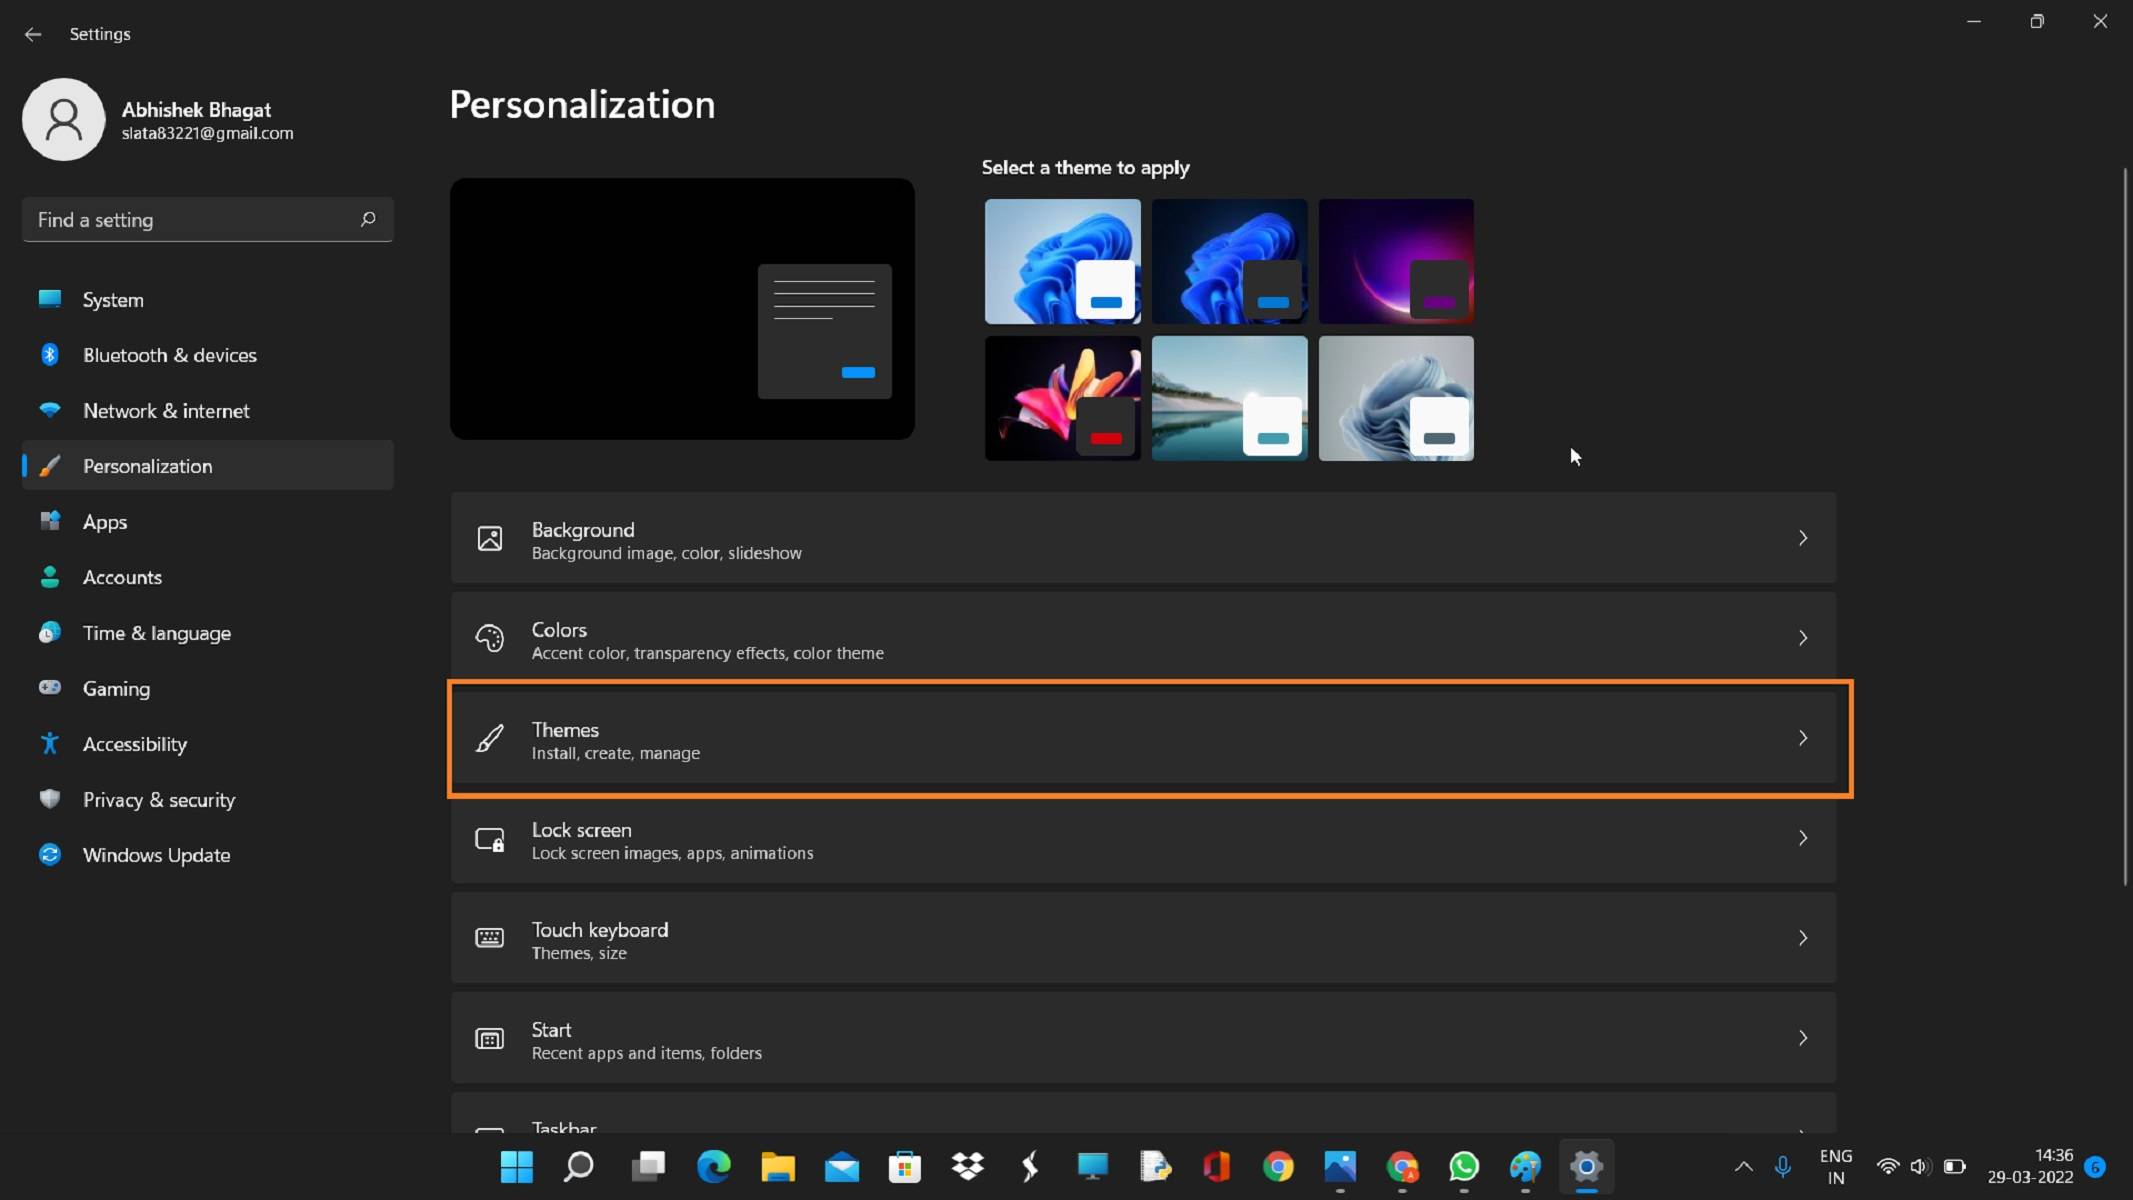
- From the left-hand menu, tap Personalization, and then Themes from the right-hand menu.


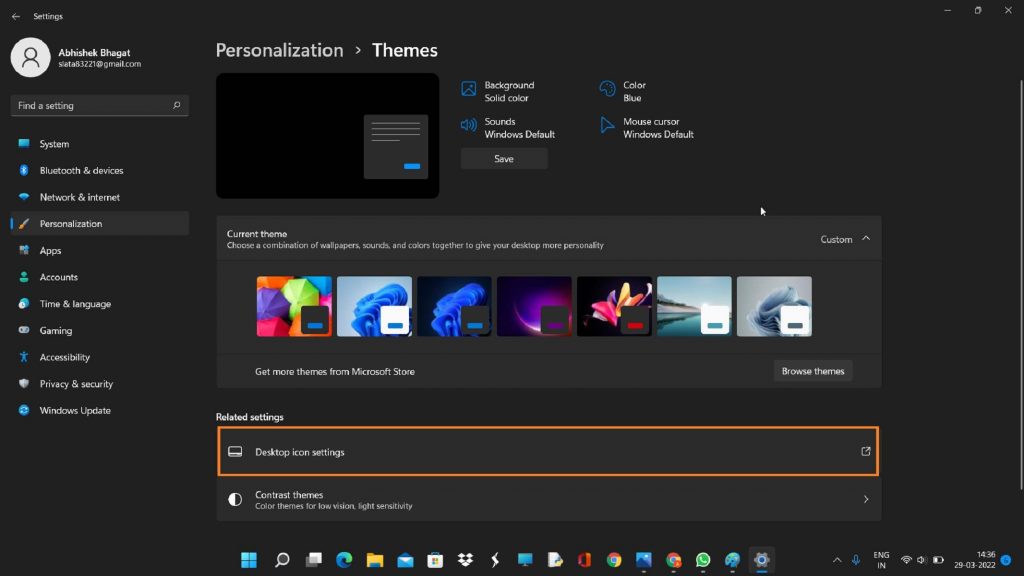
- Select the Desktop Icon Settings option.

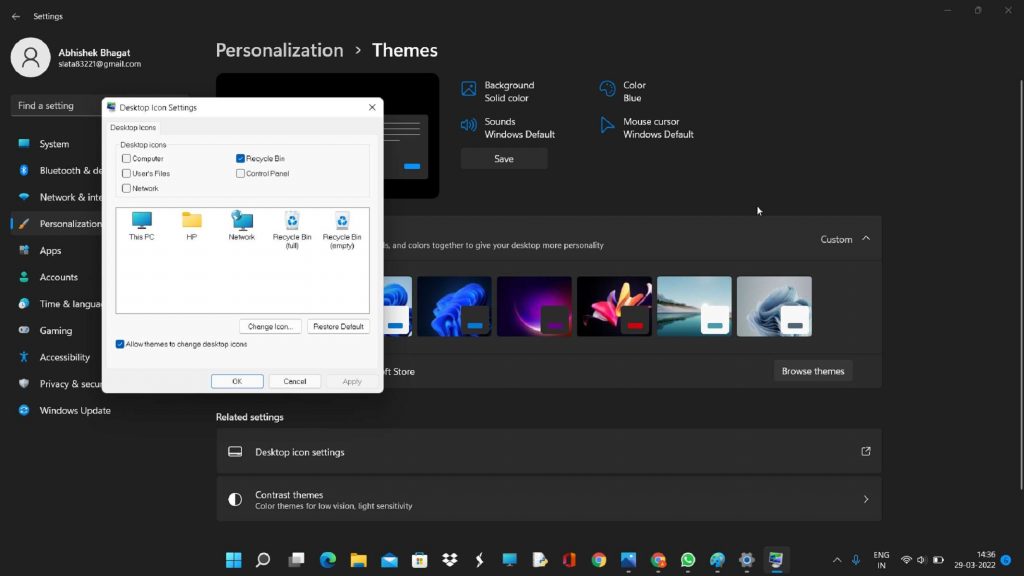
- Choose one of the desktop icons, then Change the Icon to switch to a new icon.

- To save, select OK on the open windows.
4. Change Hard drive icons
The hard drive icon is another folder-like icon that you may change in Windows 11. You should make the change in the Windows Registry because there isn’t an easy-to-access setting for this.
- Copy the path of the ICO icon file you wish to use. To copy a file to the clipboard, just right-click it and select Copy as path.
- From the taskbar, type Regedit to open Registry Editor.
- Find your way here using the registry keys on the left side of Registry Editor:
HKEY_LOCAL_MACHINE\SOFTWARE\Microsoft\Windows\CurrentVersion\Explorer\DriveIcons - From the left pane, right-click DriveIcons and select New > Key.
- Whatever drive letter corresponds to the drive for which you’re altering the icon, give the key that name. If the drive letter is C or D, for example, call it that.
- Make a new key named DefaultIcon by right-clicking the letter key you just made (New > Key).
- Double-click the (Default) registry value from the right pane when DefaultIcon is open.
- Paste the path to the icon file you copied earlier into the Value data text box that’s now open.
- Paste the path to the icon file you copied earlier into the Value data text box that’s now open.
5. Shortcut icons
Adding a shortcut for folders and applications makes things very easy and simple on any operating system. Users can alter the icon for a shortcut in Windows and this works for all sorts of shortcuts including a shortcut to an app, folder, or even Command Prompt command. Here are the steps to customize any shortcut icon:
1. Go to your ‘Desktop’ and select the shortcut you wish to change the icon for
2. Right-click the shortcut and select ‘Properties’.
3. On the ‘Shortcut’ tab, select the ‘Change Icon’ button.
4. This opens the standard ‘Change Icon’ window you saw above.
5. Now follow the same steps as listed in the above ‘Desktop Icon’ option to select the icon and apply settings.
Also Read: How To Set Up Microsoft Family App On Windows 11
6. Change icons with custom images
The options listed for icons on the computer are limited and many of you may want to add custom icons. It’s pretty simple, all you have to do is download the icons from the web, and then convert them to ICO format. You can download creative icons online or convert any other picture into the ICO format, and set it as the icon.
After you have downloaded the icon files in PNG format, it’s time to convert them to ICO, a format recognized by Windows for icons.
Now, transfer the ICO files to a separate folder and make sure you don’t move them around since it would lead to problems locating them for Windows.
After you have the required images in ICO format placed in a designated folder, it’s time you start changing the icons. The process remains pretty much the same as earlier but instead of choosing one from the list of options, you would have to browse and select the ICO file.
We will walk you through the process of changing the icons for folders and with the same concept, you can easily change the icons for others as well.
To change the icon to a custom one, right-click on the folder and select ‘Properties’ from the context menu. Alternatively, you can select the folder and press ALT + ENTER to launch the Properties.
Now follow the same steps as listed in the above ‘Desktop Icon’ option to select the icon and apply settings.
Conclusion
In this guide, we took you through why you should change folder icons and how you should change your icons. I hope, this helped you. In case you are stuck in any trouble, feel free to contact us through the comments section.


