Is Your Mac Running Slow After macOS Sierra Upgrade? Or CPU Overheating With The Fans Running At a Blazing Fast Speed? Don’t Worry, We Will Help You!
Almost everyone of us have upgraded their Mac to macOS Sierra by now and some of us have felt that the computer is running slower than it should be. If you have also noticed a degradation in performance after upgrading to macOS Sierra or fan running with a blasting speed , there is likely a good reason for it or you need to perform some simple check to troubleshoot the slow performance hit after upgrading to macOS Sierra. After reading this article, you will be able to answer the following questions:
- Why my Mac is running slower after upgrading to macOS Sierra?
- Why do I see a beachball sign and my Mac respond very slow?
- Why the macOS Sierra is very slow?
- How to turn iCloud drive off to fix slow performance?
- How to find the Faulty app or process causing the slowness?.
- Is FileVault causing the slow performance on macOS Sierra?.
- How to repair disk permission to fix slow Mac?
Read this article to learn why macOS Sierra may be running slow or overheating with CPU fans running at blazing fast speed ever since you upgraded to macOS Sierra.You must know what to do about it as your Mac may not be running smoothly or it may be literally crawling on you. Go through the each steps mentioned below in the same order as it is written to make your Mac run faster again. For those whose Mac is running slow due to low disk space or whose startup disk is almost full can jump directly to step #12 to fix slow Mac due to low space on startup disk.
#1. Check if your Mac is working on Spotlight Indexing after upgrade
Yes, indexing in your Mac is exactly the same thing as indexing in a book. This is a necessary task that your Mac must complete after upgrading to macOS Sierra, to use all of its features. Indexing is used to quickly locate data without having to search though every row in a database table. It collects, stores and parses data to facilitate fast and accurate information retrieval.
macOS Sierra comes with some outstanding features like facial recognition that lets you search people in photos, identify places, features, faces and other landmarks. Siri is another new feature that works on voice recognition technology, which can accept your voice command and search through your Mac. So your Mac has to index information from your photo library for identifiable features and faces, iTunes library for songs and artists, Mail, Messages and all the documents. Indexing normally takes quite a while to complete before it can be used with Spotlight and Siri but it can take a very long time if you have a large photo library and a large hard drive with a ton of files causing your Mac to run slow while it is indexing. So just let the indexing complete itself, interrupting it will cause Spotlight to not work properly, and it will just attempt to re-index again anyway. After the indexing is completed your computer should be back to normal.
To check if your Mac is working on Spotlight Indexing click on the Spotlight icon ( Looks like a magnifying glass ) on the top right hand corner of the screen and just type anything. It will show the status as indexing.
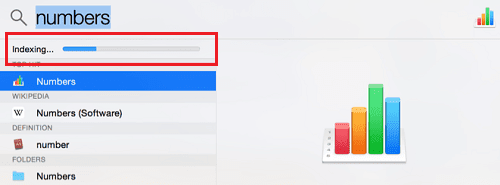 |
| Mac runs slow after macOS Sierra upgrade- Indexing |
If your Mac is not indexing and it is still running Slow after upgrade then move on to the next step.
# 2. Check if your Mac is taking Time Machine backup
Time Machine is an automatic backup utility in macOS Sierra. After upgrading your Mac, the operating system files and settings are changed and so Time Machine would also start taking backup of new macOS Sierra and everything on your Mac as a fresh which would take a considerable amount of time depending upon the number of files and their sizes. Though Time Machine Backup process has got low CPU usage priority but it still uses the memory and resources to read and write data. Sometimes this Time Machine gets in the way of spotlight indexing and they both runs at the same time which makes your Mac go haywire. Time Machine may also get stuck causing your Mac to run slower. You may want to stop the the Time Machine backup process temporarily and resume it later once everything else has finished doing their job and Mac runs faster.
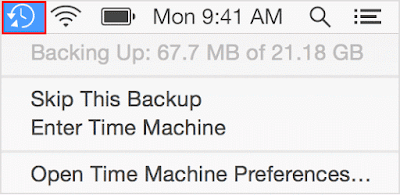
Click on the Time Machine icon up at the top next to Wi-Fi or battery icon to check if you Mac is backing up your data.
 |
| Slow macOS Due to Time Machine Backup |
If the backup is going on, then choose ” Open Time Machine Preferences… ” and see the “time remaining” below the progress bar. If it shows more than 10 minutes then click on the ” X ” icon next to progress bar to stop it temporarily. This will definitely help finishing spotlight indexing sooner.
 |
| Slow macOS Due to Time Machine Backup |
Check the performance of your Mac after the Spotlight indexing and Time Machine Backup is completed. If it still runs slow then follow the next step.
# 3. Verify macOS Sierra’s Compatibility With Your Mac
Sometime we just install any updates coming into our way without verifying its compatibility and adverse effect. It might be possible that your Mac is not compatible with the macOS Sierra. Your Mac must meet the following minimum hardware requirement to run macOS Sierra properly otherwise you will have various problems and challenges that include Slow macOS Sierra after upgrade.
Minimum RAM ( Memory Stick ) : 2GB ( 4GB would be Recommended)
Available Space on the hard drive : 8.8GB of available storage
You must have the following Mac model
- MacBook (Late 2009 or newer)
- MacBook Pro (Mid 2010 or newer)
- MacBook Air (Late 2010 or newer)
- Mac mini (Mid 2010 or newer)
- iMac (Late 2009 or newer)
- Mac Pro (Mid 2010 or newer)
If you have a 2GB RAM, I would suggest you to install more memory at least 2GB more to make your Mac run better. If your Mac is older than above mentioned model then consider downgrading it to previous version that you had. If your Mac meet all the requirement as mentioned above then move on to the next step.
# 4. Boot your Mac in Safe mode
It is always a good practice to start your Mac in safe mode when it doesn’t work well or runs slower. Safe mode in Mac is different than Safe mode in Windows, as your Mac attempts to fix problems while booting into safe mode. So start your Mac in safe mode by holding the Shift key down during boot up and compare how your Mac works in Safe Mode to how it was in normal mode. Restart the Mac in normal mode again without holding any key and see if the problem persists.
- If the issue doesn’t come back, it was probably caused by a cache or directory issue with your startup disk, which safe mode fixed.
- If the issue comes back, you might have incompatible login items or some Antivirus or such programs causing your Mac run slower. Follow the next step to fix them.
# 5. Uninstall Any Antivirus or Such Security Software Causing Slowness
Mac has been known for its inbuilt security against Viruses and Malwares and being a Unix based operating system it is Sandboxed (Computer Security). Apart from that, it has got its own security called Gatekeeper to block any software that hasn’t been digitally signed and approved by Apple to run on your Mac without your agreement from being installed. So third party Antivirus Software are not required on Mac and they tend to cause More issues than they claim to fix.
But remember it does not mean that the Macs are not hackable, they can still be exploited by newer types of threats like adware or malware. These threats can not harm your file but can annoy you to buy something or stop you from doing something by showing a lot of pop ups and weird search engines causing your Mac run slower.These malware and adware can be removed easily by running Malwarebyte for Mac once in a while or every time you notice their suspicious activity. So you are not required to install any Antivirus on your Mac as their so called real time protection or shield will keep hogging your CPU and computer resources all the time causing frequent slowness and other problems. Uninstall all of these Antivirus thing using their uninstaller or removal tools. Download the removal tools for some the majorly used Antivirus from below link and run it.
Sophos Antivirus Uninstaller – https://community.sophos.com/kb/hu-hu/121206
Avast Uninstaller for Mac- https://www.avast.com/download-thank-you.php?product=MAC-FREE-AVAST
Norton Uninstaller for Mac – ftp://ftp.symantec.com/misc/tools/mactools/RemoveSymantecMacFiles.zip
Mcafee Uninstaller for Mac- Removed by uninstaller program that comes with the Antivirus.
ESET Antivirus Uninstaller For Mac – http://support.eset.com/kb3239/?locale=en_EN
ClamXav Uninstaller For Mac – http://www.clamxav.com/clamavEngineREMOVER.zip
Bitdefender Uninstaller Tool for Mac – http://www.bitdefender.com/files/KnowledgeBase/file/Uninstaller.zip
Trend Micro Uninstaller For Mac – https://esupport.trendmicro.com/en-us/home/pages/technical-support/1061005.aspx
# 6. Scan Your Computer With Malwarebyte For Mac
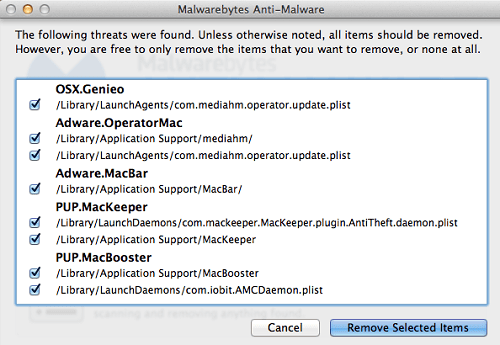
Malwarebyte for Mac, previously known as Adwaremedic is a light and lean but very powerful software. It scans for and removes all harmful software and their codes that degrades performance or attacks your system. It only takes 8.4MB of space on your hard drive and runs at ultra fast speed. It does not have any real time shield protection or any such technology that keeps utilizing your CPU and resources all the time. You just need to runs it once in a while and it cleans all the malware and adware from your Mac making it faster again. I would recommend you to download Malwarebyte for Mac and keep it in your system.
 |
| Run Malwarebyte on Slow macOS Sierra |
Install Malwarebyte and open it >> Select Scan and wait for the results. Within few seconds it will show you the results with all the detected malware, spyware and adware already checked.You just need to click on remove selected items at the bottom to remove harmful apps or their code causing your Mac run slower. Make sure you check the list and just uncheck the one that you want to keep, though I have never seen Malwarebyte detecting useful software as a threat so the list is always correct and you should click the button “ Remove Selected Items“.
 | |
|
Restart your Mac after removing threats and check if it works fine. If it is still running slow after upgrade, follow the next step.
# 7. Remove Unwanted or Unnecessary Applications from Your Mac
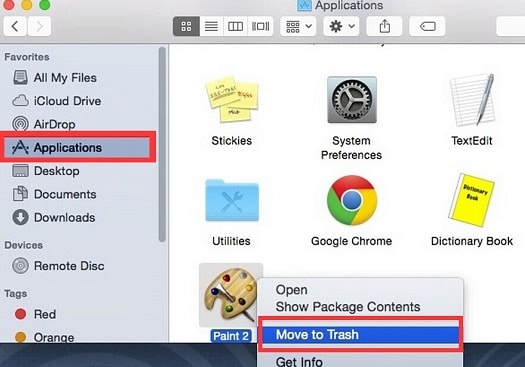
It is kind of a natural instinctive behavior in humans that we always want to grab things which are available for free and believe easily on whatever is shown to us by digital media. And because of this very reason we download and install so many free software thinking they would help finish the job easily or make the system faster. But remember most of them are considered akin to malware or adware and are unnecessary. An example of them are Mackeeper, MacBooster, CleanMyMac, TuneupMyMac, Disk Diag, Zip Cloud, Cocktail and etc.They are not required at all because you already have a similar tool by Apple to curb their needs. If you have any of these software or akin to them, they might be the reason of your Mac running slower. So open the Application folder and find such program that are harmful or the one you have not been using for a long time and move them to Trash.
 |
| Slow Mac after Sierra Upgrade-2 |
# 8. Remove Unnecessary Login Items To Fix Slow Startup
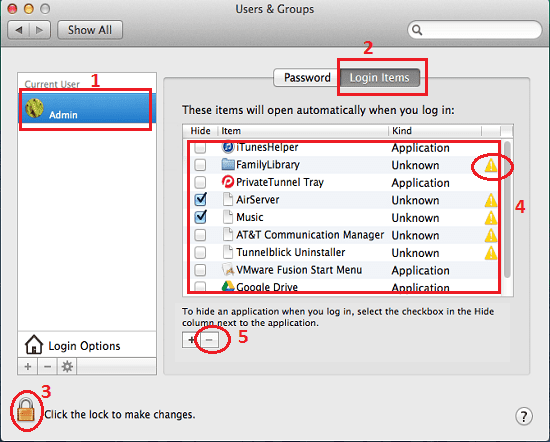
Startup items, or login items, are services or applications that are set to launch every time you start your Mac. Programmers use the startup items to start the necessary services to load some programs in the background beforehand. You can also add any application to login items list to start it automatically as soon as your Mac is turned on. But remember if you have so many startup or login items, it weighs heavily on your Mac ‘s processor and memory capacities and slow it down. You can remove all or some startup items leaving just the necessary one to fix slow macOS Sierra bootup. Sometimes when you uninstall any application or services, it leaves a login item with a broken link showing an exclamation mark. You must remove them as they are completely useless and slow the computer when macOS looks for those non-existent applications to load at startup.
To remove startup items on your macOS Sierra :
- Click on the Apple icon and choose System Preferences.
- Open Users & Groups applet from System Preferences >> Select your user account on the left.
- Click on the Login Items tab on the right pane.
- Click the lock icon at the bottom and enter your password.

Remove Login items to fix slow Mac after macOS Sierra upgrade - Select the startup / login items in the list and click on the delete button ( ” – ” minus sign) at the bottom to remove them. Remove them all as they can be added again if required. I would recommend you to just leave items related to your dial-up connection, VPN connection, Fitbit app, Tom Tom app or any similar app that you need to start along with the Mac.
# 9. Check and Remove Unnecessary Items from Launch Agents and Launch Daemons
LaunchAgents and Launch Daemons are two designated folder provided by Apple for the developers to launch any application or script or task automatically at the time of boot up or at the time of login or run every so often or at a certain date and time and so on. They both are managed and loaded into memory by ” launchd “ process and contains XML files called plists. The only difference between them is the time they are loaded. LaunchDaemons loads while the system boots whereas LaunchAgents loads later when a user logs in rather than at system boot. Removing unnecessary items from LaunchAgents and LaunchDaemons can help fixing slow performance of Mac. LaunchAgents has three different locations as mentioned below.
Library/LaunchAgents/ – (For all users)
/Library/LaunchDaemons ( For All Users)
Most of the apps create their startup entry in these two folders so you might want to delete the unnecessary items from these locations to stop such apps or script from loading at startup or at login causing your macOS Sierra run slower.You can remove all the items from “~/Library/LaunchAgents “ without any worry as this is a user specific folder however be careful when removing anything from “/Library/LaunchAgents” or “/Library/LaunchDaemons” as they also contains important OS X related files and licensing information for some programs such as Microsoft Office which keeps the licensing information in a file called ” com.microsoft.office.licensing.plist “and “com.microsoft.office.licensing.helper.plist” in these two folders. Removing those plist may cause Microsoft Office to not work or activate again. It is advisable not to touch them if you are not aware of what these files are and what is it used for. Only remove plist files related to a problematic app that causes troubles on Mac startup or slowness.
To open LaunchAgents or LaunchDaemons:
- Click on the Go menu at the Top and select “Go to Folder..”
Remove LaunchAgents to fix Slow Mac after Sierra Upgrade - Type the path you want to go to and hit Enter/Return.
Slow Mac after macOS Sierra upgrade -3 - Check the plists of the harmful program causing slowness and move them to trash.
- Restart your Mac and check if the problematic app has been stopped from running at startup.
# 10. Turn iCloud Drive Off
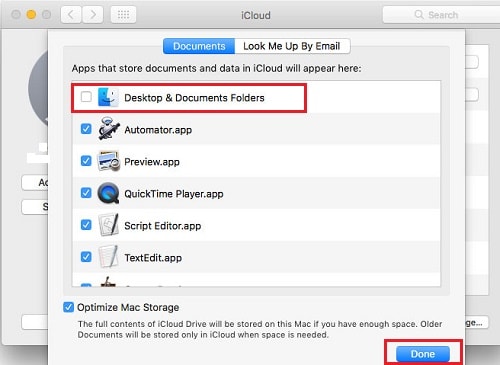
iCloud Drive is the another big reason why your Mac is running slower after upgrading to macOS Sierra. With macOS Sierra, Apple introduced this new feature that allows you to add files from your Mac Desktop and Documents folder to iCloud Drive automatically. While upgrading to macOS Sierra, you’re asked if you want to sync your Desktop and Documents folders with iCloud. If you turn this feature on, your Desktop and Documents folders are really moved to iCloud Drive which can be accessed from the left sidebar in Finder. So every time you open a file from Desktop / Documents or save it to Desktop / Documents, it synchronizes the file with iCloud Drive across all the devices.
Though this is a great feature but due to dependency on internet and iCloud services it ends up putting extra pressure on Mac CPU and resources because downloading and uploading a file from iCloud get more services and resources engaged to achieve the task as compared to the number of services and resources engaged in accessing the files locally. Also, it becomes more problematic when someone has a slow internet connection or using a dial up connection in remote areas.Another drawback is the limited storage available from Apple until you buy additional space. Every user gets 5GB of free iCloud Storage so if someone has a ton of files weighing more than 5GB, he could not move them all to iCloud Drive but macOS sierra will keep checking if space has become available on iCloud drive to move the files which wastes the CPU and resources and slow your Mac down.
So turn off the iCloud Drive and check your computer’s performance, if it runs faster or performance improves then turn it back on and only back up the stuff you need and leave the Desktop and Documents options unchecked. Compare the performance again or just turn the iCloud Drive off again if your Mac runs slow.
To Turn iCloud Drive Off:
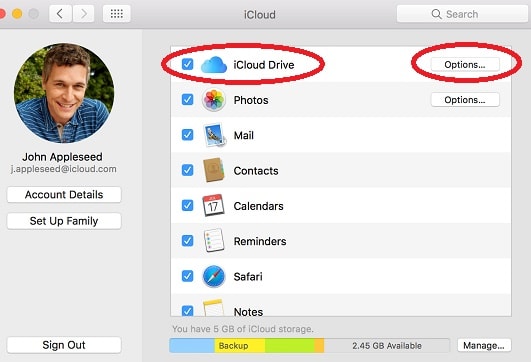
- Go to Apple menu > System Preferences and select iCloud.
- Uncheck iCloud Drive from the list.

iCloud Drive Slowing the macOS Sierra after upgrade - If you just want to turn Desktop and Document synchronization off then click Options next to iCloud Drive.
- Uncheck the Desktop & Documents Folders and click Done.

iCloud Drive Slowing the macOS Sierra after upgrade
# 11. Verify and Repair Your Mac’s Startup Drive With Disk Utility’s First Aid
Another important step in fixing your slow macOS Sierra after upgrade would be to run the built-in disk permission repair tool called First Aid for hard drives. I highly suggest you to repair disk permissions by running First Aid on your Mac’s startup volume as it solves hundreds of problems and repair corrupted OS X files causing slow Mac.
Every drive has several physical and logical components which are involved in reading and writing Data on a hard drive. Most of the logical components are hidden invisible files like, Allocation File, Catalog Files, Volume Header, Attributes File, Log Files of metadata, Access control lists and etc. Access control lists store permissions information of a file,that determine who can read or write to this file and which user should be denied from reading its contents. A permission allows one application to “talk” with another application and so OS X wants permissions and ownership to be accurate and enabled to function properly. Disk Utility’s First Aid feature checks all those permissions and files in order to repair the corrupted or altered ones. So you must run the First Aid on the startup disk to repair drive’s data structures and to improve computer’s performance. However, the repair to the startup disk can not be performed until the selected drive is unmounted. Your Mac’s startup drive can’t be unmounted since it’s in use so you must restart your Mac in recovery mode by holding the ” CMD + R” during bootup and run the repair from recovery mode to fix hard drive errors causing your Mac running slow. If your Mac can not boot to the recovery mode you will need to boot your Mac from any OS X install disk.
To Run Disk Utility’s First Aid on macOS Sierra ‘s Startup Drive:
- Open Disk Utility (through Spotlight or in Applications/Utilities), choose your Startup hard drive on the left which is mostly named as Macintosh HD.
- Click on the “First Aid ” and click Run.

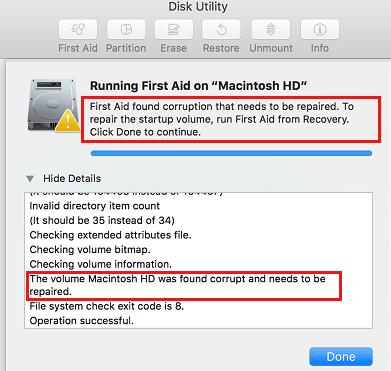
Run Disk Utility to Fix Slow Mac after upgrade to macOS Sierra - It the drive has no problems then disk utility will report that the drive appears to be OK, or that the drive has been repaired, and you’re done.

Run Disk Utility to Fix Slow Mac after upgrade to macOS Sierra -1 - If an error is found, First Aid will display the error, but make no attempt to repair the drive. It will suggest you to try repairing it from Recovery Mode.You must repair the drive in recovery mode in order to fix the slow running Mac, post upgrading to macOS Sierra.

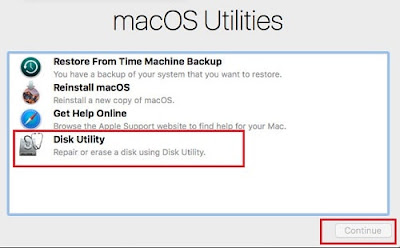
Run Disk Utility to Fix Slow Mac after upgrade to macOS Sierra -2 - Turn off the Mac and restart while holding ” CMD + R ” keys together.Let go off the keys when you see Apple logo.
- Select Disk Utility and click continue.

Run Disk Utility to Fix Slow Mac after upgrade to macOS Sierra -3 - Select the startup disk Macintosh HD on the left and click on the First Aid from the main menu on the right.
- Click run to repair the hard drive.
- If Disk Utility reports that it can’t repair your disk, try to run the First Aid again.
- If that doesn’t work, back up your data, format the disk and reinstall macOS Sierra.
- If the problem continues or it can’t be repaired, it may be physically damaged and need to be replaced.
Reboot the computer after repair is complete as 80-90% of the times reboot itself fixes slow Mac issue, because it flushes RAM, stop memory leaks, fixes small errors and installs any pending updates. Follow the next step if your Mac still runs slow ever since you upgraded to macOS Sierra. If you are getting any other message read this post by apple on how to use Disk Utility to fix hard drive errors.
# 12. Free Up More Space on the Startup Disk
The startup disk is the hard drive with macOS on it which your computer boots from. Most Mac users have just one disk so that internal disk becomes the startup disk for them. This is the hard drive your macOS uses all the time while running any app, browsing internet, checking emails or doing any other task, so it also collects a lot of junks, logs, caches, cookies, error logs, unwanted apps, duplicate files, old backups, unused languages and etc. These unwanted files and junks eat up a lot of precious space on your startup disk over time and shrink the room space available for macOS Sierra to work properly which causes several other problems including slow Mac. Your macOS may also report some errors including startup disk is almost full. Free up disk space as much as possible otherwise it can lead to data loss if the drive becomes so full that the OS cannot even boot. To fix this slow Mac issue caused by low disk space on the startup disk, you just need to delete or move files from your Mac. Follow the steps mentioned in the post ” macOS Sierra: Your Startup Disk is Almost Full” to fix slow Mac and recover space on your startup disk.
# 13. Disable automatic update from the App store
Though, updates are important for your Mac and fixes so many other problems including slow performance of an app or the whole computer but you may not want your Mac to sync up for updates at the wrong time specially when you are running intensive memory hogging software like iMovie, Adobe Premiere, Photo Booth or any similar video or picture editing software. Turning automatic updates off from app store will stop them to sync up automatically in the background and you can check for those update manually once in a week and install the update whenever you want. This will improve the performance of your Mac a little and fix slowness caused by Automatic updates.
To Turn Automatic Updates Off and do it manually:-
- Click on the Apple menu and choose System Preferences.
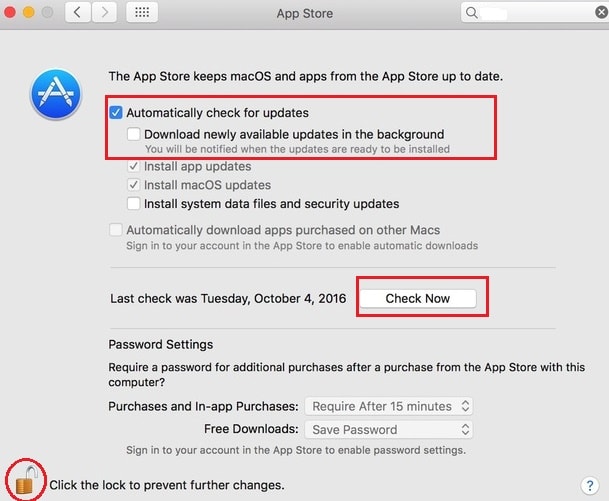
- Click on App Store and open the lock at the bottom left corner.
- Uncheck the box for “Download newly available updates in the background” and “Automatically Check for Updates” if you want to stop automatic update.

Mac Slow down due to Automatic Update - Click the box “Check Now” at the same page whenever you want to check for updates manually.
- Open App Store and go to the updates tab to look and install all or selected updates.
# 14. Turn off the Glamorous Feature of macOS Sierra
Mac has been known for its top class fresh looking glamorous and eye candy features. While a glamorous look is always exciting and attractive but sometimes they really take a toll on your Mac’s performance specially when it’s already struggling with the memory and processor hogging apps.
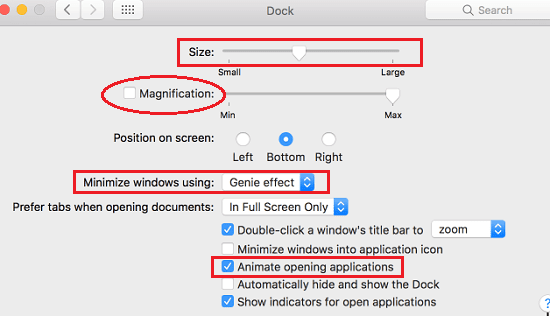
Some features like transparency, animation while opening application, notifications and magnification in dock are some examples of them which you can get rid of because the more the operating system has to deal with the more it slows down. Here are the few actions that you can take to reduce the utilization of processor and memory in order to fix slow macOS Sierra after upgrade.
1. Optimize the Dock:
- Click on the Apple menu and choose System Preferences.
- Click on Dock.

Optimize the Dock on slow macOS Sierra after upgrade - First of all move the slider for size to the left to decrease the dock size.
- Uncheck Magnification box to turn it off.
- Select ” Scale Effect ” under ” Minimize windows using” option to turn animation off.
- Uncheck the box next to “Animate opening applications“.
- Change the ” Prefer tabs when opening documents” to the Always option. This will cut down on the memory usage by opening every documents of the same application as a tabbed document under just one app session rather that opening a new app session with every new documents.Almost every app supports tabbed view.

Enable Tabbed View on slow macOS Sierra after upgrade
2. Reduce the transparency and reduce motion
- Go to system preferences >> open accessibility,
- Select Display and check the box for ” Reduce transparency ” and ” Reduce Motion “.
Reduce Transparency on slow macOS Sierra after upgrade - This will immediately change the appearance of Mac windows, Dock, Titlebars, Sidebars, and other UI elements and you will definately find the difference in performance.
- Go to Finder >> Preferences.
- Click on the General and make sure “Open folders in tabs instead of new windows” is checked.
- Uncheck “Connected servers”.
Optimize Finder on Slow Mac after Sierra update - Go to sidebar and uncheck the items you do not need to load while opening the finder which makes finder’s work load lighter.
# 15. Optimize Notification Center to Save more memory and resources
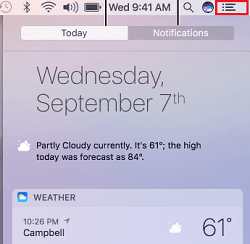
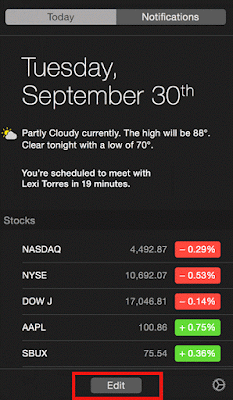
This is the another step in optimizing slow macOS Sierra after upgrade.Notification Center lets you view details about your day—appointments, weather, birthdays, notifications from Facebook or Linkedin and catch up on notifications you missed. With the macOS Sierra it has become more powerful that you can ask Siri to find something and pin it to notification center for later use. You can drag and drop any picture, document or widget to and from notification center. It can show you the mail preview or remind you to call someone. Most of the apps use the notifications to let you know about events, updates, or changes, that appears in notification center too. But if you are not using them all or do not need it, it is better to remove or disable some or all of the app notification and widgets to save your Mac’s processor and resources.
 |
| Optimize Notification Center if your Mac runs slow after macOS Sierra upgrade |
Notification Center can be accessed by just clicking the three parallel lines next to spotlight at the top-right corner of your screen or by swiping in from the right side of your Mac’s trackpad with two fingers.
Optimize Notification Center in order to fix slow macOS Sierra after upgrade:
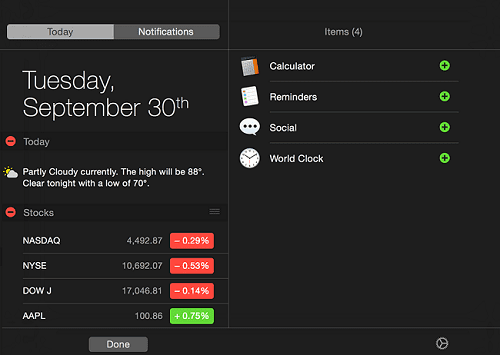
1. To Remove a Widget from Notification Center : Click Edit at the bottom of Today view >> Click the Remove button ( ” – ” Sign) to remove it and the widget is moved to the list of available widgets.
 | |
|
 | |
|
2. Turn off notifications for an app:
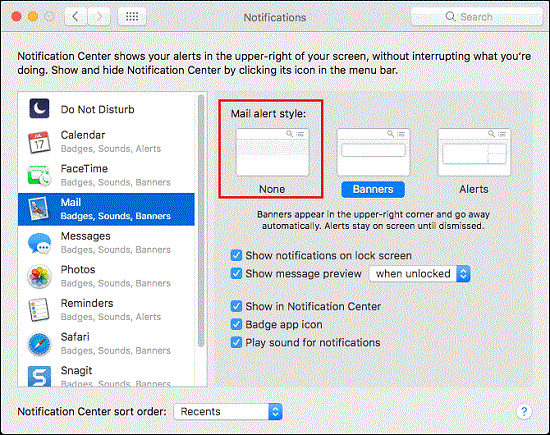
- Go to system preferences >> Click Notifications icon.
- Select the app on the left, then choose None for the app alert style on the right. You will no longer receive any notifications for that app.
 | |
|
# 16. Remove Unwanted Dashboard Widgets
There are so many widgets available for Mac that you can download and install in your macOS Sierra. Your Mac comes with several widgets that you might have used and left running in the background. Every widget uses your Mac’s memory and resources so removing them from dashboard will definitely contribute in improving system’s performance. You can remove weather, stock and other widgets that you don’t need as you can find these information anytime from spotlight or on internet.
To remove unwanted Dashboard Widgets:
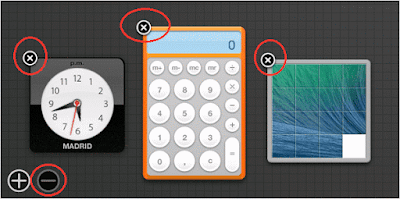
- Press F12 to get to the Dashboard or Press Command + Spacebar to get the spotlight search and type Dashboard to open it.

Remove unwanted Widgets on Slow running Mac after Sierra upgrade - Click the delete ( “-” Minus button ) at the bottom left corner and the you will see a cross simbol on top left corner of each widgets.
- Click the x symbol on the widget to remove it from Dashboard in order to fix slow macOS Sierra after upgrade.
# 17. Remove Apps in Preference Pane
A Preference Pane is a dynamically loaded plugin in macOS often installed by a third party software to allow users to change settings or preferences for that particular software in graphical user interface.This plugin is a small program which loads in the memory and runs in the background. Sometimes these plugins are left even after uninstalling their core applications which pop up error messages and causes slow Mac issue. Preference panes are located at the bottom row of system preferences window.You must delete the faulty or corrupted preference pane in order to fix slow macOS Sierra.
To remove a third party preference pane open System Preferences, simply right-click on its icon and select Remove Preference Pane.
Clearing out unused preference panes can help recover memory and disk space, You can either disable it in its menu or delete it completely by removing it from ” ~/Library/PreferencePanes/ ” and ” /Library/PreferencePanes/ “folder.
# 18. Clean Your Desktop
Every little icon on your desktop is a small window that is loaded into memory so that the icons on your desktop should appear to you all the time. So, the more file you have on the desktop the more memory and resources are used. Move all similar files or documents in a folder and organize the desktop.Remove or transfer the unnecessary files from desktop to an external disk.
# 19. Turn Siri Off
I am not sure if this step will help you fixing the slow Mac. Many users have reported that turning Siri off has fixed the slow Mac for them. Though Siri doesn’t consume a lot of memory and CPU but you can check if turning Siri off helps you making you Mac faster. It may not improve the performance that can be noticed . But every bit of this effort is worth doing if it improves the performance. Read the post on how to turn Siri off on macOS Sierra?
# 20. Stop or Delete Spam from Messages App
Messages app on macOS Sierra has some awesome feature that allows you to add a Tapback to message (a quick response that expresses what you think about a message), play videos in message, send or receive animated GIFs, effects and stickers with auto-play feature.You can create groups and start a conversation. If you have any groups or contacts who sends you a lot of GIFs and videos you Messages app has to keep up with all that buzz in order to keep you informed. Despite being a great feature, it can eventually take a toll on system performance by utilizing CPU and memory. So close all that messages windows and keep cleaning those conversation threads or entire Messages app from time to time to help your Mac perform better.
# 21. Turn FileVault Encryption Off
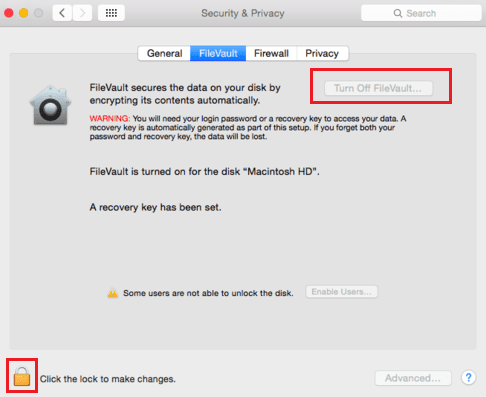
FileVault ( FaileVault 2) is a very secure encryption technology developed by Apple inc. It encrypts the whole startup disk. When you upgrade your Mac to macOS Sierra, you are also asked if you want to enable the FileVault and if you select yes then it will start encrypting the whole startup disk which may take an hour or more depending upon the size of the disk. FileVault uses a lots of processor cycles while encrypting and de-crypting those files causing your Mac run slower. You will also notice significant slowness during startup and shut down. If your Mac is running slow after upgrading to macOS Sierra, check the FileVault and switch it off and see if it improves the performance. Please check this setting first to see if is enabled or not or in process. if your Mac is currently encrypting your hard drive, let it finish. However, once the process is done, you can turn FileVault encryption off.
To Turn the FIleVault Off:-
- Click on the Apple menu and choose System Preferences.
- Open Security & Privacy, then Click on the FileVault tab.

Turn FileVault Off if Your macOS Sierra is slow after turning it on - Click the padlock and type in an administrator password
- Click Turn off FileVault.
# 22. Remove problematic third-party Kexts and extensions and clear the Kexts Caches.
Every new operating System version gets some compatibility issue with some third party hardware or software so does the macOS Sierra. Several users have reported some compatibility issues with macOS Sierra, which is identified and known with some software like Parallels Desktop 11 for Mac and Adobe creative Cloud 2015’s Photoshop doesn’t work, Problem in scanning with Fujitsu’s ScanSnap scanner, Microsoft Ergonomic Keyborad 4000 or some other vendor’s keyboard character misalignment issue, older version of Microsoft office and some Quickbook version cease to work while mouse made by Logitech and Razor are having the most trouble with macOS Sierra causing slow Mac after upgrade. If you also have some hardware or software creating problems with Sierra then try uninstalling it and remove its Kexts ( Kernel Extensions ) file to fix problems caused by them.
Kernel extensions, or kexts are like drivers for a hardware and load at startup. They provide low-level features such as transferring data to and from computer, processing print command or audio and adding support for peripherals. They are normally removed by the uninstaller program provided by their developers, however, sometimes they are not removed properly or left by uninstaller which causes several issue including Slow Mac. You can look for any such third party .kext file under the following locations and move them to trash. Be careful, do not remove anything that you are not aware of otherwise it can cause severe problem.
/Library/Extensions/
/System/Library/Extensions
/Library/Extensions/RazerHID.kext ( For mouse by Razor )
After removing any kext file you must also clear the kext caches. Open Terminal and type the following command to clear the kext cache.
$ sudo touch /System/Library/Extensions
Empty Trash to delete the file and restart the system.
# 23. Reset SMC and PRAM
Resetting SMC and PRAM fixes hundreds of problems including hardware misbehaving (keyboard, lights, fans) and slow Mac despite low CPU load. SMC manages the power specific options and customization that you may have made to OS X ranging from screen brightness levels and settings for peripheral attached to Mac to settings in Energy Saver like auto-dimming based on lighting and power sources, screen sleep behavior, sleep when idle, etc. After upgrading to macOS Sierra, you may need to reset SMC for the setting to become compatible with new OS. Resetting them does not risk the loss of any data or other adverse effect so just go ahead and perform this action without any worry. Resetting NVRAM is generally recommended when you experience issues with screen resolution, startup disk or when kernel process panics.Both of these components are important for your Mac to run it properly, but once they get corrupted, things slow down. If your Mac slow down after sierra update, you should reset SMC and PRAM.
To reset SMC read the post on “How to Reset SMC?“.
To Reset PRAM read the post on ” How to reset PRAM?“.
# 24. Find the faulty, CPU hogging process in Activity Monitor
Activity Monitor in macOS gives plenty of information related to all the apps and their services running in the background. Whenever your Mac slows down open Activity Monitor and check for the faulty app or process which is utilizing the CPU and memory more than it should. Quit the faulty app and check your Mac again. Try running the faulty app in safe mode and contact the software manufacturer if the process causes high CPU load even in the safe mode.
To Open Activity Monitor:
- Go to /Application/Utilities and open Activity Monitor.
- Choose CPU tab from main menu at the top of the Activity Monitor.

Identify the problematic app or process causing your Mac slow down - Now Activity Monitor will show you the list of all the apps and processes running with their respective CPU load. Click the ” %CPU ” column to sort it in ascending or descending order.
- Now the one eating CPU the most will show up on top. Click to select the top most process and click “x ” button at the top left corner to quit that process.
- Observe the performance of your Mac. If the performance improves try using the same faulty app in safe mode and contact the software manufacturer for any update or patch if the issue persists in the safe mode as well.
# 25. Increase Memory ( RAM )
Physical memory (RAM) plays significant role in system performance. A faulty or less memory (RAM) could cause several problems like system crashes, app crashes, failures to boot, slow to perform and etc.The more RAM you get the better your Mac performs. If you have recently upgraded your Mac to macOS sierra and experiencing slow performance issue, you might have low memory for macOS sierra to perform better for your usage patterns. Sierra must have at least 2GB of memory in order to be installed on a Mac, but 4GB is recommended if you are running video editing software or doing multitasking with several windows of safari opened. If you have already tried the above steps to fix slow running Mac and you still do not see much difference, it is time to upgrade the memory.
How to Upgrade / Replace RAM on your Macbook:
Upgrading memory in your Mac is much simpler than doing it on PC. You just need to be sure about the type and speed of RAM, that your Mac can support, the brand of memory chip (RAM) doesn’t matter at all. Thanks to Apple for providing such a descriptive guide on ” How to remove or install memory ” on your Mac. The article also shows the memory specifications for various models along with an illustrated guide on replacing the memory. You could also refer to some of the YouTube videos to learn how to install or replace memory on Mac. I have linked one of the best YouTube videos by Dom Esposito here below for your reference.
In order to upgrade your Mac’s memory all you need is a Phillips Screwdriver Set ( $10.71) and 8GB or 16GB memory chip( RAM). Amazon is the best place to buy them as it also offers you to compare the pries of different model. I bought the following two for upgrading my MacBook Pro (13-inch, Mid 2012)’s memory. You could buy two memory stick of 8GB each to make it 16GB. Your Mac should work like a charms after upgrading memory to 16GB. Check the specifications of memory module required for your Mac first, before you buy it.


# 26. Reinstall macOS Sierra
If your mac is still running slow even after upgrading the memory, it is possible that your macOS sierra has got some kernel related issues or system file corruption. Reinstalling your Mac will replace the corrupted system files and fix all the issues. Reinstalling macOS Sierra will not risk of any data loss until you do a clean installation.
To Reinstall macOS Sierra:
Restart your Mac and hold down “Cmd+R ” together until you see gray Apple Logo. Make sure you’re connected to the Internet, select your preferred language from the list and click continue. Select “Reinstall macOS ” and click “Continue.” Follow the onscreen instructions to complete the installation.
# 27. Run the Diagnostic Tool and Post the report on this Blog
If you have tried all the above steps and are still experiencing slow Mac issue after upgrading to macOS Sierra. Download and run EtreCheck an Apple Support Community tool. Copy the results to clipboard and Post it here in the comment section and I will help you fixing the slow performance issue.


