Notifications are a helpful feature that can assist you in staying updated and informed about significant events or messages. By customizing your notification settings, you can control which apps are authorized to send notifications. And how those notifications emerge on your screen.
Additionally, notifications appear on your device’s screen to inform you about recent messages, emails, or further updates from different apps and the system. To customize your notification settings, you can access the “Notifications from apps and other senders” section in Windows 11 Settings, where you can establish which apps can send notifications and modify their appearance.
However, if you’re having concerns with notifications or solely want to clear them out. In this guide, you will learn how to reset the “Notifications from apps and other senders” list to its default settings and clear it from your Windows 11.
However, it’s important to keep in mind that taking this action will also result in resetting the settings for all apps and senders to their default state. By doing so, you’ll have to reconfigure your preferences and notification settings for each app and sender from scratch.
Also Read- Change Network Adapter Interface Connection Priority Order In Windows 11
Method 1: Reset and Clear Notifications from Specific apps and other Senders using Regedit
Here are the steps you require to follow to remove a specific app or sender from the “Notifications from apps and other senders” list by utilizing Registry Editor:
Step 1: First, you need to launch Registry Editor by typing “Registry Editor” into the search bar and hitting Enter. After that, in the left pane of Registry Editor, navigate to and expand open the Settings key.
Use this path to navigate to the Notifications settings as follows:
Computer\HKEY_CURRENT_USER\Software\Microsoft\Windows\CurrentVersion\Notifications\Settings
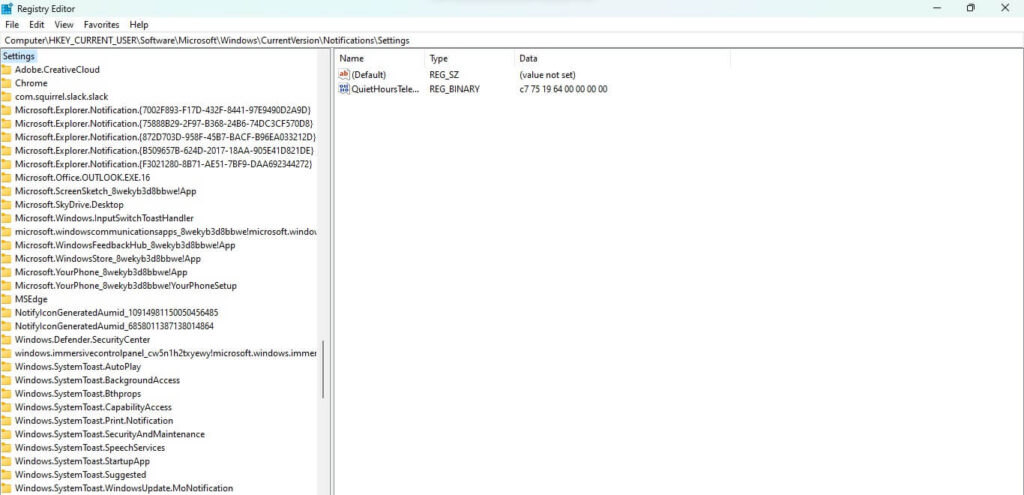
Step 2: Now, you will notice, under the Settings key, locate the app or sender that you want to remove and right-click on it. Then, select “Delete” from the context menu that appears, and click “Yes” to confirm the deletion.
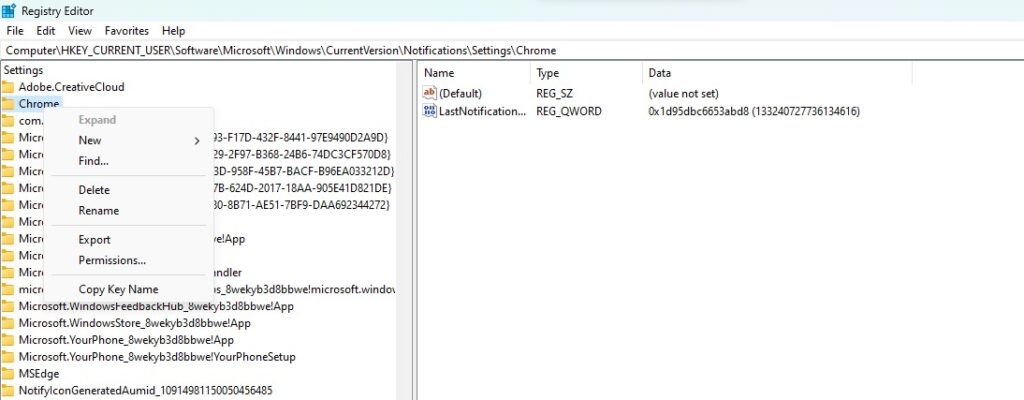
Step 3: If you wish, you can repeat steps 3 and 4 for any additional apps or senders that you wish to remove from the list. Once you have finished removing the desired apps and senders, you can close Registry Editor if you like.
Step 4: After resetting and clearing the “Notifications from apps and other senders” List in Windows 11. It is recommended to close and reopen the Setting app to ensure that the changes take effect.
Also Read- Remote Assistance With Quick Assist App In Windows 11- A Complete Guide
Method 1: Reset and Clear “Notifications from apps and other senders” using Terminal
Here are the steps to remove all app and sender notifications from the “Notifications from apps and other senders” list using Windows Terminal:
Step 1: Begin by opening the Windows Terminal, and choose either Windows PowerShell or Command Prompt based on your preference. You can choose the terminal by right-clicking on the Start menu.
Step 2: Now, you need to copy the following command and paste it into Windows Terminal, then press Enter to execute the command:
REG DELETE HKCU\Software\Microsoft\Windows\CurrentVersion\Notifications\Settings /F
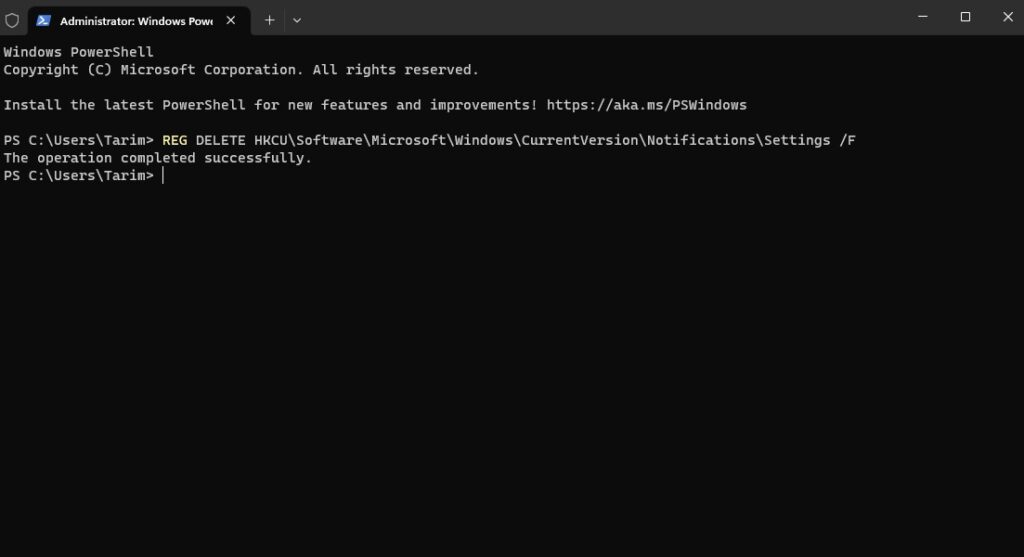
Step 3: If the Settings app is currently open, you should close and reopen it to apply the changes. Once you have confirmed that all unwanted notifications have been removed, you can close Windows Terminal.
Important: This method will remove all app and sender notifications from the list, which implies you will have to configure your notification preferences from scratch. Consequently, it’s recommended that you only use this method if you want to start fresh with your notification settings.
Moreover, if you want to enable or disable notifications from distinct apps as it is specifically useful when dealing with manufacturing apps, social media apps, and other apps that induce endless ads and spam notifications on your Windows 11, disabling notifications from these apps can assist you to stay immersed in your work.
Also Read- How To Change Theme In Notepad App In Windows 11
Disable notifications from individual apps using the Settings app
You can do it from the Settings app. To disable notifications from individual apps using the Settings app, follow the steps given below:
Step 1: Simply open Windows 11 Settings by clicking the Start button or pressing Windows+I.
Step 2: Now on System, you will notice the Notifications settings on the left pane. Just click on the Notification option to configure settings.
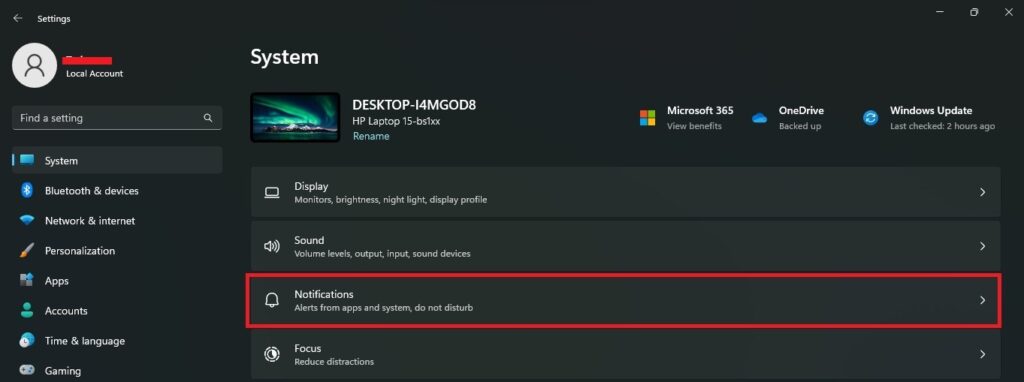
Step 3: Within the Notifications settings page, scroll down to the ‘Notifications from apps and other senders’ section. Now, find the app for which you want to disable notifications and turn off the toggle next to the app listing.
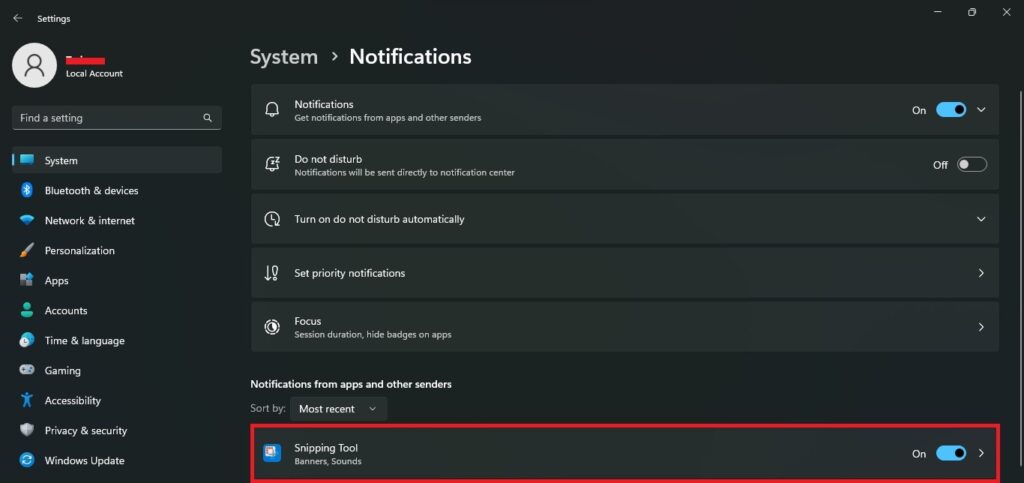
Step 4: This will prevent any future notifications from that app. To enable notifications for the app again, just turn on the corresponding toggle utilizing the same steps.
That’s it! This is how you can Reset and Clear the “Notifications from apps and other senders” List in Windows 11.
Also Read- How To Install Or Uninstall VBScript Feature In Windows 11


