In this article, we have mentioned different solutions to resolve the snap layout not working in Windows 11 issue.
Microsoft rolled out the latest iteration of Windows last year and it brought a bunch of impressive features to the plate. Among several useful features, snap layouts are one such feature that helps organizes different app windows to improve the workflow.
Since it improves efficiency, users are actively using snap layout features. However, several Windows users have stated that they are unable to use the snap layouts feature on their laptops running on Windows 11. If you are one of those users who are afflicted with the snap layout not working in the Windows 11 issue, you are at the right place. In this article, we have mentioned the most probable fixes that can help resolve this issue.

Also Read: 15 Best Registry Hacks For Windows 11
Try keyboard shortcuts
If the snap layouts do not pop up when you hover over the maximize icon on the top right, you can use the keyboard shortcut to bring them up.
- Use the Windows + Z shortcut key to access the snap layouts.
- Apart from this, pressing the Windows key along with some other arrow key, allows you to dock the active window in the direction of the pressed arrow key.
- If you cannot access snap layouts using the keyboard shortcuts also, move on to the next method.
Also Read: How To Sign in To Windows 11 On Shared Device
Ensure that Snap Layouts are enabled
If the above method did not work, you need to make sure that snap layouts are available in Windows 11. For this, you need to enable the snap layout settings from the settings app. Let’s begin:

- Tap the windows icon to bring up the Start menu.
- Now, click on the Gear icon to open the Settings app.
- You can also use the Windows key + I shortcut to open the settings window.
- Once in the Settings window, click the system option on the navigation pane and choose Multitasking from the right pane.
- Now, move the switch next to Snap windows in on position.
- Now open the Snap settings and tick the checkboxes to set your preference.
Also Read: How To Activate And Deactivate Cortana In Windows 11
Turn on Snap Layouts using Registry
If you could not enable the snap layouts by tweaking the settings, don’t worry, you also have another option. Windows has also allowed you to enable the snap layouts using the Registry Editor.
Also read: How To Show Taskbar On All Monitors In Windows 11
Note: Before you go ahead with this step, you should know that the Windows registry is one of the core components of the Windows OS. If you are not cautious while editing the registry, it can create problems in the working of Windows.
Keeping that aside, let’s see how to enable Snap Layouts using the registry editor.
- Launch the Run dialog box using the Windows+ R shortcut key combination.
- Type Regedit in the command line and press the enter key.
- In the address bar located on the top of the window, type the following path:
ComputerHKEY_CURRENT_USERSoftwareMicrosoftWindowsCurrentVersionExplorerAdvanced - Now right-click on anywhere in the registry window and choose the New option.
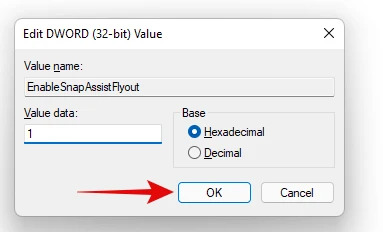
- Choose DWORD (32-bit) Value and name it as ‘EnableSnapAssistFlyout’.

- Now double click the DWORD you’ve just created and assign 1 as the data value.
- Now press the OK button.
- Finally, close the Registry Editor and restart your PC.
- After your PC reboots, try using the snap layouts.
Also Read: How To Turn On And Off Touch Indicator In Windows 11
Make sure the app is compatible
Microsoft has introduced the snap layout feature as a part of the latest iteration and all the native Windows apps and programs are compatible with this feature. However, some third-party apps might not support this feature at the moment.
If some app uses a container to handle the size of the window, it won’t support the snap layout feature.
The most obvious example of this issue was the Firefox browser. When the snap layout functionality was first introduced, Firefox did not support it. Later on, Firefox rolled out an update that resolved the problem. So if you are unable to use the snap layout feature with only a few apps then it means those apps do not support the snap layout feature.
Remove third-party apps that offer similar functionality
Several third-party apps such as PowerToys, MaxTo, AquaSnap, Divvy, and others offer similar functionality as Windows 11. If you use any of the above apps, they might conflict with the snap layout feature of Windows 11.
To resolve this feature, uninstall these apps.
Update Windows
Since Windows 11 is relatively new, it is bugs and issues. So there is a good probability that some bug may interfere with the features of Windows 11. To get rid of these bugs, you need to download the latest version of Windows. Here’s how:

- Tap the Windows + I shortcut key to open the Settings app.
- Click on the Windows Update option from the navigation pane.
- Click the Check for updates button located on the right pane.
- If any pending update is available, download and install it to use the snap layout feature again.
Also Read: How To Fix Memory Issues On Windows 11
Conclusion
That’s all in this troubleshooting guide. Hope you were able to resolve the snap layouts not working in Windows 11 issue. If you are facing some other problem in Windows 11, reach out to us to get a solution for it.


