How to create a free or paid Website:
Today I am going to tell you how to create a new website for your personal or business use. I am writing this article after doing a lot of research so I am going to start from scratch and this article will cover all the aspects and methods to create a new website from scratch so that even a newbie who doesn’t even know what exactly a website is and want to have a website, he could easily make a website after reading this article. I have included screenshots of every single step taken in making a website so it’s your one stop article to learn how to make a website.
Let’s start with what a website is?
A website is a collection of web pages saved on a server( known as web server) that runs 24x7x365 (Server that is running all the time ). A web page is what you see on the screen when you type in a web address like http://www.yahoo.com, click on a link, or put a query in a search engine. A web page can contain any type of information, and can include text, color, graphics, animation and sound. For example, when you type www.yahoo.com you see the yahoo’s webpage and that is the default page of domain yahoo.com which opens first and so it’s called the yahoo’s home page.
What is a web server?
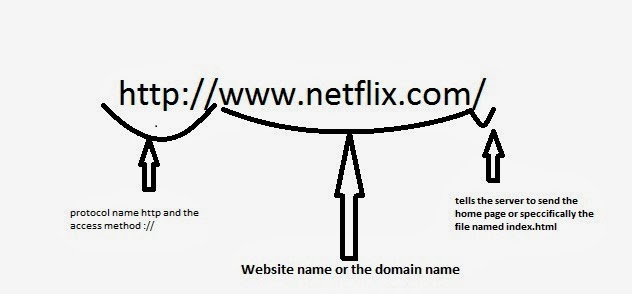
A website is typically written in HTML, which is almost always accessible via HTTP, a protocol that transfers information from the Web server to display in the user’s Web browser. And hence when in the browser you type www.netflix.com , browser automatically change the address as http://www.netflix.com/. Which means the website Netflix.com is accessed by http (hyper text transfer protocol) and the forward slash added in the end of the address is telling the web server to transfer the home page of website netflix.com.
The three primary things to make a website are domain name, web host and a topic. So, you know you want to create a website, but first you need to consider what the website will be about. Knowing what the website is about will help determine your domain name.
So the first step in creating a website is to register a Domain name. Now to understand the domain name registration you have to first understand the Domain Name System (DNS) for a deep knowledge of how website works?
Domain Name System(DNS)
So when you have to call your friend you actually find his name in address book and dial his name but it’s his phone number which is dialed and connected to same way each website also has an address on internet by which it is accessed and that address is known as IP address and typically written as 31.124.56.80 so if you have to open a website you can also type the IP address of that website in the browser and the browser will open it for you. Normally this IP address is always the IP address of the web server where the web pages are held or hosted. But remembering the IP address of any website is not easy so the concept of DNS came and it actually maintains the name and IP address of the entire website in the world and translates the web address in text format into IP address.
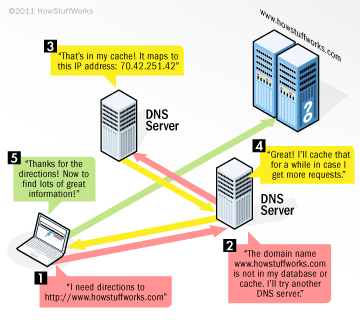
{This picture states that when a user types a name of a website in his browser and hits enter to open any website. The browser first sends the request to DNS server to check the IP address for the website which is the IP address of the hosting Web Server once your browser gets the IP address of hosting web server it then sends the get page command to website hosting server and website hosting server then fulfills the request by sending the home page of that website.}
I registered my domain with Namecheap.com because I found them best in terms of charges and services. You can also register your domain with Namecheap.com by clicking at this link, Register your domain with Namecheap.com and I am going to show you the steps of creating a website from registering a domain to hosting a website using Namecheap and 000webhost.com because I did it with them.
So the first step in creating a website is to go to Namecheap.com. And check if the domain name you have decided is available.So type in the name of domain( mydomain.com) in search box and then click search as shown in the picture 1(a).
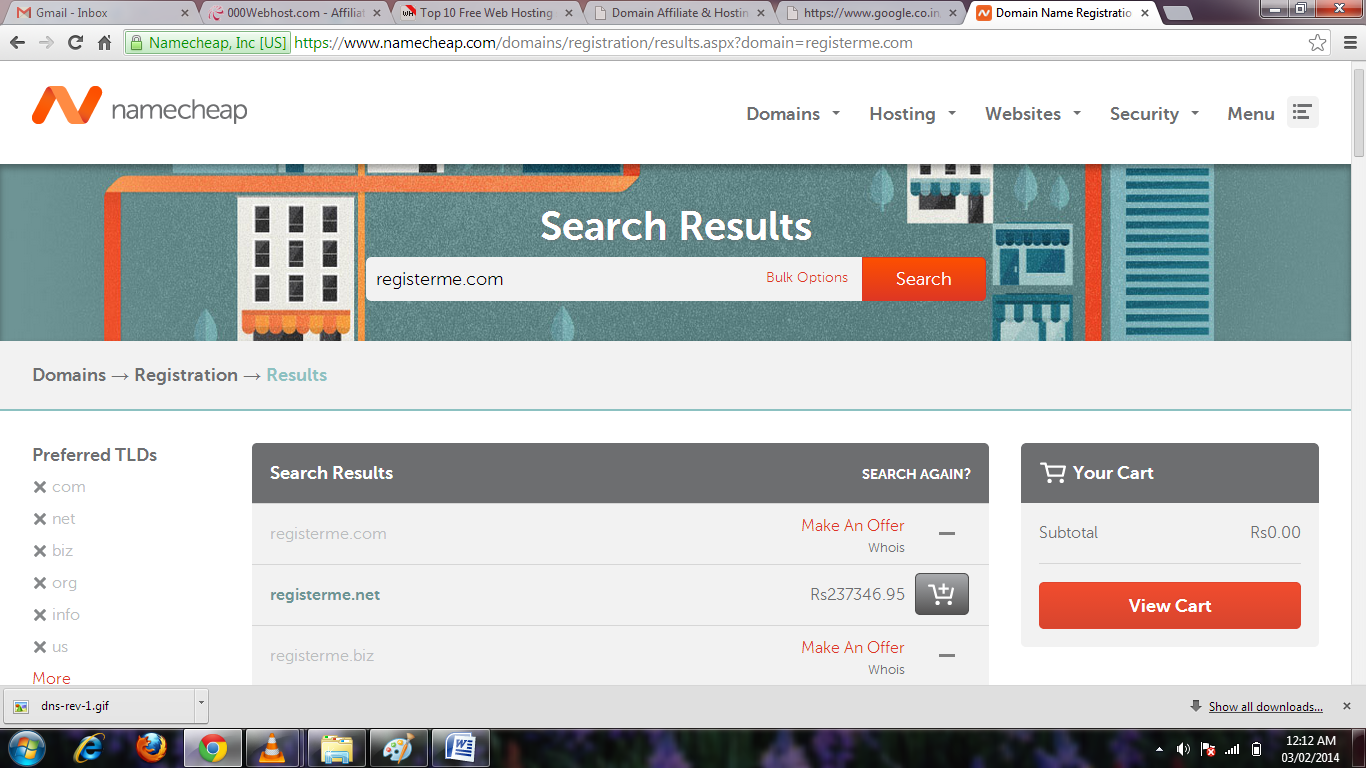
Now if that domain is not available it would not give you the option of buying rather it would show you the option to make an offer as its going to buy it from the existing website owner as shown in the picture below.
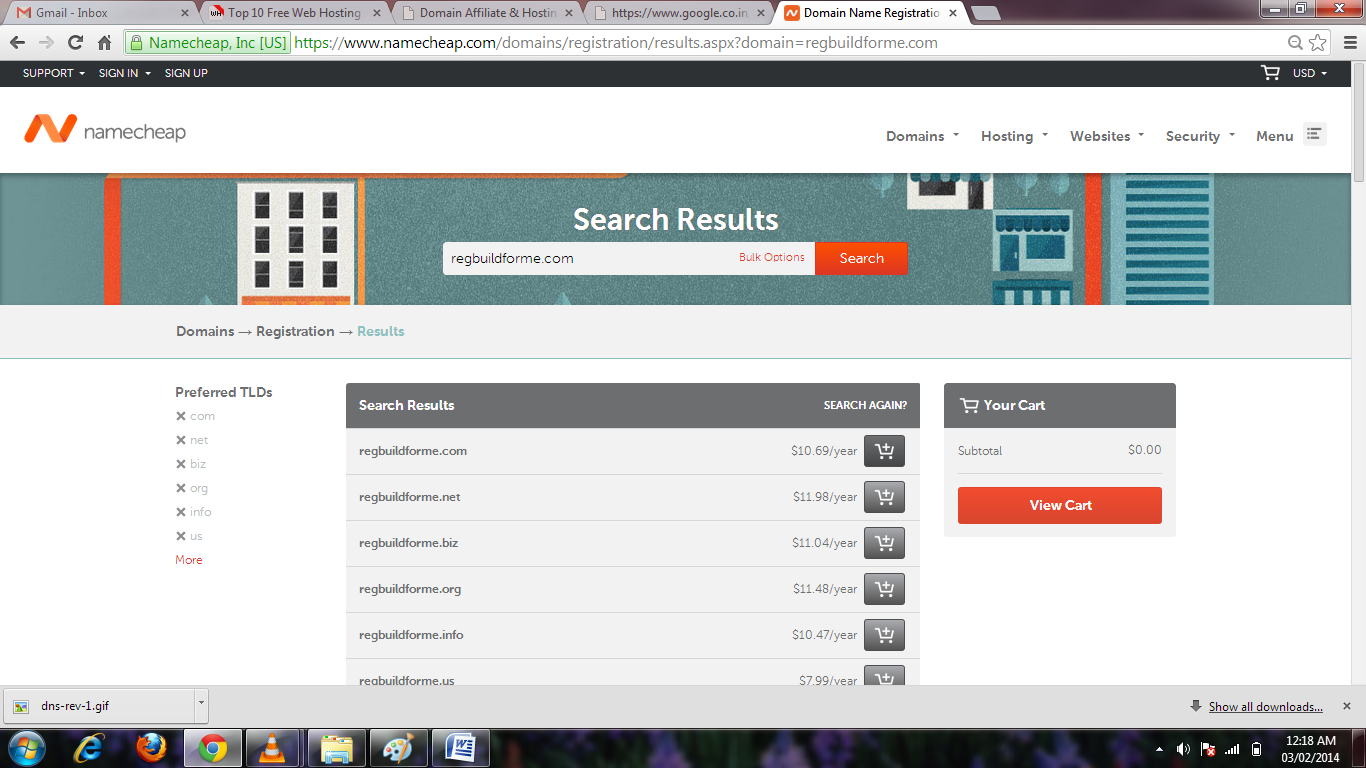
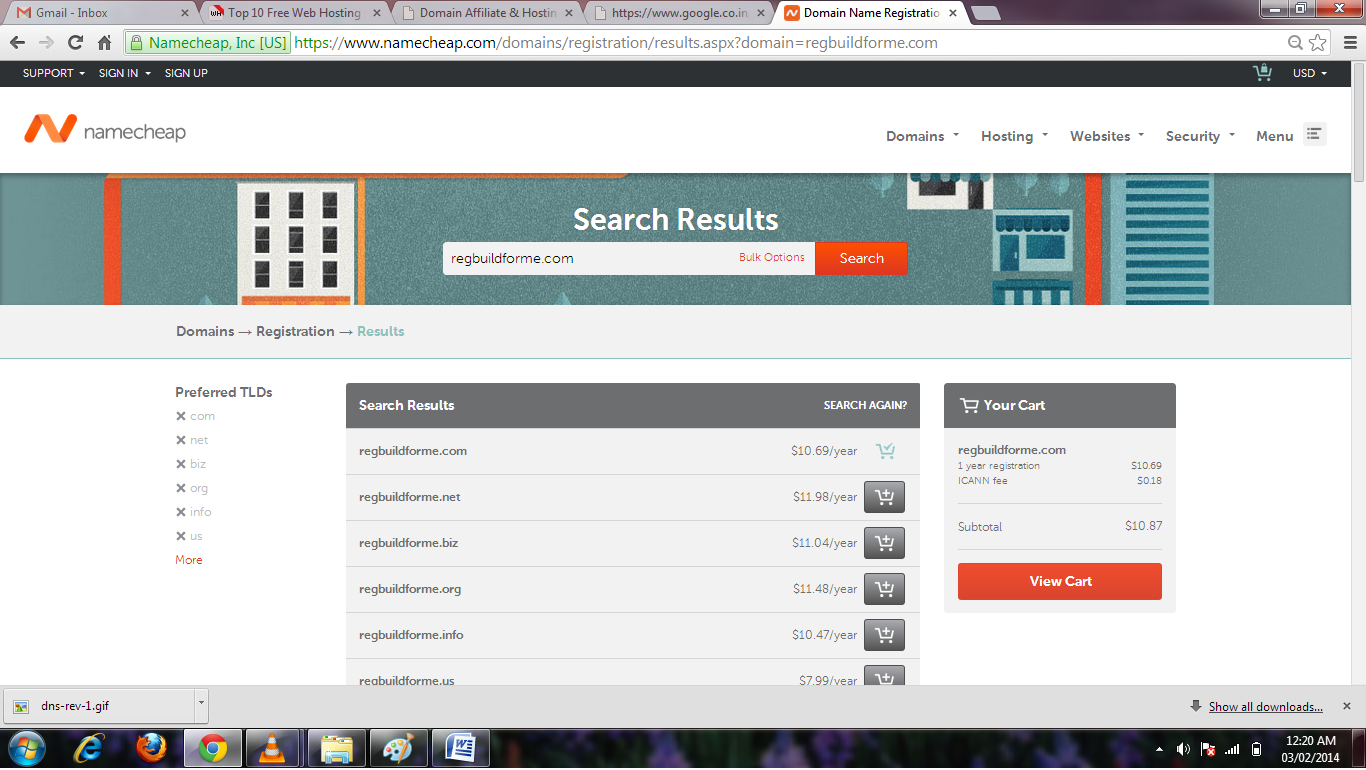
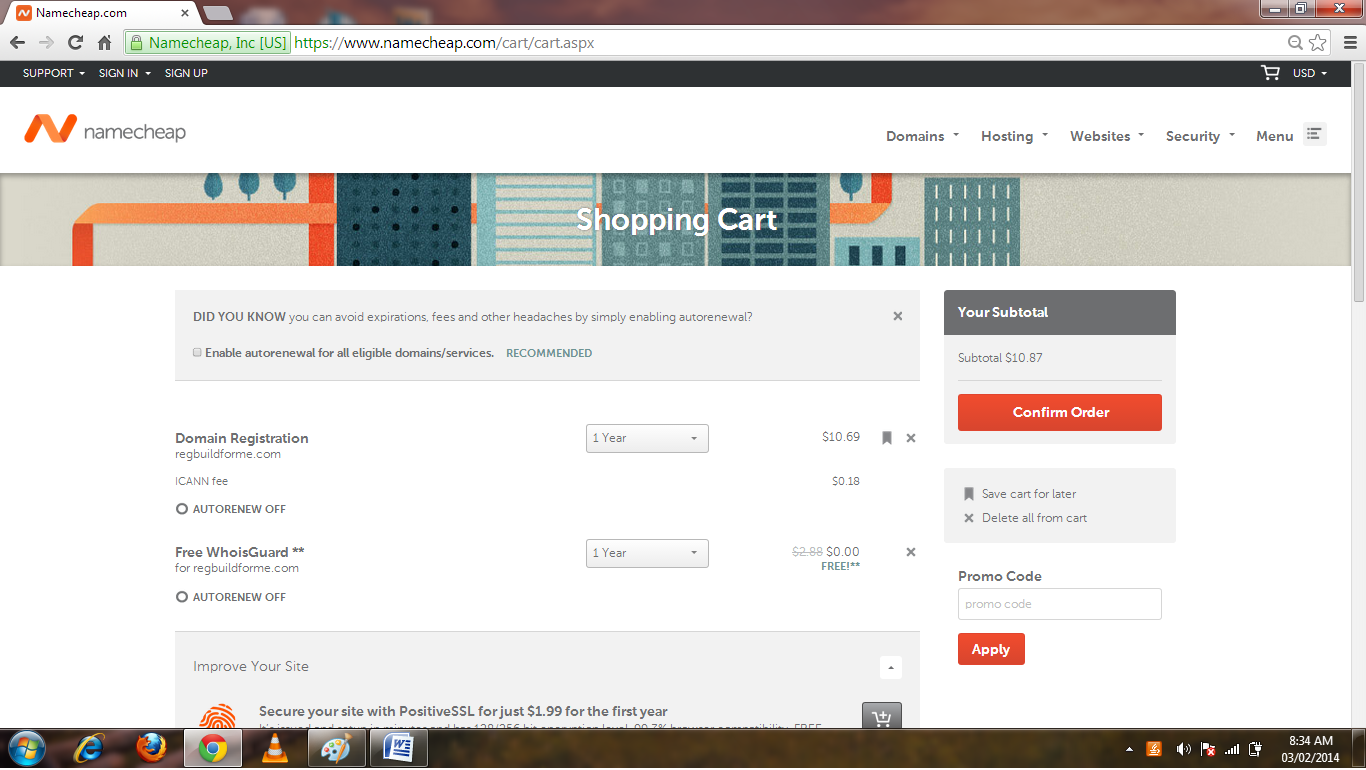

Pic-1(b) – now when I searched a different domain. That domain regbuildforme.com is available so It gives me the option to buy that domain for $10.69/year. So I would click on add to cart button and then click On view cart once it shows in the cart on right hand side. then select the no of years you want to purchase that domain for and then click confirm order and then it is going to ask you to login with your existing user ID and Password if you have, otherwise create an account by filling up the information and then you will be redirected to payment method page so you have to select a payment method like by credit card, debit card or by PayPal account. So fill in the card details and click continue at the bottom, verify the payment and once payment is confirmed you will get a mail from Namecheap.com in your registered email which will have all the necessary information about your purchase and login.
So now you have purchased a domain but you still don’t have a website because your domain does not point to any website on any hosting web server. So you will have to get a hosting account to host a website.In other words that means you have to buy space on a Web server (Which runs 24*7 and can be accessed anytime from anywhere) to keep your webpages so that it can be accessed online anytime. So by now you should have your website written in HTML language and should be ready. Keep all these WebPages in one folder and now get a hosting account. You can also get hosting account from Namecheap.com.
Host Your Website Free Now
Here in this article I am going to show you free website hosting option on 000webhost.com which is one of the best options to host your website free of cost so you just pay for domain. Which means even if you register a domain for $2.95 from Godaddy.com and using free hosting account you are just spending $2.95 .To register a domain with Godaddy now click on this banner below.
000webhost also gives you the option of creating a free sub domain with them. So let’s go to 00webhost by clicking here.
For a quick comparison and information on Best 10 Web Hosting provider please follow my other blog post. Now on this website click on Signup and select from options to host your own domain which is already registered or create a sub domain with them as shown in picture 1- (c) below and your absolutely free website will have a name like www.yourdomain.netai.net / www.yourdomain.cumli.net or something like that. So this is also a good option to build a free website and learn the website administration because this web server support all the services from PHP, Mail handling to zyro web builder tool. You can also use their templates to auto install your website.
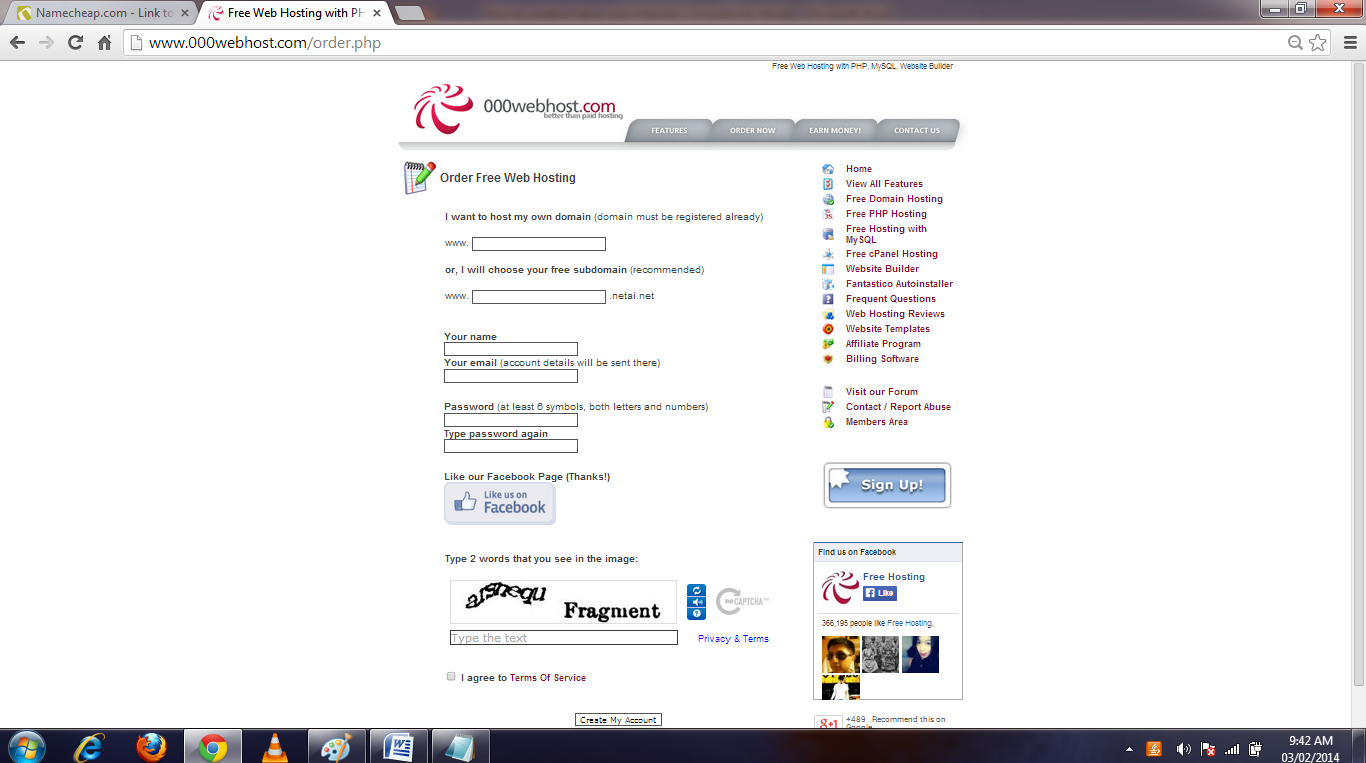
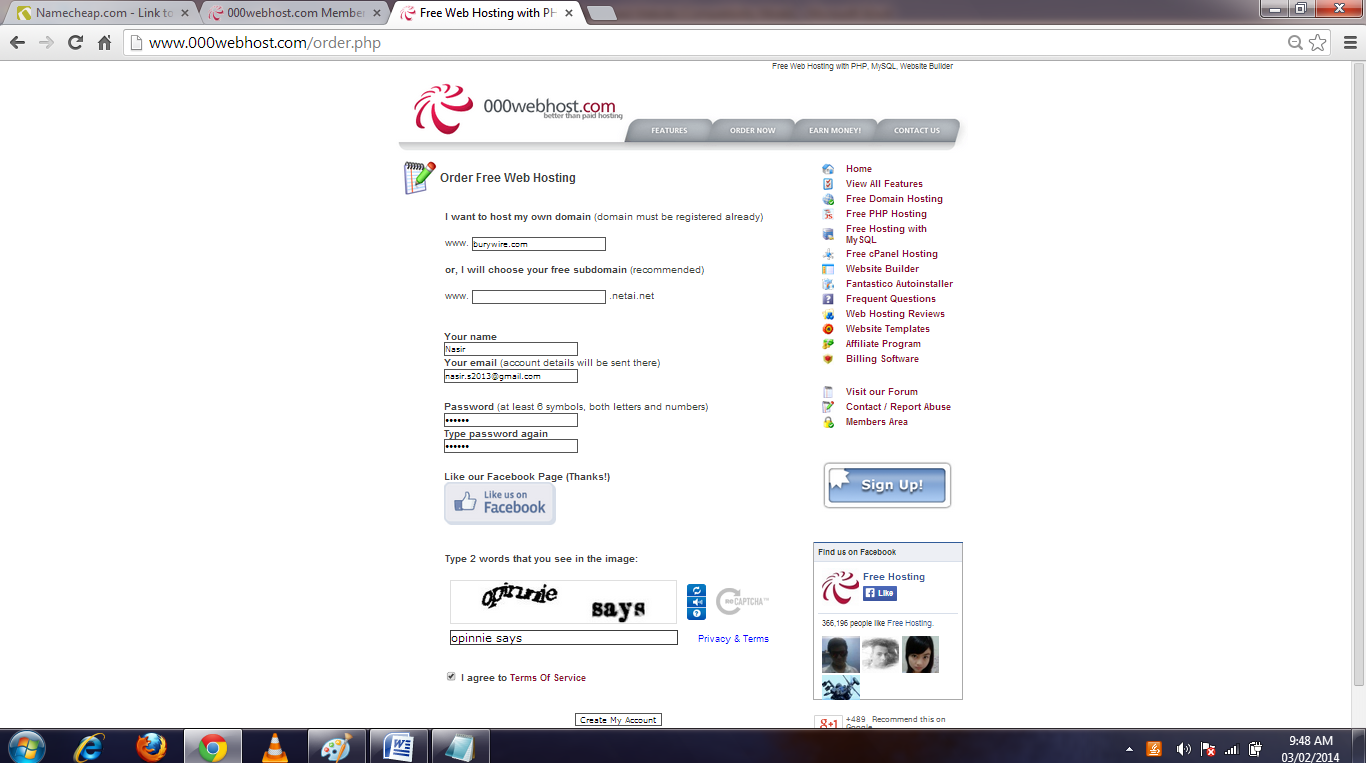
So let’s start with hosting your own registered domain. So just as shown in picture 1-(d) below fill in the details and click on to create account. Here burywire.com is domail which I registered and now going to host on 000Webhost.com. It will redirect you to the account list and will show you the Status as building website and then it will say pending verification so you better check your inbox and follow the link in the mail to verify your email address and after the verification is done the status of your website under the list will show as active as shown in pic 1(e) .
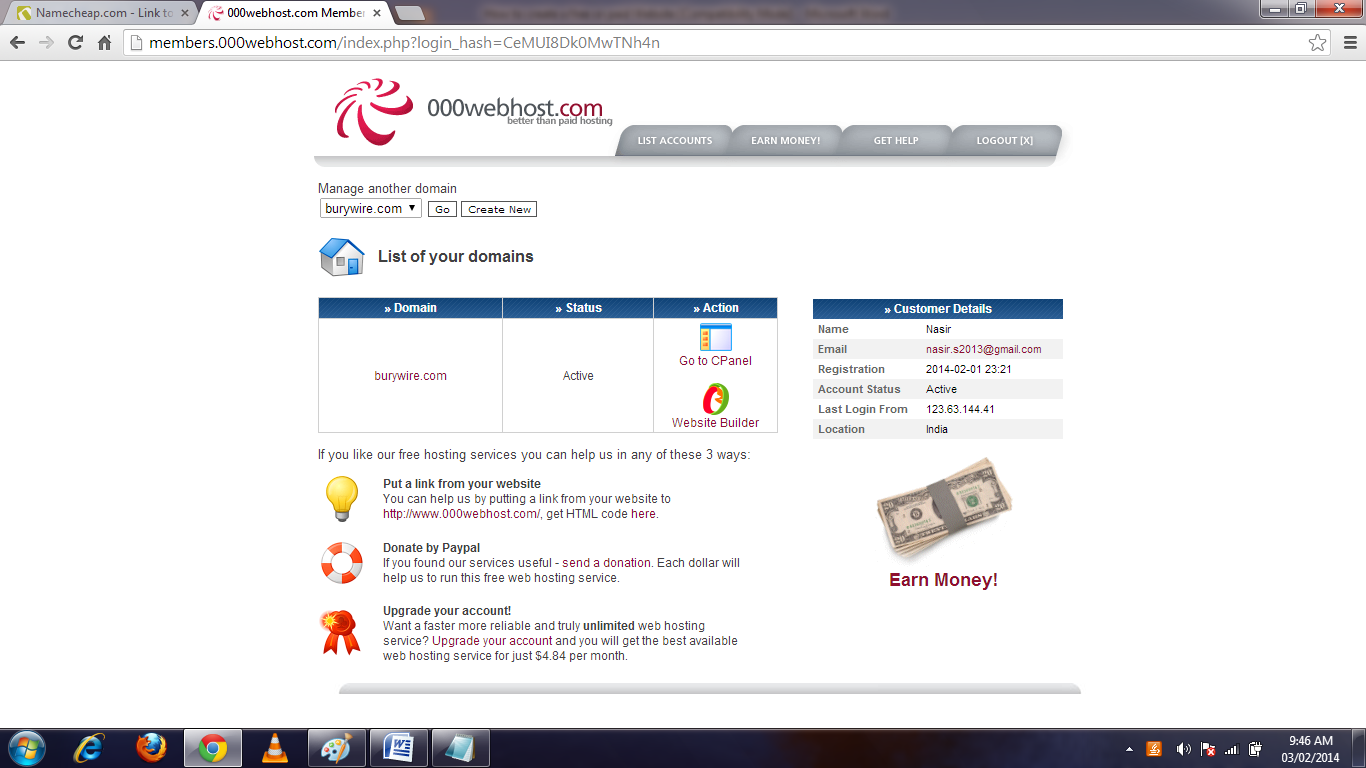
Now you just need to go to your domain registrar and you need to change the DNS settings of the registrar to point your domain to the 000webhost server. It’s very simple you just need to change the DNS server address of your Namecheap.com registrar to the DNS server of 000webhost which are normally ns01.000webhost.com and ns02.000webhost.com but I would recommend you to better check that in account details by going into the C panel of the 000webhost.Refer to the picture 1(f) below for more information.
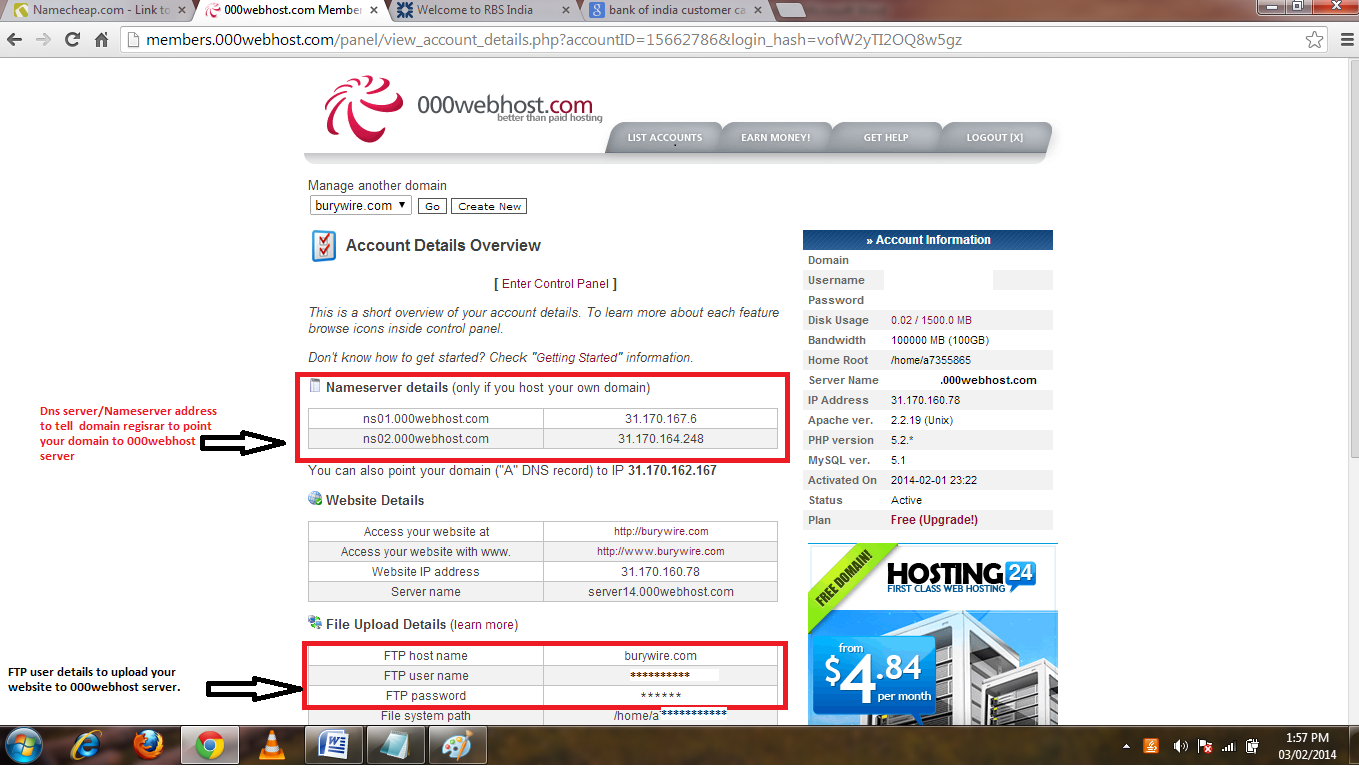
Now you will need to go to your domain registrar to change the DNS server address i.e to tell the global DNS that your WebPages are held at 000webhost server. Here my domain registrar is Namecheap.com. So lets login there and you will see the home page of your account something like below Picture 1(g).
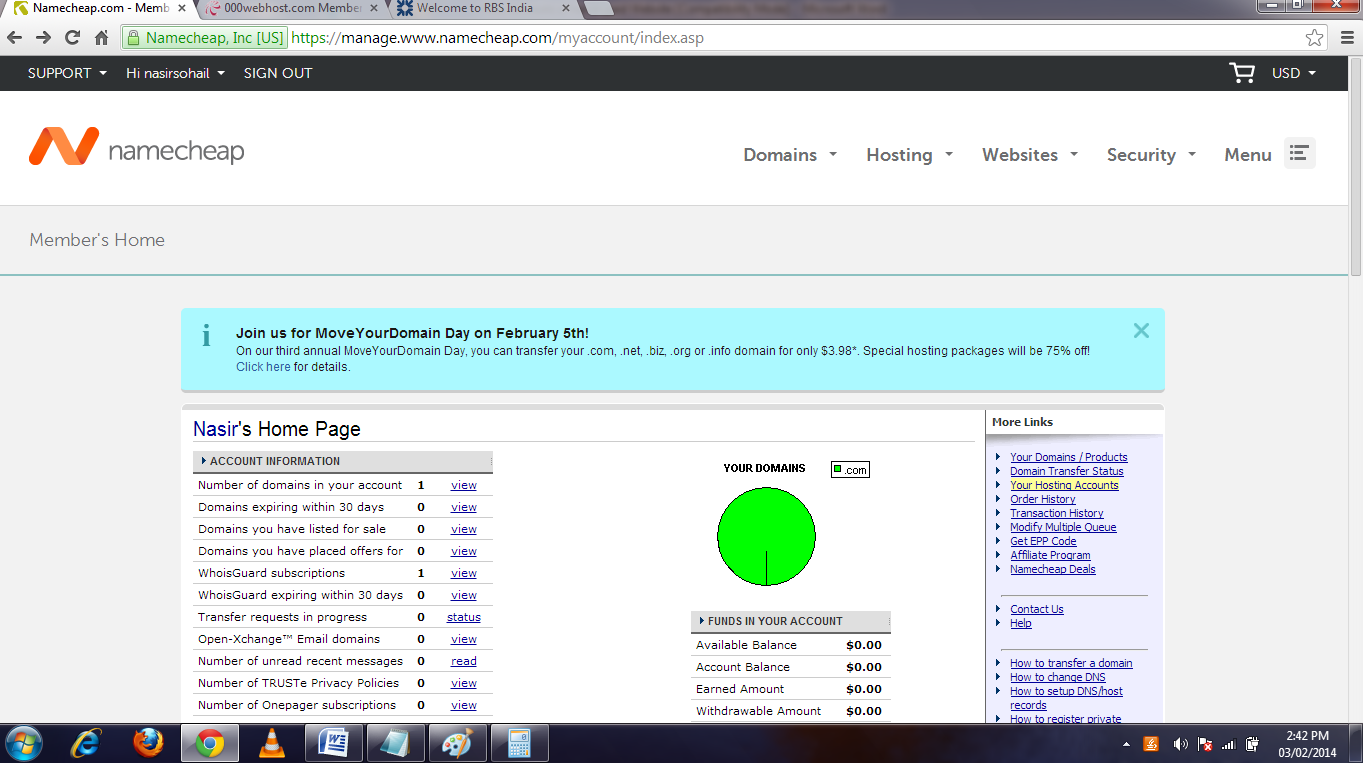
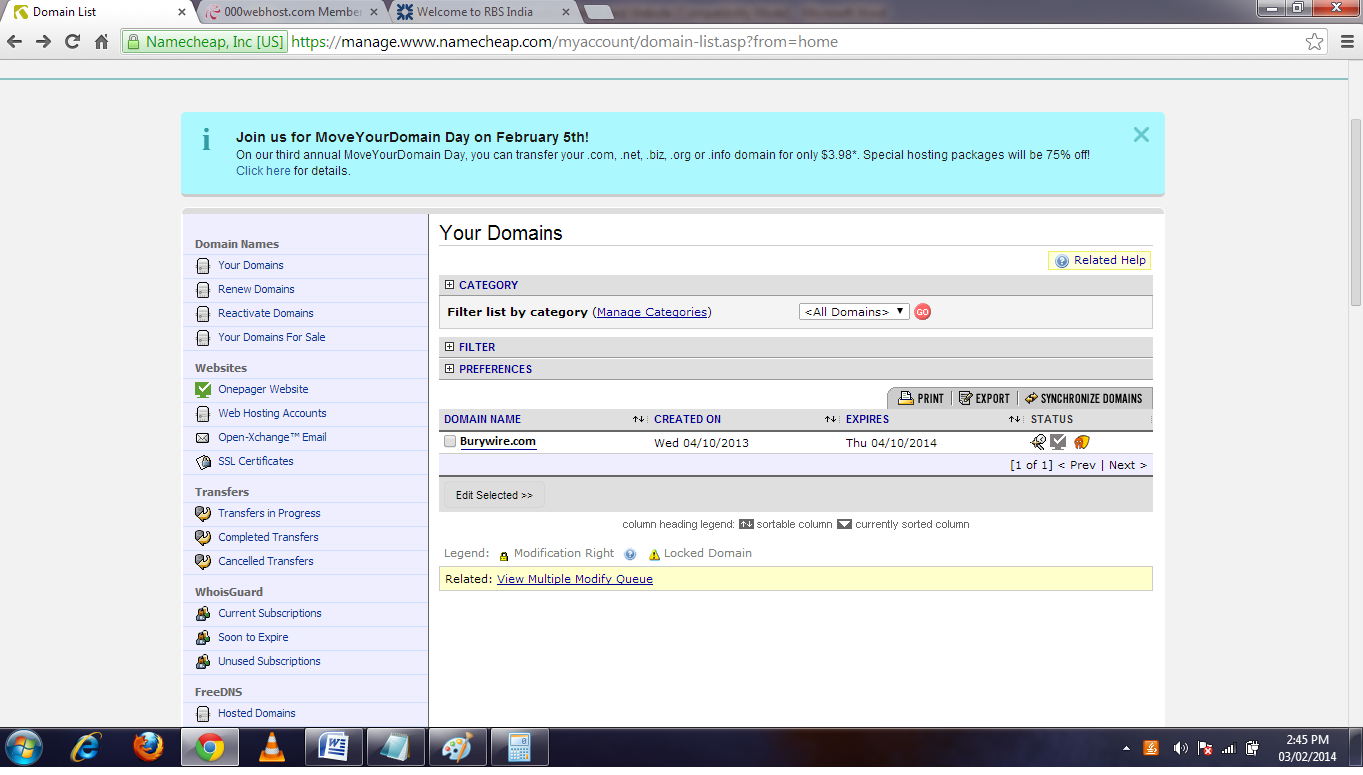
Then click on the first option “Your Domains/Products” on the right hand side. And then you will see the list of domain you have registered as shown in the pic 1-(i). So click on the domain name you want to modify the settings for. And then on next page look at the left hand side menu options for Domain Nameserver setup link as shown in picture 1-(h) and click it to change the DNS server to ns01.000webhost.com and record 2 as ns02.000webhost.com and you are done.
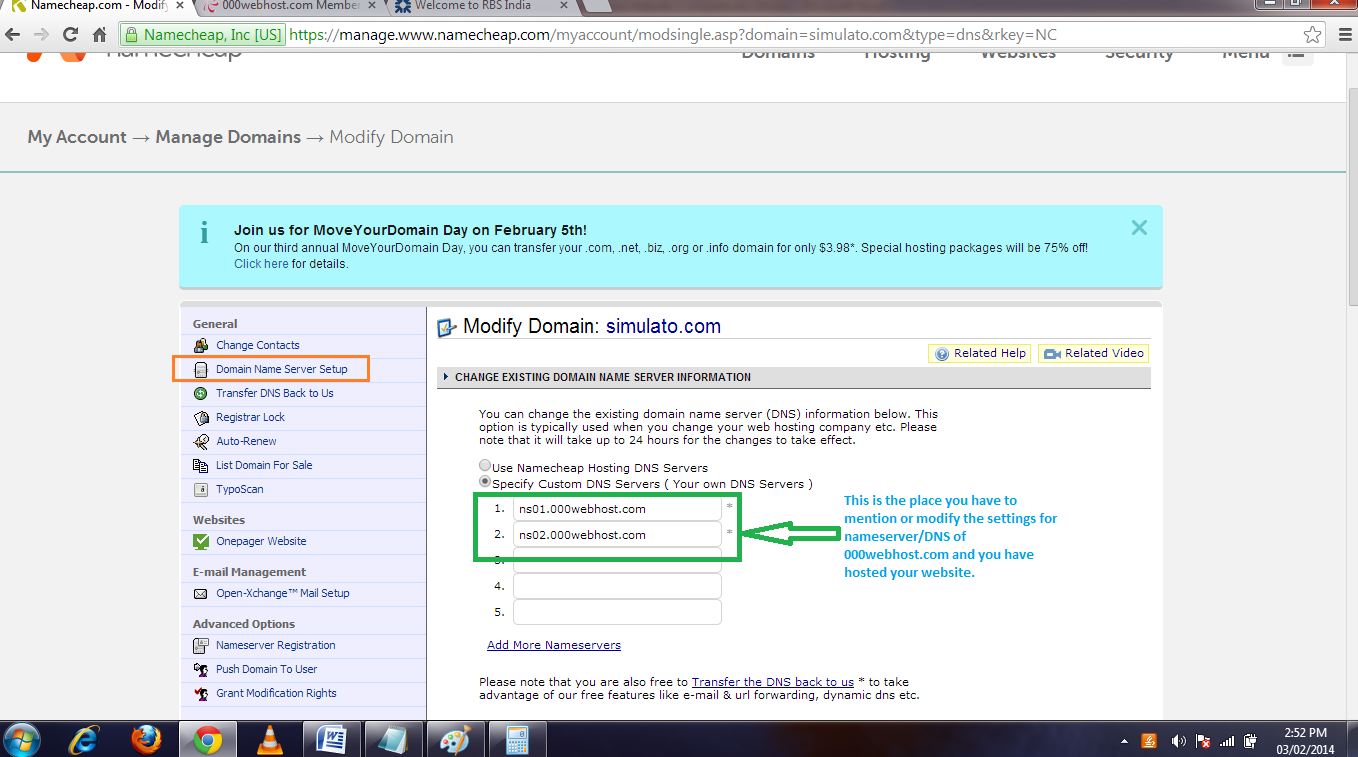
Now after changing this value your domain registrar may take few hours to update the records. Once the records are updated the 000webhost will start displaying your page and your website is ups and running.
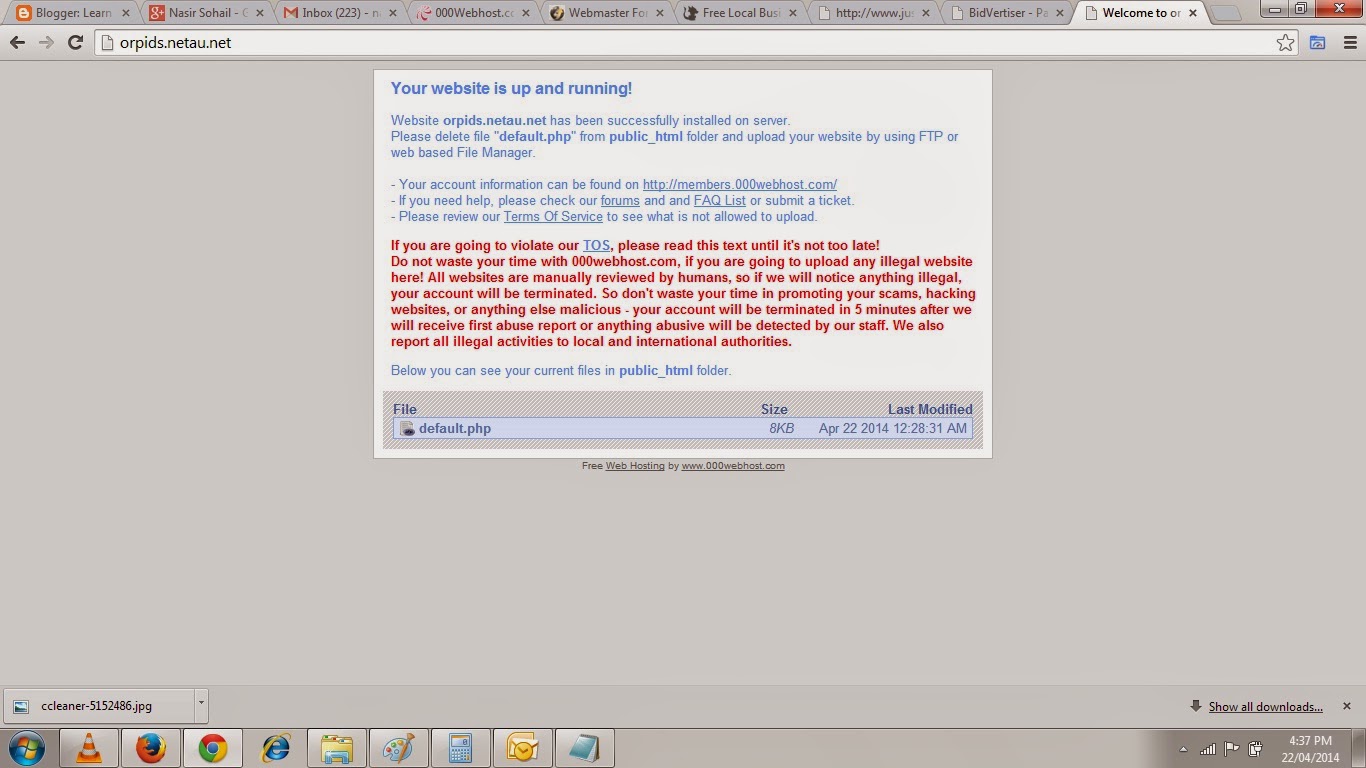
Now you have hosted your website on 000webhost.com but if you visit your website it will show you the default page as shown below.
When you see this message it means your website is ups and running you just need to upload your custom webpage to the server you have got access to. So to learn how you can upload pages to your Web Server read this next Post.










This comment has been removed by a blog administrator.
This comment has been removed by a blog administrator.