Microsft Outlook is an email client that enables you to manage emails. With this, you can send and receive emails seamlessly. Additionally, it can allow calendaring, task management, contact management, notetaking, etc. So, in this article, we will learn various ways to fix Outlook not connecting to Server on Windows 11.
Outlook is one of the best information managers. However, many users are not able to use it efficiently after upgrading to the latest version. If you are also struggling with Outlook not connecting to Server on Windows 11, you are at the right place. So, let us discuss the best troubleshooting tricks to fix Outlook not connecting to Server on Windows 11.
Also Read: Outlook Search Not Working In Windows 11? Try These Fixes
9 Ways to Fix Outlook not connecting to Server on Windows 11
- Check your internet connection
- Restart Outlook
- Check Outlook status
- Check your credentials
- Repair Outlook Account
- Rebuild data file of Outlook
- Disable Extensions
- Update Outlook
- Reinstall Outlook
Now, let us discuss these steps to fix Outlook not connecting to server in detail.
1. Check your internet connection
The first and the most obvious thing to check for is the internet connection. A major reason behind Outlook not connecting to the server may be an inefficient or poor internet connection. In such cases, it is better to wait until the internet signals are strengthened again. In the worst-case scenario (if you have a serious problem with the internet connection), you may need to contact your internet service provider.
Also Read: How To Use Microsoft Outlook 365 In 2022?
2. Restart Outlook
Another most common way to fix the issue of Outlook cannot connect to the server is to restart it. You can also try reconnecting to the internet. And then, start the Outlook once again. Now, see if the problem has been fixed. Sometimes, a temporary software bug is what causes such problems that can be fixed by restarting Outlook.
3. Check Outlook status
Another thing you should do is to check whether Outlook status is online. If it is offline, you cannot connect it to the server in any way. So, below is how to check and set Outlook status to online:
1. Go to Outlook on your Windows 11 device.
2. Click on Send/Receive tab on the top.
3. Then, tap the Work offline option as shown below in the screenshot.

Now, Outlook will automatically start connecting to the server. See if this method fixes your problem. However, if you still face the same problem, kindly move on to the next method given below.
Also Read: How To Enable And Use Live Captions On Windows 11
4. Check your credentials
Sometimes, the problem of Outlook can’t connect to the server arises because of incorrect credentials. You could have accidentally typed in the wrong credentials and puzzled why Outlook couldn’t connect to the server. This problem mainly arises when you are logging in for the first time. So, kindly ensure that you have entered the correct credentials:
- Go to Outlook on your Windows 11 device.
2. Tap File on the top-left corner.

3. Click on Account Settings.
4. Now, again choose Account Settings from the drop-down menu.
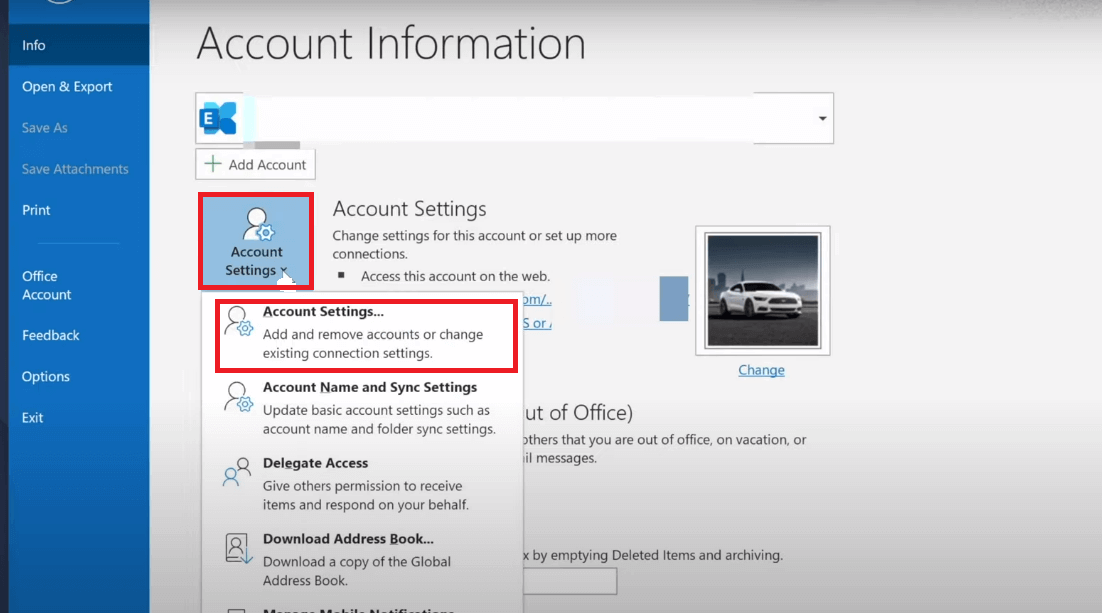
5. Navigate to the Email tap.
6. Select your email and tap Remove.
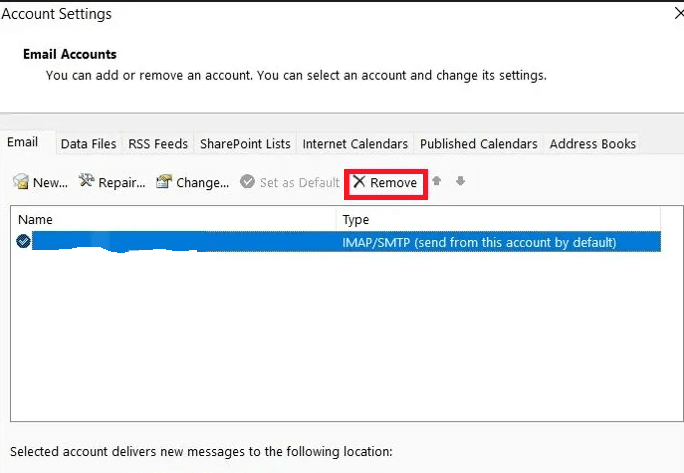
7. Once the account is successfully removed, go to the homepage and log in with the correct credentials.
Now, see if the issue has been fixed. However, if the problem persists, kindly move on to the next solution given in the further snippet.
Also Read: How To Use Microsoft Teams In Windows 11?
5. Repair Outlook Account
Another effective way to fix the issue of Outlook not connecting to the server is to repair your account associated with Outlook. There may be issues with the data and settings related to your Outlook account. So, it is better to fix your account in such cases. Below is how to do it:
1. Open Outlook on your Windows 11 device.
2. Choose File on the top-left corner.
3. Under Account Settings, tap the drop-down box.
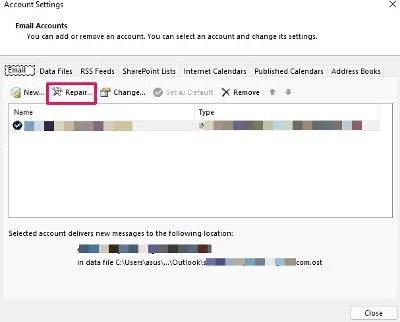
4. Select Account Settings from the drop-down menu.
5. Choose your email and click on Repair on the top.
After your account has been successfully repaired, restart your device and re-launch Outlook. The problem of Outlook not connecting to the server should be resolved now. In case the issue is still troubling you, kindly move on to the next solution given in the further snippet.
Also Read: How To Find Mac Address On Windows 11 PC
6. Rebuild data file of Outlook
A major reason behind this problem is the corrupted data file. So now, let us discuss how to rebuild the Outlook data file to get over the issue of Outlook not connecting to the Server on Windows 11:
- Open Outlook on your Windows 11 device.
2. Click on the File option on the top-left corner.
3. Then, tap Account Settings drop-box.
4. Select Account Settings from the drop-down menu.
5. Now, the Account Settings window will open up.
6. Switch to the Data files tab.
7. Click on the Open file location option on the top.
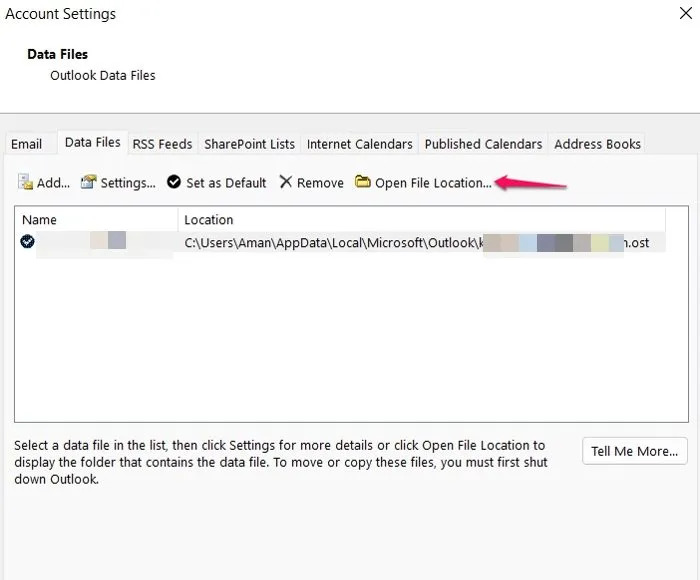
8. Now, you just need to rename the Outlook data file that is causing the problem.
So, now open outlook on your device and see if the problem has been fixed now.
Also Read: How To Remove Fingerprint Recognition Sign-in In Windows 11
7. Disable Extensions
Outlook allows the users to install various extensions to the platform. However, this can also be the culprit behind the issue you are facing. So, it is better to disable extensions. So, below is how to do it:
- Launch Outlook on your Windows 11 device.
2. Click on the File option on the top-left corner.

3. Scroll down and click on Manage Add-ins.
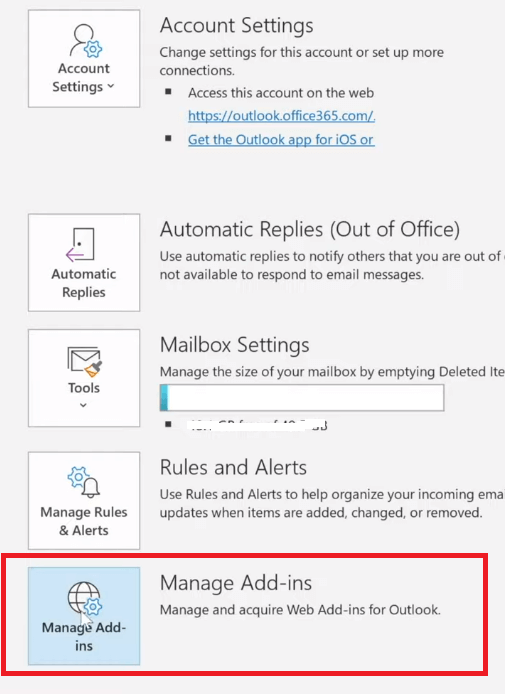
4. Now, click on the ellipsis( Three-dot) icon below individual extensions and tap Remove.
Do this for every extension and see if the problem is fixed. But, if the issue is still there, kindly move on to the next solution given in the further snippet.
8. Update Outlook
It is very essential to keep the software, apps, or operating systems up-to-date. Updating a system fixes many bugs and also adds new features released by the provider. So, an outdated or older Outlook version may be the real culprit. In this case, it is best to update Outlook. Below is how to do it:
- Go to Outlook.
- Click on the File option on the top-left corner.
- Now, tap the Office Account option on the left side.
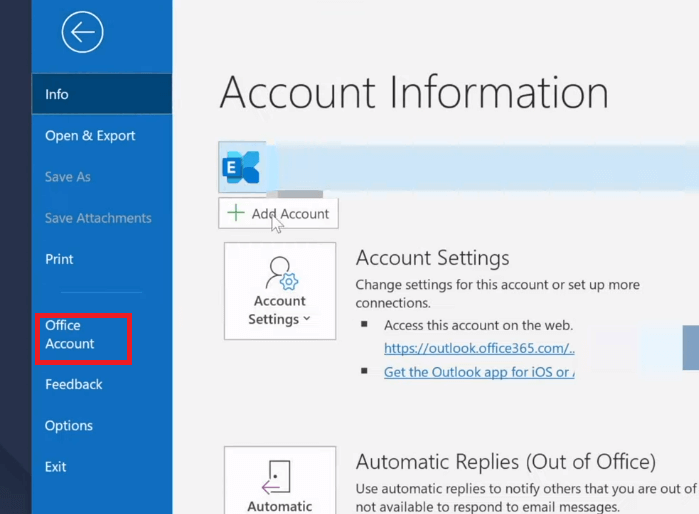
4. Click on Update options and the drop-down menu will open up.
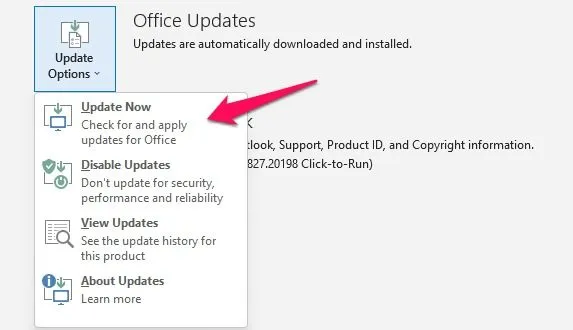
5. Tap Update Now.
9. Reinstall Outlook
Another way to resolve the issue of Outlook not connecting to the server is to reinstall Outlook. However, this should be the last resort. Before reinstalling, kindly try all the methods above in no specific order and see if any of them fixes the issue.
CONCLUSION
So, these are the 9 best ways to fix Outlook not connecting to the server issue. So, go ahead and try the solutions given in this snippet. Additionally, if you face any problems while performing the steps mentioned in this article, do let us know in the comment section. We would love to help you. So, we tried to answer the following FAQs in this guide:
- How to fix Outlook cannot connect to the server but internet is working?
- How to Fix Outlook cannot connect to the server Office 365?
- Ways to fix Outlook not connecting to server on Windows 11?


