Wi-Fi disconnecting problem Windows 11

Users of Windows 10 who recently upgraded to Windows 11 are encountering numerous troubles. We recently published a helpful tutorial on how to resolve the Windows 11 no sound issue, and now we’re hearing reports that many customers are experiencing frequent WiFi disconnections on their Windows 11 PCs. Even when the network is within range, WiFi continues to disconnect and remain disconnected. If you’re having the same problem with your WiFi constantly disconnecting on your Windows 11 PC, follow this method to cure the issue immediately. We’ve discussed both simple and complex approaches for troubleshooting the WiFi issue. Thus, let us begin the tutorial.
We’ve looking into this specific issue to determine what’s causing this issue with both insider and public versions of Windows 11. The following is a list of plausible suspects for the random Wi-Fi disconnecting problem Windows 11:
Common network inconsistency
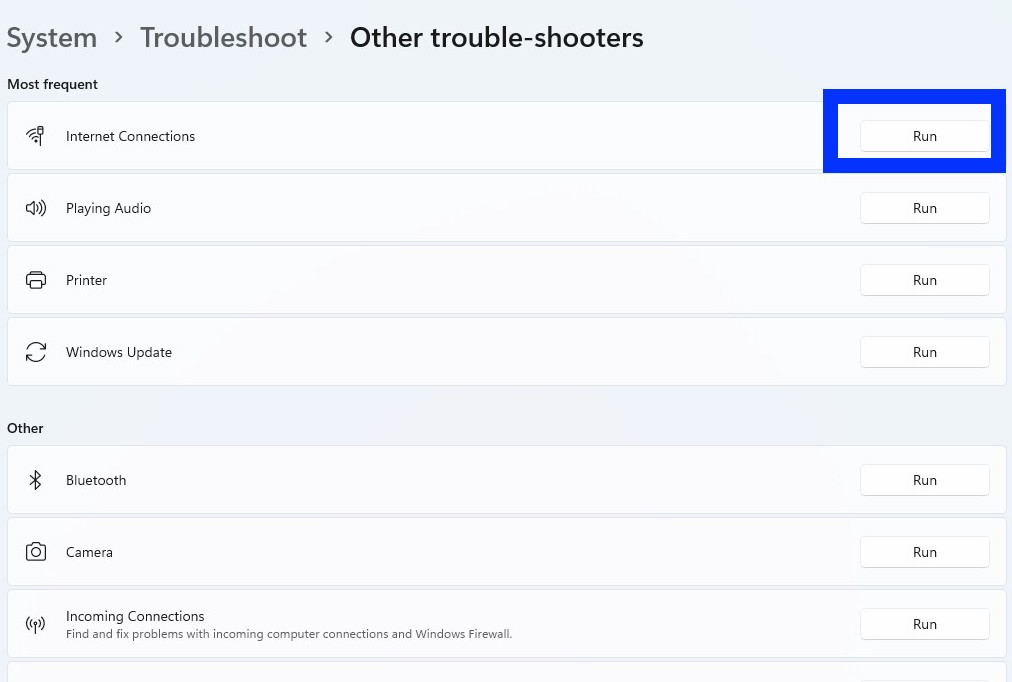
If you’re fortunate enough to have this problem emerge as a result of a network irregularity, you may be able to resolve it automatically by running the Internet Connections Troubleshooter. If Microsoft includs a repair program for your specific issue, the programme will install the fix automatically.
Network adapter inconsistency
Another reason you may encounter this issue is an inconsistency with the network adapter which is currently handling the Wi-Fi connection. In this situation, resetting the network adapter should resolve the issue.
Inconsistent TCPIP and DHCP parameters
If you’re continuously hopping between multiple Wi-Fi networks, this issue is likely caused by contradictory data accumulated by the TCPIP and DHCP settings. In this situation, you can resolve the issue by resetting both of these parameters from an elevated CMD prompt.
DNS Inconsistency
In some cases, you may encounter this type of issue as a result of an issue facilitated by an inconsistent DNS (Domain Name System). You can quickly resolve this issue by flushing your existing DNS.
Network adapter driver is corrupted or incompatible
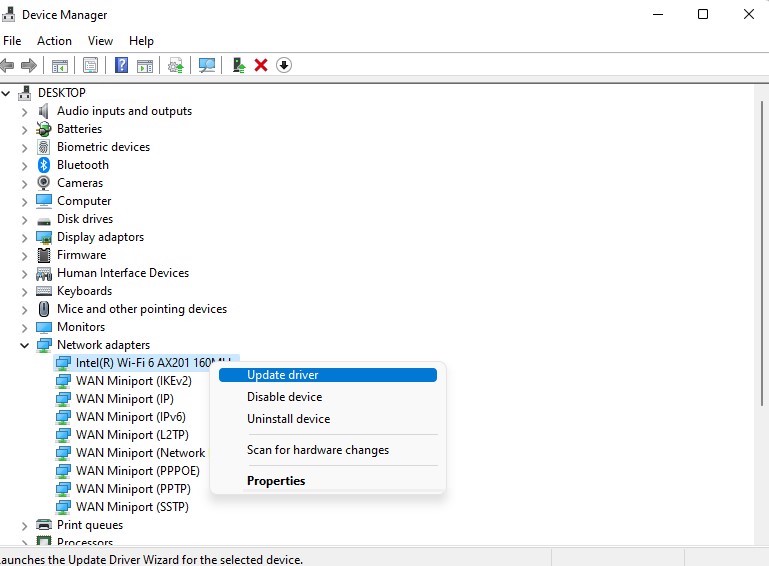
As it turns out, another possible source of these unexpected WiFi disconnects is a network adapter driver that is partially incompatible or corrupted. This issue generally happens soon after consumers upgrade to Windows 11 (from a previous Windows version) and can typically be resolved by deleting your present network adapter and allowing your operating system to install a completely compatible generic alternative.
There is no Wi-Fi Hotfix installed
As it turns out, Microsoft is aware of the issue impacting a subset of Windows 11 users and has already provided a remedy for Windows Insiders. By the time you read this, the patch may have already been incorporated into the Public build, so begin by installing all pending updates. If a patch is not available immediately, consider joining the Insider Program to help resolve the issue.
System file corruption
In certain circumstances (most commonly following an update from an earlier version of Windows), you can anticipate this issue to arise as a result of system file corruption. If this case applies, the only solution is to perform a repair install or a clean install.
Also Read:How To Fix Driver Power State Failure Error In Windows 11
After going over all of the possible causes of this issue on Windows 11, let’s go over all of the fixes that other people in a similar situation have successfully utilised to resolve Wi-Fi disconnecting problem Windows 11:
1: Restart the wireless router
A quick restart is one of the simplest ways to resolve any wifi disconnects automatically or wi-fi does not work difficulties. Simply turn off the wifi router for 2-3 minutes and then turn it back on. This will re-establish the connection, spectrum, and networking frequency, resolving the issue.
2: Enable/disable aircraft mode
The second troubleshooting option you can try to resolve the wifi not functioning issue is to switch your computer or laptop to airplane mode. For 3-4 minutes, you must activate Airplane mode. To do so, press the “Windows+A” keyboard shortcut and select “Flight mode.”
3: Verify the WiFi power management configuration.
This happened to a buddy whose wifi was frequently disconnecting, and in order to resolve the issue, we needed to tweak the power management settings somewhat. To begin, though, here is a procedure for resolving the issue.
- Go to the Windows 11 PC settings and click on Device manager, or press the “Windows + X” key and click on Device manager. Expand the Network adapter section once you’re in the device manager settings.
- Now, right-click on the WiFi card to view its properties.
- Here, navigate to the Power management section and uncheck the box labelled “Allow the computer to power down this device to conserve energy.” By activating this feature, the computer will be able to keep the WiFi turned on indefinitely.
By activating this feature, the computer will be able to keep the WiFi turned on indefinitely.
Also read:How To Fix Microsoft Store Error 0x800B010FI In Windows 11?
4: Internet Connection Troubleshooting on Windows 11

By using the Internet Connection Troubleshooter, you can launch the troubleshooting tool for Windows 11’s wireless network. Adhere to the steps outlined below:
- To begin, hit the Windows+I buttons on your keyboard simultaneously to access the Settings app.
- Following that, navigate to System > Troubleshoot > Additional troubleshooters.
- Now, in the Most Frequent menu, locate and click on Internet Connections.
Windows will attempt to resolve the issue automatically. If the issue remains unresolved, proceed to the next method listed below.
5: When in Range, Activate Connect Automatically on Windows 11
Additionally, you can attempt to enable the Connect Automatically when in range option on your Windows 11 PC by following the steps below.
- To begin, open the Settings app.
- Following that, navigate to the Network & Internet menu.
- You must now navigate to Wifi > Wifi connection properties.
- Then, simply check the option to connect automatically when in range.
- That’s all there is to it; simply quit the settings.
- Verify that the issue has been rectified. Otherwise, you might attempt the following solution.
6: Disabling and re-enabling WiFi in Windows 11
Additionally, you can use your Windows 11 computer’s Forget and Reconnect WiFi option. This strategy has benefited millions of Windows 11 users. Examine the procedure outlined below.
- To begin, click on the Wifi icon in the Taskbar.
- Following that, expand the Wifi menu by right-clicking on the name of your wireless network.
- Simply choose the Forgot option from the menu.
That is all. Now, using your credentials, attempt to login to the same wifi connection.
Also Read:[Fixed] Unable To Upload Images In Steam On Windows 11
7: Reset Network Adapters in Windows 11
This workaround will necessitate a network adapter reset. This is how you do it:

- To begin, open the Settings app.
- Following that, select the Network & Internet option.
- Now, scroll down to the Advanced network settings section and click on it.
- Repeat the process by scrolling down and clicking on Network reset.
- Finally, click Reset now.
It will reinstall the network adapters and restore the default state of the major network components.
Conclusion
If you’ve come to realise without finding a feasible solution, the only explanation is that your system is suffering from some form of underlying system file corruption that impairs its capacity to connect to and maintain Wi-Fi networks.
If you’ve eliminate the possibility of a signal issue (the router is too far away), the only realistic cure at this stage is to effectively replace every system file with a healthy counterpart.


