Most of us are working from home these days. Sometimes, we just take a small coffee break, and the skype status changes to inactive. So, to avoid this, we will be discussing the 2 best ways to set skype status to always available. There are status indicators in Skype for business. For each contact seen within the app’s window, the app provided status indicators like Available, Busy, Away, and Do not disturb.
By default, this status changes within 5 minutes of inactivity. So, if you don’t like this change of status, fortunately, there is a solution. in this article, we will be discussing the 2 best ways to set skype for business status to always available.
Also Read: Safari keeps opening Login.skype.com in different tabs after every 10 seconds
Table of Contents
- Do it from Settings
- Use a third-party tool
1. Set Skype for business status to always available!
( Settings)
1. Open Skype for business on your device.
2. Click on the Settings icon on the right-side.
3. Select Tools from the Settings menu.
4. Tap Options.
5. Click on the Status option on the Left-side of the Options Window.
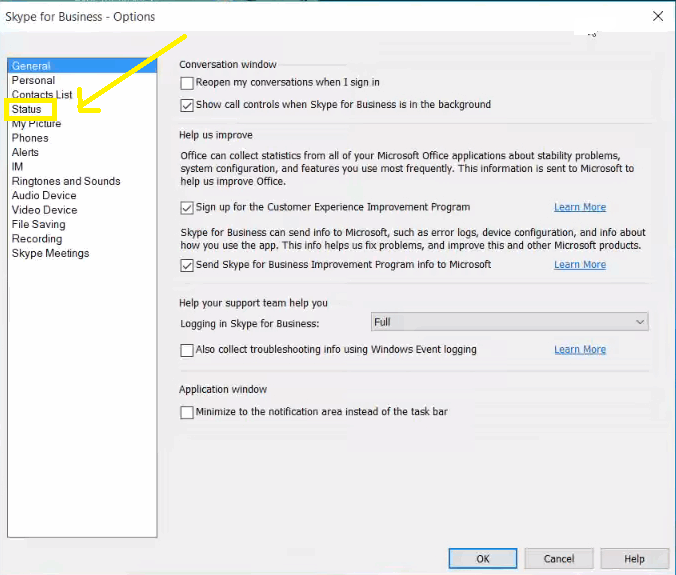
6. In the box next to Show me as Inactive when my computer has been inactive for this many minutes, enter 360( this is the maximum value).
7. Now, in the box next to Change my status from inactive to away after this many minutes, again enter 360( that is the maximum value).
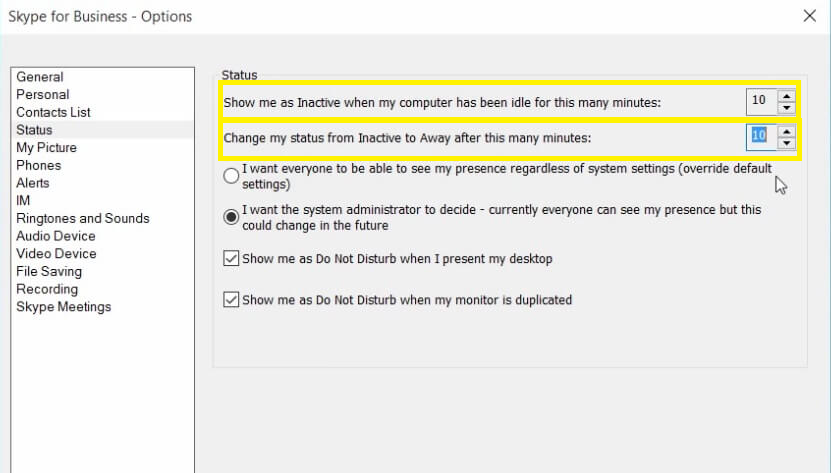
8. Press OK and close the window.
This setting is basically to increase the duration after which the status changes. So, if you are away for less than 360 minutes or in a short coffee break, you will no longer be worried about your activity status on Skype for business.
You need to keep in mind that the company business administrators can change this setting.
You can also set Skype for business status to always available using a third-party tool. So, in the next snippet, we have discussed this method.
Also Read: 3 Best Ways To Set Skype Status To Always Available
2. A third-party tool to Set Skype for business status to always available!
Before using this tool, you must keep in mind that you must use it when it is very urgent. This tool can make you appear always online on Skype. But, you must not use it unnecessarily.
First of all: Skype perceives the activity status from the cursor or mouse movements. So, if you have not been using the mouse or curser for a longer period, you would be labeled as inactive.
So, we have an awesome tool known as Mouse Wiggler. This tool automatically moves the cursor after a few seconds. Hence, the skype status remains online.
- Go to Microsoft Store.
- Download the Wiggler app.
- Open it.
- Click on Wiggle.
- That’s it.
 \
\
Note: The Wiggler app will only run in the foreground. If you want to minimize it and run in the background, you will have to get Wiggler Pro.
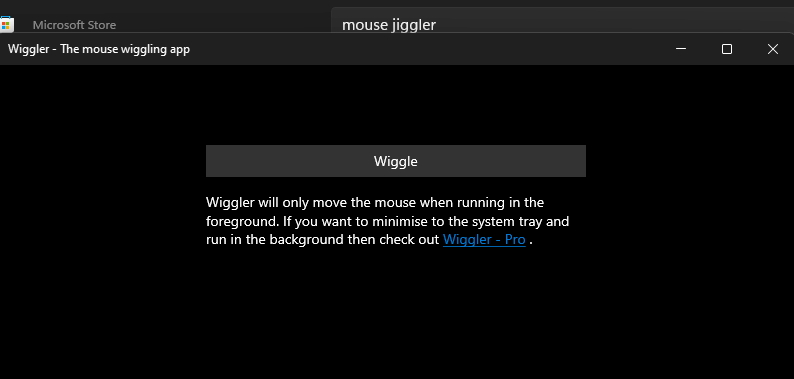
- This app automatically moves the cursor after a few seconds. Hence, Skype declares your activity status as active. This is a super useful tool.
Also Read: How To Fix Windows 10 Snip And Sketch Not Working?
Another such Tool
- There is another tool known as Mouse jiggler. This tool also performs the same function. The only difference is that you can set the duration after which the cursor moves manually.
- You can download this tool from here.
- Open the file and setup.
- Follow the on-screen instructions.
- Run the mouse jiggler.
- Set the duration after which you want the cursor to move.
- That’s it.

Now, the tool will automatically move the cursor after some time. This will help you appear always available on Skype. Isn’t it useful? Additionally, you can impress others or use it when you are away for a short period.
Also Read: How To Record Meetings On Google Meet Without Permission?
CONCLUSION
So, that’s all for now. These are the two best ways to set Skype for business status to always be available. You can accomplish this task either by modifying the settings or using a third-party tool. Where changing the settings can set the status to almost available, the third-party tools set it to always available. Beware to not use these tools unnecessarily.
If you face any problems while performing the steps mentioned in this article, do let us know in the comment section. We would love to help you.


