AirDrop makes the transfer of videos, photos, etc. between Apple devices easier. Using this feature, you can effortlessly send and receive important documents and other types of files from other Apple devices nearby you. It is a great tool that allows sharing of files between apple devices without using the internet. So, in this article, we will be discussing how to use AirDrop in iPhone, iPad, or iPod?
If you possess an Apple device and want to share a picture, video, or any type of file with a nearby Apple device without the use of the Internet, then AirDrop is the answer. This is a wonderful sharing tool. So, let us discuss how to use AirDrop.
Also Read: AirDrop Not Working On iPhone or Mac? Here’s How To Fix It
Table of Contents:
- How to use AirDrop?
- How to receive files using AirDrop?
- Change AirDrop Settings
How to use AirDrop in iPhone, iPad, iPod touch?
In a nutshell:
- Open the photo(e.g.) you want to share.
- Click the Share option.
- Tap AirDrop.
- Now, you will see a list of devices available nearby you.
- Click the device you want to share with.
https://www.youtube.com/watch?v=CVLdVmUiqqU&t=15s
Pre-requisites for using AirDrop
1. Personal hotspot: must be turned off on both the devices( Sender as well as receiver).
2. Bluetooth and Wi-Fi: must be turned on.
3. You must ensure that the person you are sharing with is nearby and within the Wi-Fi and Bluetooth range.
4. The recipient must have already set their AirDrop to receive from Contacts Only.
5. If both the sender as well as receiver set their AirDrop to receive from Contacts only, their contacts or Apple ID’s email address must be saved on each other’s device.
6. However, if your contact is not saved on the receiver’s device, they can change the AirDrop setting to receive from Everyone.
Also Read: iOS 15: How To Copy Paste Across Multiple Apple Devices Without AirDrop
How to use AirDrop in iPhone, iPad, iPod touch?
(Steps in detail)
For iPhone 11 or later:
- Open the photo(e.g.) you want to share.
- Click the Share option.
- Tap AirDrop.
- Now, you will see a list of available devices nearby you.
- Click the device you want to share with.
- In case you want to receive a file, a notification of the content preview with an option to accept or decline will appear on your screen.
- Click on Accept and the file will be saved on your phone.
- The content will be downloaded in the app it was shared with.


Note: If the recipient also has an iPhone 11 or later model, point your iPhone in the direction of theirs. Then, tap the profile picture of the user on the top of the screen.
For iPhone XS or earlier, iPad, or iPod touch
1. Open the picture(for e.g) you want to share.
2. Click on the AirDrop button.
3. You will see a list of devices available nearby you.
4. Select the device you want to share with.
5. That’s it. You have successfully shared a file without using the internet.
Also Read: How To Use Apple Translate App On iPhone: iOS15
How to receive files using AirDrop?
All you need to do is to follow a few easy steps which are given below. When someone sends something to you via AirDrop:
- You will see a notification with a preview of the content being shared.
- There will two options: Accept or Decline.
- Click on Accept to receive the file.
- The shared content will be accessible in the same app it was shared with
For example, if you received a photo, then it will be saved in the Photos app. However, websites will open in the Safari app. Moreover, you will be able to open the shared app links in the Apple App Store.
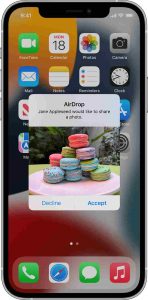
Note: You won’t see an option to Accept or Decline if you AirDrop anything to yourself, such as a photo from your iPhone to your iPad, because it will be delivered to your device automatically. Just make sure you’re logged in with the same Apple ID on both devices.
Also Read: How To Install And Use Custom Fonts On iPhone And iPad: iOS15
How to change AirDrop settings?
Now, you will learn how to change AirDrop settings on your Apple device. You can accomplish this task in no time.
Change who can send you something
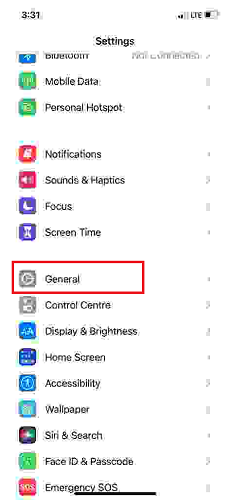
- Go to the Settings app.
- Click on General.
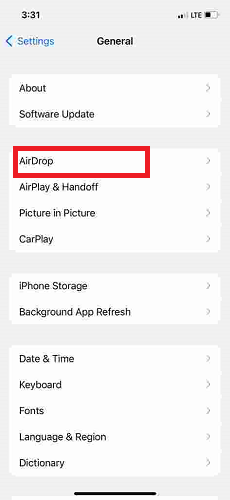
- Tap the AirDrop option.
- Select Receiving Off, Contacts Only, or Everyone as per your preference. If you choose Everyone, you may receive notifications related to a content invitation from unknown people.

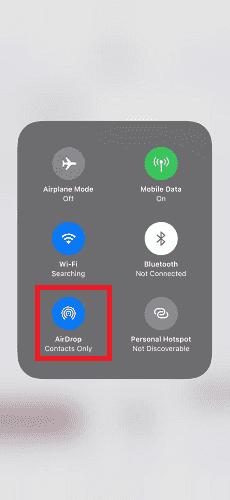
Change AirDrop Settings from Control Panel
1.iPhone X or later/iPad with iOS 12 or later/ iPadOS
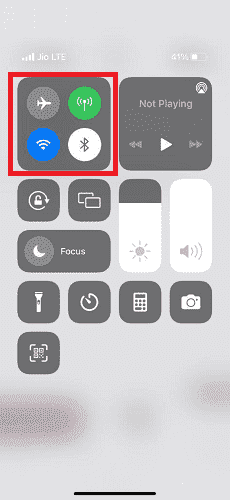
- Swipe down on the screen from the top-right corner.
- Touch and hold the Network settings card on the top-left.
- Click on AirDrop.
- Select option Receiving Off, Contacts Only, or Everyone as per your preference.
- If you set the setting to everyone, you may receive notifications related to content invitations from unknown people.
2.iPhone 8 or earlier /iPod touch
- From the bottom of the screen, swipe up.
- Touch and hold the Network Settings card.
- Tap the AirDrop option to Change Settings.
- Choose an option as per your preference:
- Receiving Off: Requests to receive will not be sent to you.
- Contacts Only: Your device is only visible to your contacts.
- Everyone: Your device is visible to all nearby Apple devices that use AirDrop.
If you see Receiving Off and are unable to alter it, try the following:
- Open the Settings on your Apple Device.
- Click on Screen Time.
- Then, Choose Content & Privacy Restrictions.
- Click on the Allowed Apps option.
- Check if the Toggle next to AirDrop is turned on.
Also Read: How To Set Up And Use Universal Control Feature On Mac And iPad
Summing Up
So, this is all about how to use AirDrop on iPhone, iPad, or iPod touch. This tool allows the users to share content with nearby Apple devices within seconds. Moreover, it does not make use of the internet. So, you don’t need an internet connection to share files using this tool. Additionally, all you need is just to turn on the Bluetooth and Wi-Fi of your device. In this guide, the steps to use this tool are mentioned. In this article, steps to change AirDrop Settings are also mentioned.
So, go ahead and perform these steps. If you face any difficulties while doing so, do let us know in the comment section.


