I was not aware of this very common problem until I migrated my blog from Blogger platform to WordPress and hosted it on Vultr and then moved it to DigitalOcean‘s ultra fast cloud hosting. One day I forgot my WordPress admin account password and tried to reset it. And much to my surprise, I got the following error message saying “your host may have disabled the mail() function”.
The e-mail could not be sent.
Possible reason: your host may have disabled the mail() function.
That day I dug on the internet and found that it’s a very common issue that people keep finding the solution for, in various situations. Some would look for a solution when they are unable to receive any email from contact form on a WordPress site while some had problem with comment moderation email which would not be sent to the admin of the website. While others had biggest problem in accessing their WordPress dashboard as the password reset email is never sent to the registered email account and they get the error saying “Your host may have disabled the mail() function” . So how to fix this WordPress not sending any email issue?
Whatever your concern is, it always cripples you specially when you are running your website on a Linux based VPS ( Virtual Private Server) without any cPanel or Plesk like graphical interface. Most of the fast VPS servers are setup on Ubuntu or CentOS. Managing them on your own is really a tough job, specially when you are not an expert in Linux based commands. Vultr, DigitalOcean, CloudCone, Linode and Atlantic.net are a few top names on the list of best and the fastest cloud hosting service providers around the world. They all can be subscribed for a web hosting account using LAMP (Linux, Apache, MySQL and PHP) or LEMP (Linux, Nginx, MySQL and PHP) software stacks. And you can have a similar problem with WordPress hosting on any of them.
It’s a very common issue that PHP mail() function, which is responsible for sending WordPress related emails like- Password reset emails, Comment notifications, Contact form emails, is not enabled or configured by default. In this post, we will discuss about what PHP mail() is used for in WordPress and how to enable it to allow WordPress to send password reset email. Also I will show you a very simple way to enable and configure PHP mail() or mail() function on Vultr Cloud Compute Server (Vultr’s virtual cloud hosting server).
PHP mail() function in WordPress
WordPress is built on PHP and it uses PHP mail() to send emails in different situations. It is also referred as “Wp_mail()” function or just “mail()” function. PHP mail() function however, uses a program called “sendmail” to work or send email using “sendmail_path”. Often this program is installed by default with your LAMP or LEMP stack. The settings and configurations of “sendmail” is also updated into the “php.ini” file which is used by web-server to execute hundreds of tasks.
So basically any website built on PHP, can take advantage of PHP mail() function to send emails directly from your website without asking you to provide the SMTP or login password for the Email account used to send email from. This is actually not as good as it sounds because anybody can setup their website to send mail for any XYZ domain, which is always the reason why most of the WordPress emails are marked as [SPAM] by Gmail, Yahoo, Outlook or similar other e-mail providers. Sometimes they are even blocked by Gmail, Yahoo or other such Email providers to prevent spamming and and to secure their network. That’s also the reason why some WordPress hosting providers ask their users to only use email associated with the domain WordPress is installed on. Some providers also use security policy to block sending WordPress emails from domain other than the one WordPress is installed on. But here we will be focusing on PHP mail() function, which is unable to deliver WordPress email. Let me mention the most common reasons of “WordPress not sending email on cloud hosting services like Vultr, DigitalOcean, Cloudcone, etc”.
Common reason of WordPress unable to Send Mails or PHP mail() not working
- PHP Mail() function is disabled in php.ini
- Incorrect Hostname setup in /etc/hosts or Virtual host (vhosts) files
- ‘sendmail‘ not installed
- sendmail incorrectly configured or ‘sendmail_path‘ is missing in php.ini file
- Firewall is Blocking Traffic
- SMTP port is blocked by Hosting Provider
#1. PHP Mail() function is disabled in php.ini
Your host may have disabled the mail() function
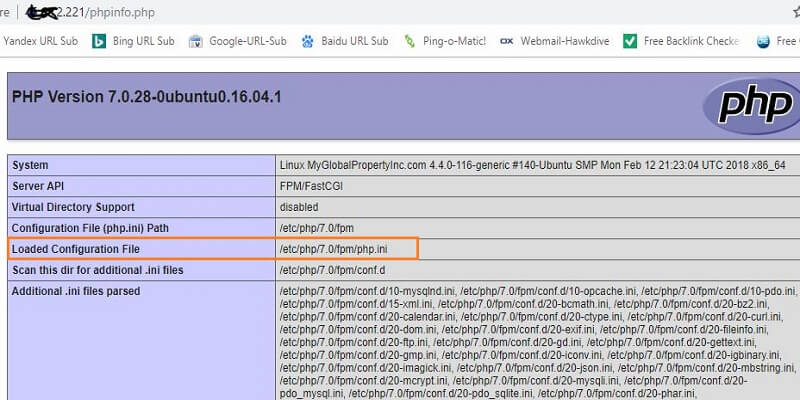
To find out if PHP mail() function is disabled in php.ini file, you need to first open the php.ini file. ‘php.ini‘ file is often located in a folder under /etc/php/. Its path varies according to the PHP and OS version installed on your VPS. In one click WordPress app with Vultr, the path to php.ini file is “/etc/php/7.0/fpm/php.ini” while the same One click WordPress app on DigitalOcean (with LAMP) has its path at “/etc/php/7.2/apache2/php.ini“. You can easily find the path of PHP.ini file by uploading a simple php file with following script to your hosting server.
<?php

phpinfo();

?>
Simply copy the above written php script and paste it into a text-editor like notepad++ or notepad or TextEdit on Mac and save it as info.php. Upload info.php file to the root directory of your WordPress website which may be /var/www/html/ if not changed.
After the info.php file is uploaded, try to access it by typing the following URL:
http://ipaddress_of_your_server/info.php or http://yourdomainname.com/info.php
This URL will open a web page with tons of information on PHP version, its settings and configuration. Look for the “Loaded Configuration File” option and note down the path of PHP.ini file.

Now SSH to your Cloud hosting server or VPS using puTTY or Console. Type the following command to read and edit php.ini file.
sudo nano /etc/php/7.0/fpm/php.ini
Now look for directive “disable_function=”, if it has got mail in there, jut remove mail and press “CTRL+X” to quit and type “Y” to confirm changes if there is any and hit enter to confirm the file write. Now try to reset the password and see if you still get the same error saying “Your host may have disabled the mail() function”.
#2. Incorrect Hostname setup in /etc/hosts or Virtual host (vhosts) files
There are two hosts file that you want to check here. If anyone of them has incorrect setting, your WordPress will not be able to send any email. Open console or login to your VPS by SSH and type the following command.
sudo nano /etc/hosts
You should see something similar to one of the following
127.0.0.1 localhost localhost.localdomain
::1 localhost localhost.localdomain
103.82.101.18 webhost.hawkdivemedia.com
OR,
127.0.0.1 localhost localhost.localdomain yourhostname
If you see something similar to any of the above, you are good. If it’s not, then just copy the second line “127.0.0.1 localhost localhost.localdomain yourhostname” replace “yourhostname” with the actual name you want to give to your server such as “webhost” or “Darvis” or anything”. Press CTRL+X to quit, say yes to save changes and press Enter. If you are on Vultr and your “/etc/hosts” is blank or was never created then create the file and past just the second line.
Editing Virtual Hosts(vhosts) file
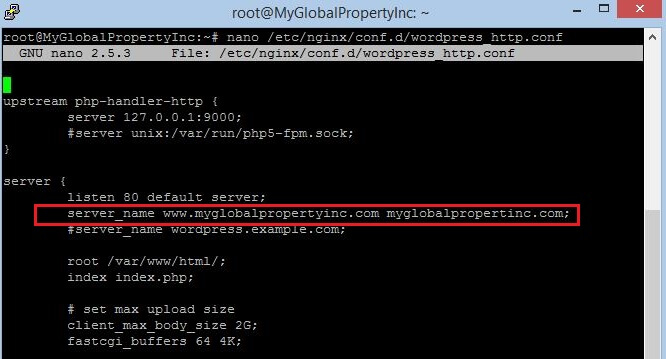
Once the /etc/hosts file is created or updated, you need to check the virtual hosts file. Virtual host files are used to host multiple site on same VPS server. It has different path according to the OS. Nginx on LEMP stack has its virtual hosts file located at /etc/nginx/conf.d/ while Apache on LAMP stacks has its path to /etc/apache2/sites-available/. Vultr installs LEMP with one click WordPress app, and the default vhosts files are “/etc/nginx/conf.d/wordpress_http.conf” and “/etc/nginx/conf.d/wordpress_https.conf”. Open both the virtual hosts also known as server blocks or Nginx configuration files and update the “server_name” attribute to the domain of your WordPress Website. You might see an “_” as a value for “server_name”- you just need to replace it with real domain name and it should look similar to this.

Do the same with “/etc/nginx/conf.d/wordpress_https.conf” and save the file by pressing CTRL+X, then say yes and hit enter to save. After both the file are updated restart the Nginx service by typing:
systemctl restart nginx.service
On Apache Server
If you are on Apache server or using LAMP stack just like DigitalOcean’s one click WordPress app, then type the following commands to open virtual hosts files and make sure the ServerName and ServerAlias attribute has the correct address as shown below.
sudo nano /etc/apache2/sites-available/000-default.conf

sudo nano /etc/apache2/sites-available/default-ssl.conf
An Example of Apache Virtual Host File on My DigitalOcean Droplet.
<VirtualHost *:80>
    ServerAdmin admin@hawkdivemedia.com
    ServerName hawkdivemedia.com
    ServerAlias www.hawkdivemedia.com
    DocumentRoot /var/www/hawkdivemedia.com/public_html
    ErrorLog ${APACHE_LOG_DIR}/error.log
    CustomLog ${APACHE_LOG_DIR}/access.log combined
</VirtualHost>
After you have corrected or updated the Virtual Hosts, simply press “CTRL+X” and press ‘Y’ and hit enter to save the changes.
#3. ‘sendmail’ not installed
One of the major reason of php mail() not working with WordPress app is no sendmail application installed. To check whether the sendmail is installed or not. Simply type the following command.
sendmail myemail@gmail.com
If sendmail is installed, it will give you a blank line with blinking cursor to type your message otherwise you will see the following error.
sendmail could be found in the following packages:
exim4-daemon-heavy
exim4-daemon-light
lsb-invalid-mta
postfix
citadel-mta
courier-mta
dma
esmtp-run
masqmail
msmtp-mta
nullmailer
opensmtpd
qmail-run
sendmail-bin
ssmtp
xmail
If you see the error, then type the following command to install sendmail:
Note:- Some host such as DigitalOcean may not have the sendmail installed while some may have an outdated version of sendmail application and still does not show any error but a blank line. In such cases, simply go ahead and try to install the sendmail application.
sudo apt-get install sendmail
After the sendmail is installed, restart apache by typing ”
sudo systemctl restart apache2
If its Nginx ( Such as on Vultr Cloud Compute), type:
systemctl restart nginx.service
Now check your WordPress contact form by sending any message or try to reset you WordPress user account password. You should now receive emails. If WordPress is still not able to send email or you still see the same message: “The email can not be sent, your host may have disabled the mail() function” then move on to the next steps.
#4. sendmail incorrectly configured or ‘sendmail_path’ is missing in php.ini file
There might be a possibility that sendmail is not running or misconfigured. You can run “sendmailconfig” command to rebuild the sendmail configuration. Type the command:
sudo sendmailconfig
You just need to answer ‘Y’ to all the questions during configuration and then finally restart the Apache.
sudo systemctl restart apache2
Check if the ‘sendmail_path‘ is correct in php.ini file. You can also confirm this from the info.php script as mentioned in step #1. Just access the script URL and look for “sendmail_path” it should have the value as “/usr/sbin/sendmail -t -i” as shown in the picture below.

If the “sendmail_path” attribute has a value other than what is mentioned above, then open php.ini file and Find the following line:
sendmail_path =
and set its value to “/usr/sbin/sendmail -t -i” (without double inverted comma). Also, make sure the other attributes for [mail function] in php.ini is similar to what I have on my VPS as mentioned below.
[mail function]
; For Win32 only.
; http://php.net/smtp
SMTP = localhost
; http://php.net/smtp-port
smtp_port = 25

; For Win32 only.
; http://php.net/sendmail-from
;sendmail_from = me@example.com

; For Unix only. You may supply arguments as well (default: "sendmail -t -i").
; http://php.net/sendmail-path
sendmail_path = /usr/sbin/sendmail -t -i

; Force the addition of the specified parameters to be passed as extra parameters
; to the sendmail binary. These parameters will always replace the value of
; the 5th parameter to mail().
;mail.force_extra_parameters =

; Add X-PHP-Originating-Script: that will include uid of the script followed by the file$
mail.add_x_header = On
After you have corrected the values, finally restart your web server Apache or Nginx.
sudo systemctl restart apache2

systemctl restart nginx.service
Note:- You can also restart the sendmail service to refresh the updated values. Simply type the following command:
sudo /etc/init.d/sendmail restart
#5. Firewall is Blocking Traffic
Ubuntu 16.04 or 18.04 servers have a basic firewall called UFW (
Uncomplicated Firewall) which only allow connections to certain services. It is the best and most simple firewall configuration tool for iptables that is included and installed with Ubuntu by default. So if your WordPress website also gives error saying- ‘your host may have disabled the mail() function’, there is more likely that the UFW firewall is enabled and blocking the SMTP out port and that’s why your WordPress site is unable to send emails. To check the status of UFW firewall or to see if its running or stopped or blocking any port, run the following command.
sudo ufw status
root@Webhost:~# sudo ufw status
Status: active

To                         Action      From
--                         ------      ----
22/tcp                     ALLOW       Anywhere
80/tcp                     ALLOW       Anywhere
443/tcp                    ALLOW       Anywhere
OpenSSH                    ALLOW       Anywhere
25/tcp                     ALLOW       Anywhere
22/tcp (v6)                ALLOW       Anywhere (v6)
80/tcp (v6)                ALLOW       Anywhere (v6)
443/tcp (v6)               ALLOW       Anywhere (v6)
OpenSSH (v6)               ALLOW       Anywhere (v6)
25/tcp (v6)                ALLOW       Anywhere (v6)

25                        DENY OUT     Anywhere
25 (v6)                   DENY OUT     Anywhere (v6)
Mail servers, such as Sendmail and Postfix, uses port 25 or 587 by default to send emails. Though, you can make them change the way mail is delivered by setting up a rule to listen to mail delivery on a different port.
As per the above command and its output, we clearly see that the UFW firewall is enabled and it is blocking or denying SMTP port for outbound traffic(In Red) while the SMTP internal(In Blue) is allowed. Now if that’s the case with your server, you can simply delete that SMTP rules and enable the WordPress Email or PHP mail(function) immediately. Use the following command to delete the SMTP filter rules.
root@Webhost:~# sudo ufw allow out 25
Rule updated
Rule updated (v6)
Now reload the UFW firewall by typing the following command.
root@Webhost:~# sudo ufw reload
Firewall reloaded
root@Webhost:~#
Also restart your server for the changes to take effect. Type command:
/sbin/shutdown -r now
You can also run “iptables -L” to show all firewall rules, and “iptables -F” to flush all rules from the chain.
If you the problem is still not fixed try after disabling the firewall temporarily. Type command:
root@Webhost:~# sudo ufw disable
Firewall stopped and disabled on system startup
Now if you check the status of firewall, it should say inactive. Restart your server and check if the Mails() is working now.
root@MyGlobalPropertyInc:~# sudo ufw status
Status: inactive
root@MyGlobalPropertyInc:~#
#6. SMTP port is blocked by Hosting Provider
This is another most common reason of WordPress not being able to send email or PHP mail(), Wp_mail() function not working. Most of the hosting providers specially VPS or cloud hosting provider block SMTP port for outbound connection or apply filter based on the user account to combat spam and spam-like activities. In such cases there is nothing you can do except contacting the service provider and asking them nicely to open port #25 for you. Vultr often disable the SMTP port on new users and open it after requesting and providing them some information they may ask.
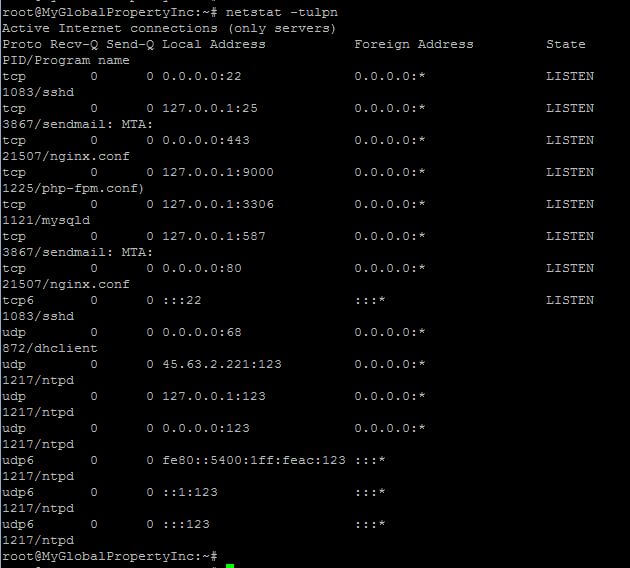
But, before you contact them, you need to be 100% sure if the SMTP port is blocked on your account. Type the following command to see all the available processes and the port they are listening upon.
netstat -tulpn or netstat -uplnt | less

As in the above picture, we see that sendmail process is available and the port 25, 443 and 587 is open for it to listen. If you do not see sendmail or any mail program in the list, then you won’t be able to send mail out until you choose and setup a different port or remote service.
Now if you have already tried all the above mentioned steps from #1 through #5 and you are still not able to send email or WordPress email are still not going through. Try the following command to check if you are able to connect with an external host on SMTP port 25.
root@webhost:~# telnet ALT1.ASPMX.L.GOOGLE.COM 25
Trying 2607:f8b0:4001:c1d::1b...
Trying 74.125.126.26...
Connected to ALT1.ASPMX.L.GOOGLE.COM.
Escape character is '^]'.
220 mx.google.com ESMTP e66-v6si1322712ite.88 - gsmtp
quit
221 2.0.0 closing connection e66-v6si1322712ite.88 - gsmtp
Connection closed by foreign host.
root@webhost:~#
If you get it connected, that means SMTP ports are open and working fine and mails are not being delivered for some other reason affecting recipient server. There may be a possibility that the recipient’s mail server is treating this email as SPAM and dropping it before delivering.
On the other hand, if it is never connected to any external SMTP host, then you must contact your hosting service provider because it could be a SMTP filter applied from their end. And the error message saying ‘Your host may have disabled the mail() function’ might be true
If the service provider is not blocking the port and you have checked and followed all the above mentioned steps but still WordPress is not sending email to your WordPress admin email ID. Try replacing the admin recipient email to an email from different service provider. If the problem still persists, try the following command to trace the email route.
root@webhost:~# echo "test message" | sendmail -v contact@hawkdivemedia.com
contact@hawkdivemedia.com... Connecting to [127.0.0.1] via relay...
220 webhost.hawkdivemedia.com ESMTP Sendmail 8.15.2/8.15.2/Debian-10; Fri, 12 Oct 2018

16:23:28 +00.1]
>>> EHLO webhost.hawkdivemedia.com
250-webhost.hawkdivemedia.com Hello localhost [127.0.0.1], pleased to meet you
250-ENHANCEDSTATUSCODES
250-PIPELINING
250-EXPN
250-VERB
250-8BITMIME
250-SIZE
250-DSN
250-ETRN
250-AUTH DIGEST-MD5 CRAM-MD5
250-DELIVERBY
250 HELP
>>> VERB
250 2.0.0 Verbose mode
>>> MAIL From:<root@webhost.hawkdivemedia.com> SIZE=13

AUTH=root@webhost.hawkdivemedia.com
250 2.1.0 <root@webhost.hawkdivemedia.com>... Sender ok
>>> RCPT To:<contact@hawkdivemedia.com>
>>> DATA
250 2.1.5 <contact@hawkdivemedia.com>... Recipient ok
354 Enter mail, end with "." on a line by itself
>>> .
050 <contact@hawkdivemedia.com>...Connecting to mail.hawkdivemedia.com. via esmtp..
050 220-box5047.bluehost.com ESMTP Exim 4.91 #1 Fri, 12 Oct 2018 09:25:06 -0600
050 220-We do not authorize the use of this system to transport unsolicited,
050 220 and/or bulk e-mail.
050 >>> EHLO webhost.hawkdivemedia.com
050 250-box5047.bluehost.com Hello webhost.hawkdivemedia.com [173.82.151.18]
050 250-SIZE 52428800
050 250-8BITMIME
050 250-PIPELINING
050 250-AUTH PLAIN LOGIN
050 250-STARTTLS
050 250 HELP
050 >>> STARTTLS
050 220 TLS go ahead
050 >>> EHLO webhost.hawkdivemedia.com
050 250-box5047.bluehost.com Hello webhost.hawkdivemedia.com [173.82.151.18]
050 250-SIZE 52428800
050 250-8BITMIME
050 250-PIPELINING
050 250-AUTH PLAIN LOGIN
050 250 HELP
050 >>> MAIL From:<root@webhost.hawkdivemedia.com> SIZE=331 AUTH=<>
050 250 OK
050 >>> RCPT To:<contact@hawkdivemedia.com>
050 >>> DATA
050 250 Accepted
050 354 Enter message, ending with "." on a line by itself
050 >>> .
050 250 OK id=1gAzJQ-0006dM-5O
050 <contact@hawkdivemedia.com>... Sent (OK id=1gAzJQ-0006dM-5O)
250 2.0.0 w9CFNSgG009826 Message accepted for delivery
contact@hawkdivemedia.com... Sent (w9CFNSgG009826 Message accepted for delivery)
Closing connection to [127.0.0.1]
>>> QUIT
221 2.0.0 webhost.hawkdivemedia.com closing connection
root@webhost:~#
Now try to send message from a contact form on WordPress site or reset your WordPress account Password to see if it works fine. I hope one of the above mentioned steps, fixed your PHP mail() related problems and you do not see the error -“Your host may have disabled the mail() function” anymore. However, if you are unable to fix this issue yourself or having some other problems in your way to figure out the exact issue, then simply contact me through Skype:live:hawkdvetech or drop me an email. Please share this article, if you liked.


![The Role Of Color Schemes In Web Design [Full Guide] web design minimalist](https://www.hawkdive.com/media/web-design-minimalist-218x150.jpg)


