In this article, you will get to know how you can easily show the Language bar on Desktop or Taskbar in Windows 11 in no time.
On your Windows 11 PC, you can effortlessly change the keyboard layout to choose the language of input as per your liking. The characters that display on your screen as you type are determined by the language of your keyboard layout. You can not only change the language of your keyboard layout but also Add a new language as your preference.
Show Language Bar on Desktop or Taskbar in Windows 11
At a Glance:
- Go to the Settings
- Select Time & Language
- Choose Typing option( Right Side)
- Click on Advanced Keyboard options
- Check/ Uncheck the box next to Use the Desktop language bar when it’s available
- Tap Language Bar Options
- Select Floating on the desktop
- Check Show additional language bar icons in the taskbar
- Tick Show text labels on the Language Bar
Now, you will be walked you the steps to display the language bar on your desktop or taskbar. Let’s get started:
- Go to the System Settings on your Windows 11 PC. To go to Settings, press the Windows+I key on your keyboard. Alternatively, you can also opt to go to Settings from the Start Menu. Just click on the windows icon on the taskbar and tap-open the Settings app from the Start Menu.
- Now, click on Time & Language on the left pane.
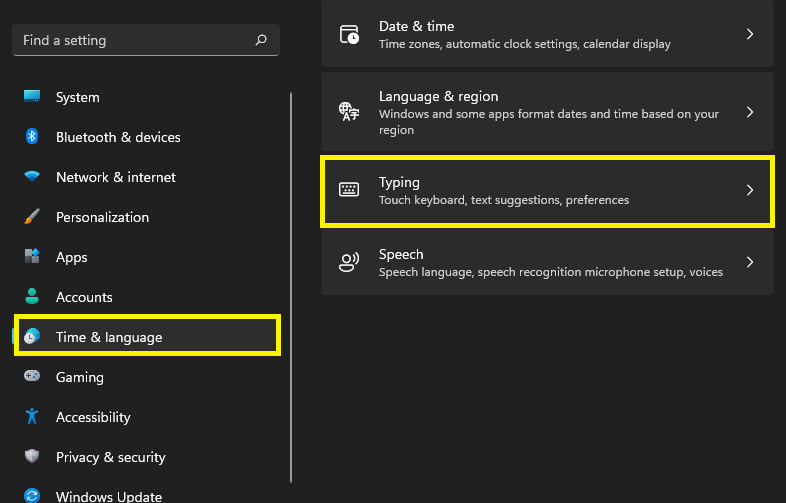
- Then, click on the Typing tile on the Right pane.
- Further, select the Advanced Keyboard Settings option from the Right side as given below.
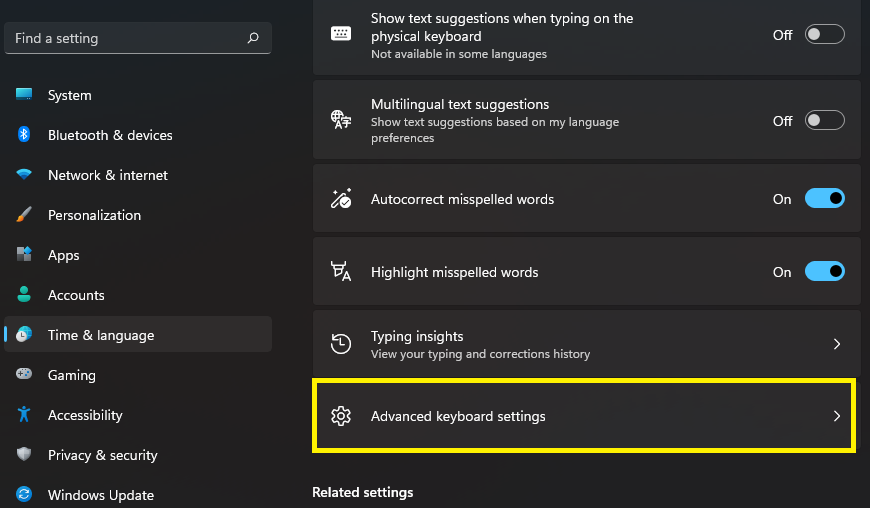
- Now, check the box next to Use the Desktop language bar when it’s available.
- if it is already checked then uncheck it and see if it makes the language bar appear on the taskbar.
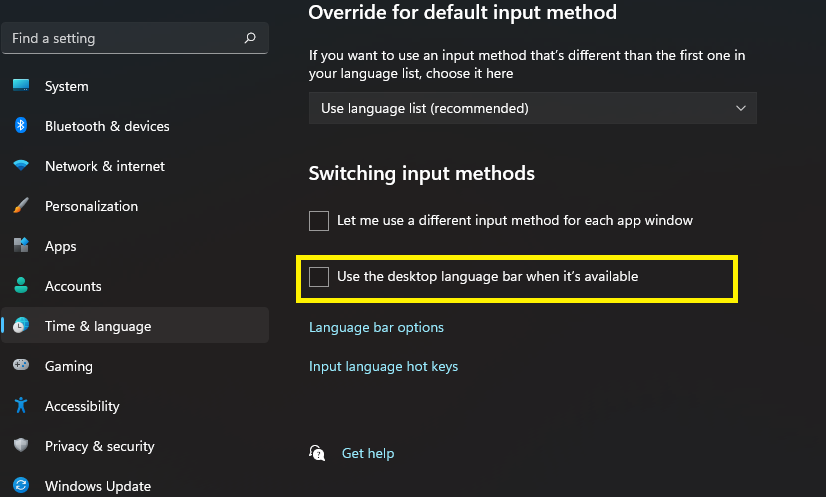
- Click on Language Bar options available just below the Use the Desktop Language bar when it’s available option.
- Select Floating on the desktop and Check Show additional language bar icons in the taskbar as well as Show text labels on the Language Bar as shown below in the screenshot.
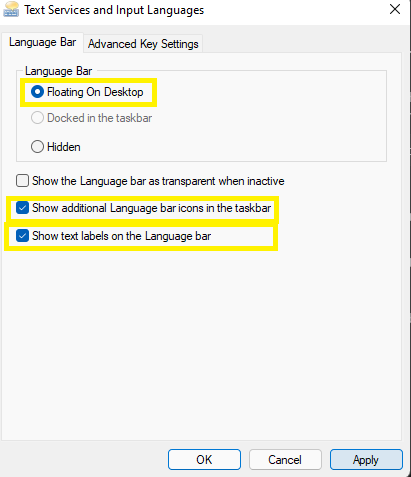
- Click on Apply and then tap OK at the bottom.
- Now, Close the Settings and you are done.
So, this way you can easily display the language bar on the taskbar or desktop on your Windows 11 PC in no time. However, you face any problems while doing so, please let us know in the Comment Section.
Also Read: Touch Screen Gestures Windows 11- Ultimate Guide
Remove Language Bar from the Taskbar
Now, let us discuss how to remove Language Bar or Switcher from the taskbar in a few easy steps:
- Open the Settings on your Windows 11 PC( Windows+I Key combination)
- Then, select Time & Language option from the left pane.
- Click on Typing option on the Right Side.
- Select the option of Advanced keyboards settings from the Right-pane.
- You’ll now notice a Use the desktop language bar when it’s an available option in the Switching input methods section. Choose that option.
Congratulations! You have successfully removed the language bar or Language switcher from the taskbar. Further, we will discuss how you can add a new keyboard language to the Language bar (taskbar).
Also Read: How To Remove Language In Windows 11
Adding a Keyboard language to Taskbar in Windows 11
As already mentioned, you can easily add another language to the Language bar. It will change the Keyboard layout to the added language. You can even attach language-specific keyboards to fully utilize this feature of the keyboard layout. Now, you will be walked through the steps to add another language to the taskbar in Windows 11:
- Open the Settings on your device and click on Time & Language on the left-pane.
- Select Language & Region on the right side.
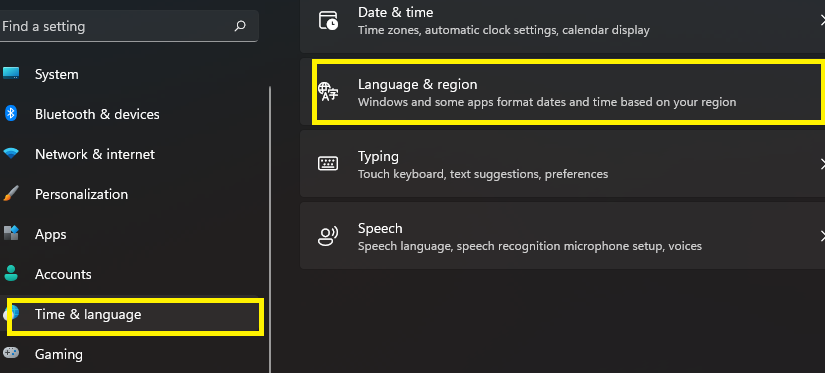
- Click on Add a language option next to Preferred language as given below in the screenshot.
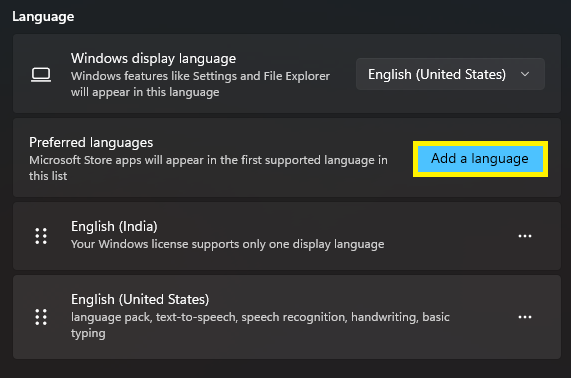
- Now, Choose a language pop-up that will appear on the screen. Select your preferred language from the list of languages displayed on the screen.
- After selecting your preferred language, click on Next.
- Next, choose whether you wish to install the optional language features or keep them as is. To continue, click Install.
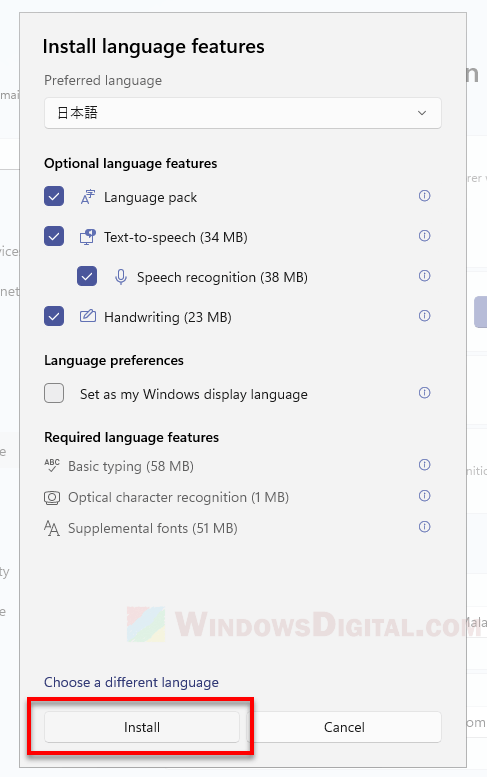
- Installation of the new language and the features related to it may take some time. So be patient.
- Further, You will be prompted to sign out of Windows after the installation is complete for the changes to take effect. To do so, sign out of Windows by clicking the “Sign out” button, then sign back in.
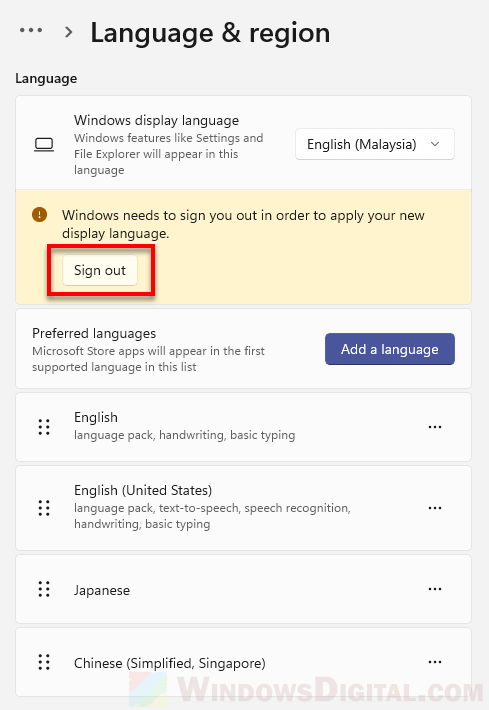
- Upon successful installation, its keyboard layout will be added by default.
Hurray! You have successfully added a new keyboard language to the taskbar. So, you can easily switch different keyboard layouts and type in your preferred language. You can do this by just going to the language switcher in the taskbar.
Also Read: How To Change Display Language in Windows 11
Winding Up
So, that’s all for now. we have mentioned various steps to show the language bar on the taskbar as well as a desktop in your Windows 11 PC. Moreover, the steps to remove the language switcher from the taskbar are also discussed in this guide. Additionally, this article also walks you through the steps to easily add a new language to the language switcher on the taskbar. If you face any problems while performing these steps, kindly let us know in the comment section. We would love to help you solve your tech-related problems.


