iCloud is a lifesaver when you require access to information like contacts, calendar events, and images on all of your devices. The people we trust the most can sometimes be the most irritating. We understand the anguish of having to cancel an iCloud backup because it’s taking too long.
The iCloud sync procedure should take no more than a few seconds under ideal circumstances. Still, if you’re as impatient or if it seems to be taking forever, here are a few easy ways to speed things up.
Why is my iCloud backup so slow, and why won’t it restore?
Considering that iCloud can only be accessed online, your Internet connection speeds will be the most crucial element. The features of iOS also increase the risk that your new backup will fail since it won’t work with the previous one. If you’ve just updated iOS, you may run into problems, such as the inability to access your iCloud backup, because each new backup is an incremental copy of the previous one.
When your iOS device is charged, locked, and connected to Wi-Fi, it will back up to iCloud if you have automatic backups enabled. Low power or a poor network connection are the most common causes of sync delays.
If you want your backups to go as quickly as possible, make sure all of your devices have a stable internet or cellphone connection. If you need to sync a lot of data, plugging your smartphone into power is a good idea regardless of the battery %.
In the case of Photos, syncing won’t happen automatically while the iPhone is in Low Power Mode. The time it takes for your media to upload to iCloud is dependent on the size of your collection and your connection speed, as stated on Apple’s support website. Your upload time may increase significantly if you have a lot of media files to transfer.
#1. Before you back up, remove any unnecessary files.
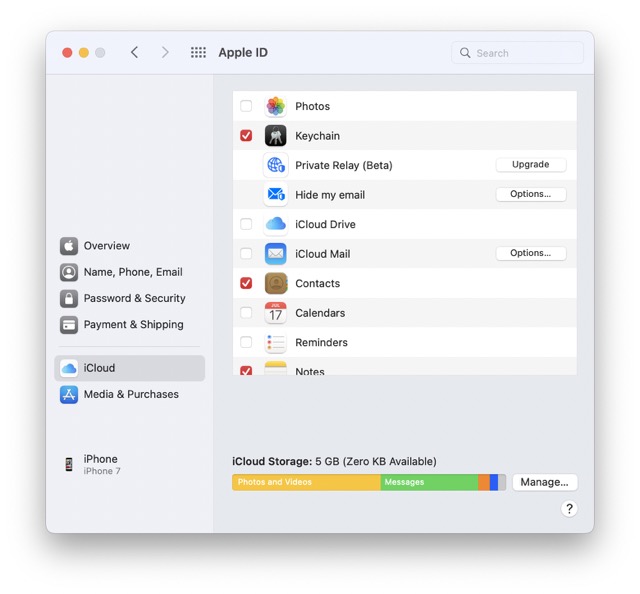
Do you have unused applications taking up space on your phone? Remove them if possible before you retreat. Although app data is backed up, app data is not backed up. The backup process may be sped up in this straightforward approach.
Go to your iPhone’s Settings; from there, choose General, and Storage.
Tips on how to lessen your phone’s storage footprint are provided below. First, you can uninstall any programmes that you no longer use. Inactive applications will be removed from your phone without erasing their icons, so you can easily reinstall them if necessary.
#2. Disable App-Specific Backups
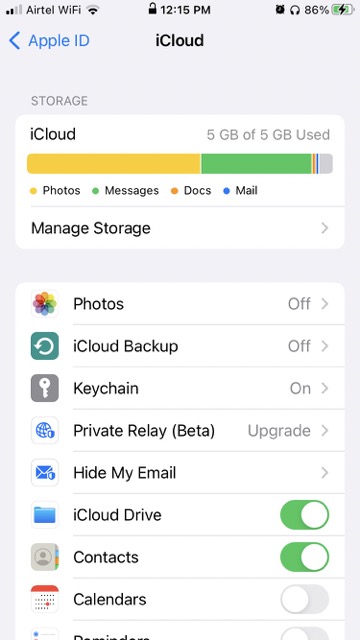
While performing a backup, it’s crucial to consider the files and folders to save carefully. This is because it’s possible that we won’t need to restore a wide variety of data and applications. As a result, the iCloud backup will run much faster, and we’ll have helped by lowering the backup size.
How to quickly and easily disable and remove backups for various items:
- To access your personal settings, choose your name.
- After that, head on over to iCloud.
- Select the storage you want to manage and click it.
- Select your device from the list and then click Backups.
- Be patient while this page loads. However, you’ll be able to view a list of all installed programs that support iCloud backup.
- To disable backup for a certain application, you may navigate to its page and move the corresponding toggle.
- Select the Turn Off and Delete options from the pop-up menu.
When you disable iCloud backup for an app, you’ll also see the Backup Size decrease at the top of the screen. In contrast, re-enabling an app is as simple as reversing the preceding steps and re-sliding the toggle.
#3. Make use of the quickest available online connection.
Our recommendation is to hasten your iCloud backup is simple: upgrade your internet speed. Select one with the quickest upload speed.
Using your 4G would be the greatest option as long as doing so wouldn’t cause you to exceed your monthly data limit. By carefully reading your plan, you do not incur any extra fees for exceeding your data limit.
If you’re feeling energetic and up for it, go out and try different networks. One of your pals probably has faster internet than you do. A nearby mall might provide you with access to a speedy Wi-Fi connection.
#4. Skip Backing Up Unnecessary Files and Folders
Instead of erasing information, you may tell your phone not to save particular data types. Take caution once again. What is the monetary value of the information on your phone, and what is the risk of losing it?
Learn here how to prevent specific documents from being processed. To access iCloud, visit Settings, then select your profile picture or name.
You may access your backups by selecting Manage Storage > Backups > Device Name. The next backup’s estimated size will be displayed, followed by a list of the programmes requiring the greatest storage space. If you turn off backups that aren’t essential, the following backup’s storage quota will be adjusted correspondingly.
To view all of the programmes that aren’t need to be backed up, you can select the Show All Apps option.
#5. Make sure syncing is activated
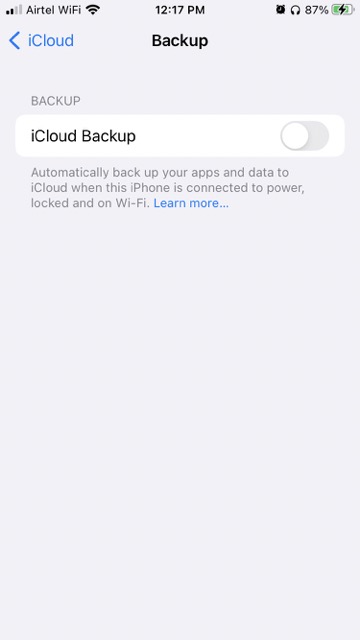
You must have (1) all of your devices set to the same time and date and (2) iCloud Drive/Documents & Data enabled for your iCloud backups to work properly, whether they are set to run automatically or manually. Here’s how to set up automatic iCloud backups:
iOS: Locate iCloud Drive by going to Settings > Apple ID > iCloud > iCloud Drive menu option. The iCloud On/Off Switch To turn iCloud back on, go to System Preferences > iCloud > Turn On. Check the boxes next to each iCloud service you wish to synchronize.
Navigate to Settings > [your name] > iCloud > iCloud Backup > Back Up Now to perform a manual iCloud backup. In addition, this is where you may verify the most recent time your gadget was properly backed up.
#6. Free Up Space on iCloud Drive
This technique is analogous to wiping data from a mobile device. If your iCloud storage is full, the backup process may be sluggish or hang altogether. If you find that files on your iCloud Drive aren’t required, you should get rid of them. Your iCloud Drive is accessible via the web browser on a Windows PC or any other Apple device.
In either an iOS device
- Launch the Files programme, then go to the Browse menu.
- Select iCloud Drive under Locations.
- The More button is up in the right corner; tap it. The next step is to press the Select button.
- You may delete many files or folders at once by selecting them all and then pressing the Delete button.
- Go return to Locations to permanently delete the files from Recently Deleted.
- To see what you’ve deleted recently, choose it. Select whatever you want eliminated, and then hit the delete button.
#7. Join the same wireless network
Having a stable internet connection and all the devices you wish to sync on the same network is important. This eliminates the need for data to “detour” through the iCloud servers and transfers it directly between the devices.
#8. Don’t automatically notify Apple of crashes whenever you perform an iTunes sync.
Depending on the crashes’ severity, iTunes may require more time to build a backup since it must first make a copy of the relevant files and send them to Apple. It is possible to save time and stop iTunes from sending crash reports by doing the following:
- Disable iTunes auto-syncing on your Apple device.
- You may force your computer to ask for permission to send the reports by right-clicking your iOS device in iTunes and selecting “Reset Warnings.”
- Uncheck “Don’t ask me again” and click “Don’t Send.”
In conclusion,
iCloud backup is a standard feature on every iOS device. It’s a simple and reliable method for keeping sensitive files safe, such as photographs or papers. More fortunately, it’s a hands-off process that automatically uploads any new or updated files from your phone to Apple’s servers safely. While you snooze, your data is backed up. Once you’ve got everything set up, you won’t even notice it.
It’s simple to retrieve your information if your phone is lost or stolen, or if you decide to upgrade to a new model. It is required to complete the replacement device setup process.


