Here’s how you can resolve the Microsoft Store Not Opening on Windows 11 issue
Microsoft Store is the official marketplace of Windows for ages and thanks to the Windows 11 update; it is completely revamped with a new design and sleeker look. Even though it already had a decent number of apps, several popular apps like Zoom, Canva, Firefox, and WordPress have made their way to the store. The Microsoft Store is pretty similar to the Apple Apps Store and the Google Play Store on Android phones, but the difference is that it is available on Windows 11 PC.
Despite such notable up-gradations, the Microsoft store still seems to be caught in the issues and users have a hard time opening the store. Apart from this, many times the apps do not download and users find themselves caught in the installation loop.
Also Read: How To Fix Widgets Not Working In Windows 11 Issue
Reasons why Microsoft Store does not open on Windows 11?
There are several reasons why Microsoft Store is not opening on your Windows 11 PC. Let’s take a look at a few of them:
- Unstable Internet Connection
- Incorrect Date & Time settings
- Incorrect Country or Region settings
- Broken or Corrupted cache Data
- Anti-virus or VPN client
- Disabled Windows Update Services
Since now we are aware of the reasons why Microsoft Store is not opening on Windows 11, let’s take a look at the solutions that can fix the problem.
Check your Internet Connection
The basic requirement to open the Microsoft Store on Windows 11 PC is a stable internet connection. That’s why a slow and unstable internet connection hampers the proper opening of the Microsoft Store. Hence before going deep into the troubleshooting hacks, it’s wise to ensure that the internet connection isn’t faulty and isn’t creating any problems. Here is an easy way to do so.
- Open the Settings App on your PC and click on the ‘Network & internet’ category in the left pane.
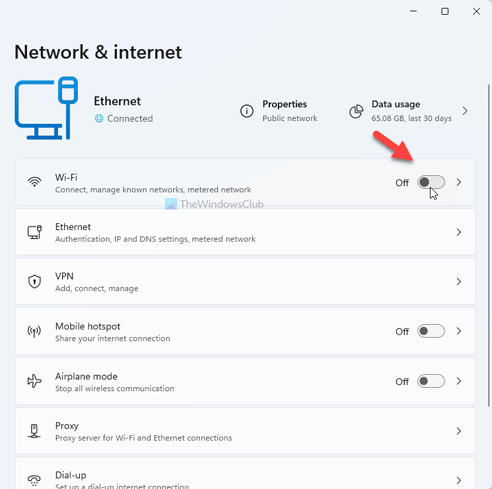
- Now you’ll see a text near the ethernet icon saying ‘Connected’ when you are connected to the Ethernet. In the case of a Wi-Fi connection, Wi-Fi will be written in place of Connected.
Reset Cache for Microsoft Store
It is possible to reset the Microsoft Store cache with only a few steps. This should be done to ensure that if there are any corrupt files in the cache, they are cleared out so that they do not hinder the working of the Microsoft Store. Here’s how to go about it:
- First of all, open the Start menu on the Windows 11 PC and type ‘wsreset’ in the search bar. Now click the first search result you see.
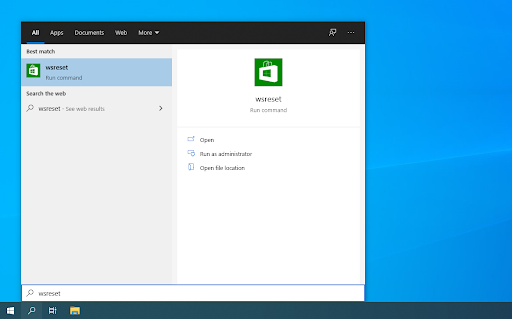
- This will open a black console window on your screen. Don’t be worried as it is normal.
- Wait patiently for it to close automatically.
- When the black screen disappears, it means the cache data is cleared.
- Now go back and see if the Microsoft Store starts working normally or not.
Use Windows Powershell to re-register on Microsoft Store
Since Microsoft Store is a native Windows app, you cannot uninstall and re-install it as any other app. So, how is it possible to re-register the application? Through the Windows Powershell. When you’ll re-register the Microsoft Store on your Windows 11 PC, all the random bugs and glitches will be solved. Here’s how to do it:
- Firstly, open the Start Menu on Windows 11 PC and type ‘PowerShell’ in the search bar.
- Now right-click the Windows Powershell tile and choose the ‘Run as Administrator option from the context menu.
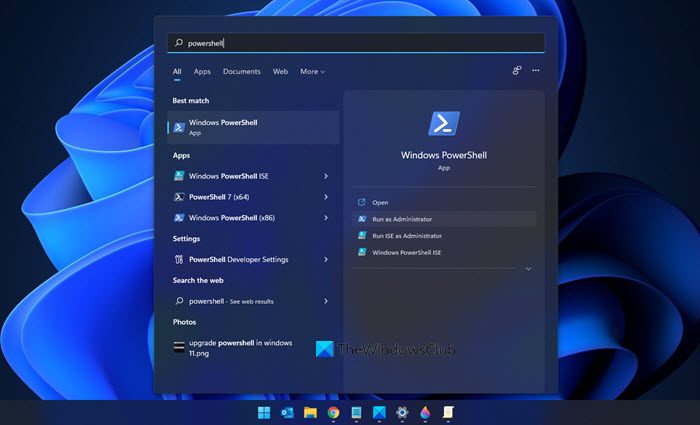
- When the PowerShell window opens up, you’ll have to copy-paste the following command in it followed by the enter key.
PowerShell -ExecutionPolicy Unrestricted -Command “& {$manifest = (Get-AppxPackage Microsoft.WindowsStore).InstallLocation + ‘AppxManifest.xml’ ; Add-AppxPackage -DisableDevelopmentMode -Register $manifest} - Now close the Windows Powershell and go back and try visiting the Microsoft Store. Most probably, it will work fine this time.
Try the Windows Store Apps Troubleshooter
Misbehaving Microsoft Store is nothing new on Windows operating system. To deal with this issue, Windows 11 includes a Microsoft Store troubleshooter. Here’s how you can use the Microsoft Troubleshooter to troubleshoot Microsoft Store issues.
- Use the Windows+I shortcut keys to open the Settings App.
- When in the Windows 11 Settings Window, click the ‘Troubleshoot’ tile to expand the category.
- Next, click the ‘Other Troubleshooters’ tile under the ‘Options’ section
- Keep scrolling until you find the ‘Windows Store Apps’. Now press the ‘Run’ button given next to this troubleshooter.
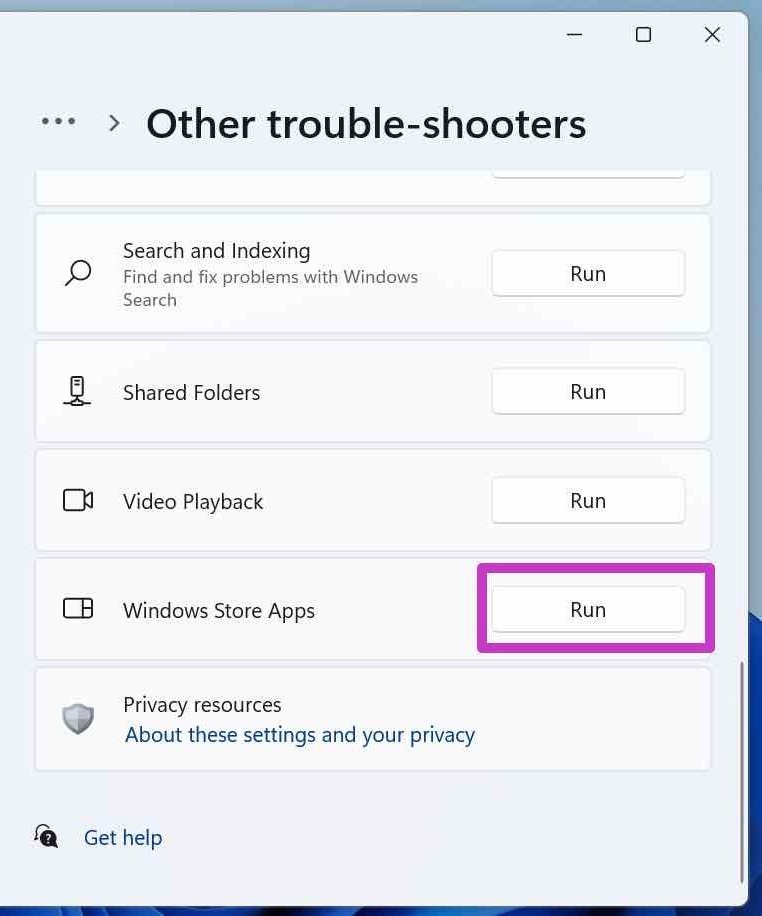
- This will open a new window and Windows will try to diagnose the issue. Wait patiently until the troubleshooter finishes running and identifies the issue with the Microsoft Store.
- If the troubleshooter is successful in identifying the issue, you will see a few solutions that can solve the issue.
Reset and Repair the Microsoft Store
Resetting or repairing the application is another easy solution that can fix the issues with the Microsoft Store. Here’s how you can reset the Microsoft Store easily.
- Head to the Settings App by using the ‘Windows+I’ shortcut key. Alternatively, you can also right-click the Windows icon present on the taskbar and click on the ‘Settings’ option.
- Now click on the ‘Apps’ tile on the left panel of the Windows Settings and then click on the ‘Apps & Features’ tile present on the right side of the window.
- Now keep scrolling until you reach the ‘Microsoft Store’ app and click the 3 dots before the app name.
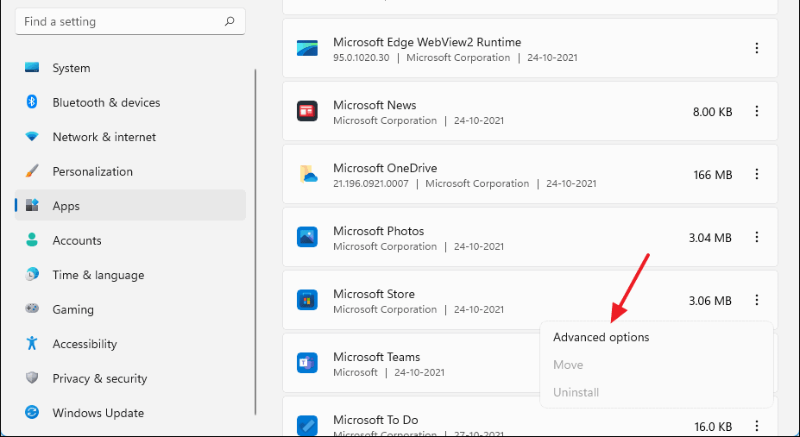
- Next, choose the ‘Advanced Options’ from the ‘Flyout’ menu.
- In the Advanced Window, keep scrolling until you reach the ‘Repair’ or ‘Reset’ option for the Microsoft Store.
- Try both the options one at a time and see if it resolves the issue with Microsoft Store on your Windows 11 PC.
Enable the Windows Update Services
If you’re not aware, Microsoft Store depends on many background services to work smoothly and ‘Windows Update Service’ is one of those important services. So if for any reason, you’ve disabled this service previously, you are will surely face problems while accessing the Microsoft store. So let’s see if the Windows Update Services is running or not and how to enable it if it is turned off.
- First of all, open the Start menu on your PC and type ‘Services’ in the Search Bar. Now click on the first search result you see. Now, you will be taken to the Services window.
- Keep scrolling until you find the Windows Update service.
- Now right-click the ‘Windows Update Service’ to access the context menu and choose the ‘Properties’ option.
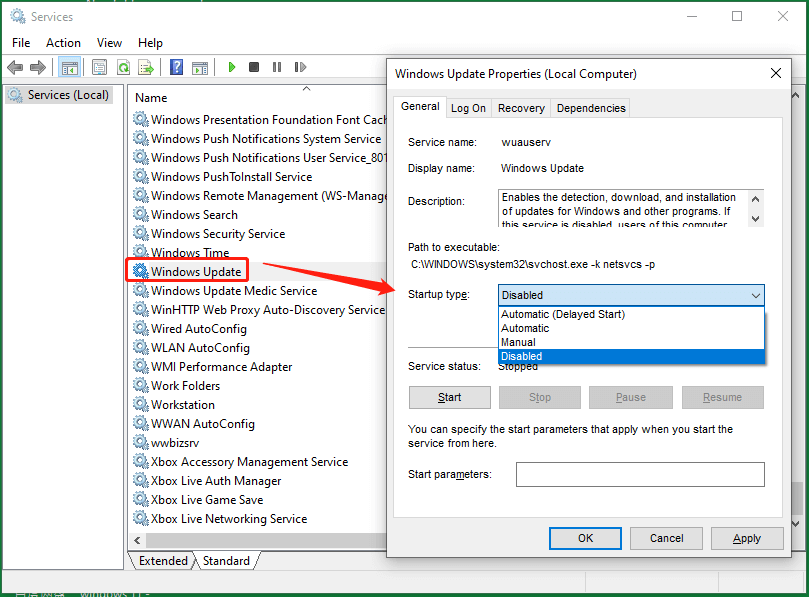
- The Properties window will open on your Windows 11 PC. Now make sure that the ‘Startup Type’ is set to ‘Automatic’.
- Don’t forget to press the Start button given below to ensure the Running Service Status.
After you make the above changes, go back and see if the Microsoft Store is working as intended. If not let’s move on to the next step.
Sign into Your Microsoft Account
This is the most obvious need to use the Microsoft Store. To download anything from the store, you need to be logged in to your Microsoft Account. Here’s how to see if you are currently signed in to your Microsoft Account or not:
- First of all, Use the Windows+I shortcut to open the Settings app on your Windows 11 PC.
- When you are in the Settings Window, click on the ‘Accounts’ category in the left pane and then choose ‘Your info’ from the right side of the Window.

- On the new window that appears, access the Account Settings and see if says ‘Microsoft account’. If you find it, this means you are currently using the Microsoft Account. If not, it means you are currently using the local account and you need to sign in to your Microsoft Account.
Conclusion
These are the tried and tested methods that have solved the Microsoft Store Not Opening on Windows 11 issue for several Windows users. So, one of the above fixes will surely work for you. Know any other method that can resolve this frustrating issue? Don’t forget to mention it in the comments.
Also Read: 12 Common Windows 11 Issues And Fixes


