Microsoft says that a computer must have a Trusted Platform Module (TPM) 2.0 component built into the motherboard in order to be able to upgrade to Windows 11. This shows how seriously the company is taking security with its new operating system.
TPM 2.0 is a feature that verifies users’ identities and protects data from being hacked. There are many things that TPM does to make it hard for someone who isn’t in front of a computer to get to it.
There are many more security and safety features in Windows 11 that start with the Trusted Platform Module, but that’s just the beginning. You need to know if you have the new operating system on your computer.
Also Read:How To Change Taskbar Location On Screen In Windows 11
1. Keep Windows 11 up to date.
Good security starts with making sure your software is up to date. If you go to Settings and click on Windows Update, you can see if the operating system has been updated with the most recent patches and bug fixes. Take a look at the options in the “Advanced options” section. Make sure Windows doesn’t restart and apply updates in the middle of the day.
2. Verify Your Login Preferences
In the Settings pane, click on your name at the top left. Then click on Sign-in options to see all the ways you can log in to the computer. You can use your webcam or a finger sensor to get more secure than a password. Most modern computers should be able to use these types of security. This is an important setting to Protect Your Privacy on Windows 11.
Also Read:How To Install Windows 11 Lite On Your PC
3. When You’re Away, Sign Out

Windows asks you to sign in again if you’ve been away from the computer for a long time. Option to make sure that you always have to log in. You may also utilise the Dynamic lock option to instruct Windows to lock your device whenever you leave it (as indicated by the location of a connected smartphone).
4. Turn on the built-in security tools.
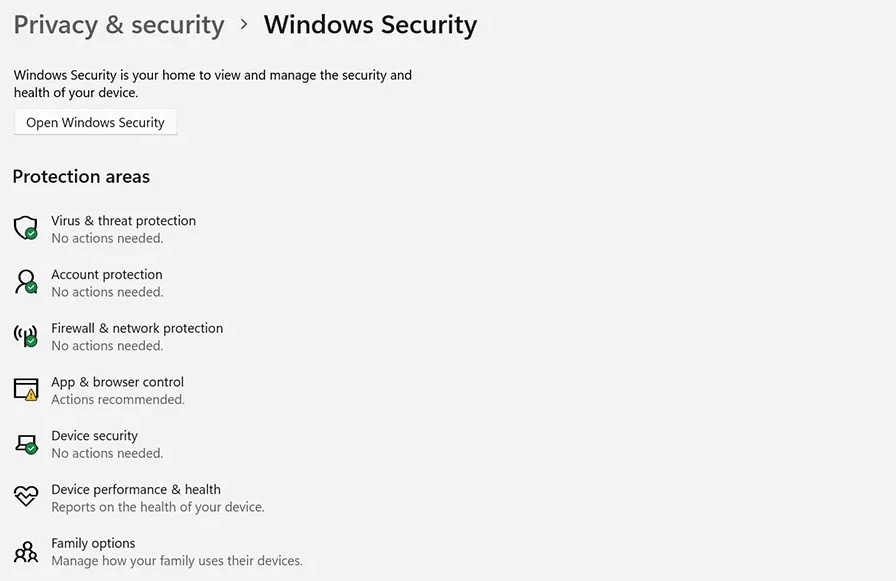
In Settings, you can make sure that the security software that comes with Windows is turned on. You can do this by clicking on Privacy & security, then Windows Security. If you don’t have third-party apps installed, this is a must. Any security issues that need your attention will be marked with a yellow exclamation point. If you click on one, you can read more about it.
Also Read:How To Temporary Disable Your Account On Windows 11
5. Do a Malware Scan
You can click Open Windows Security from the Windows Security screen to get to the built-in security centre in Windows 11. This is the same centre that comes with Windows 11. Most of the things here should be running in the background, like scans for dangerous malware. You can run a scan yourself by clicking on Virus & threat protection and choosing Quick scan.
6. Make sure your device is safe.
When you open the Windows Security tool, it will show you any problems with your Windows 11 computer’s hardware, such as problems with the TPM and the secure boot process. Take these steps right away if you think your operating system and data are at risk. This helps in to Protect Your Privacy on Windows 11
Also Read:[Fixed] DLLRegisterServer Was Not Found On Windows 11
7: Be safe when you’re on the web.
Choose App and browser control from the Windows Security tool. You’ll see two options you can choose from: Reputation-based protection (which means Windows 11 is always on the lookout for suspicious or bad-performing apps) and Exploit protection (which helps mitigate the impact of a variety of remote hacking attacks).
8. Check the security tools.
To see what software is protecting your Windows 11 computer, open Settings in Windows Security and look under Security providers for the software that is protecting your computer. This could be the security software that came with Windows or a different kind of software. If you want, you can also see what apps are running on your computer, too If you want to make sure you always know what’s going on in your home, you can also set security notification settings from this page.
Also Read:How To Remove “System Requirements Not Met” Watermark On Windows 11 Desktop
9. Manage the permissions for your apps
When you use your smartphone, you can choose which permissions apps can use. In Windows 11, you can do the same thing. Open the main Settings screen to get to the Privacy & Security page. Then, scroll down to see what permissions you have. When you click on permission, like Location, Camera, or Microphone, you can change which programs can use it. This Setting is important to Protect Your Privacy on Windows 11.
10. Ensure that your device can be located
If you lose your phone, go to Settings and choose Privacy & Security. Then, choose Find my device to have its location be recorded periodically. This means that you can log into your Microsoft account on another device and find out where your Windows 11 computer has gone. This is very useful if you left it on the train or can’t remember where it is.
Also Read:Quick Assist In Windows 11: How To Use It
11. Encrypt Your Device’s Data
This makes it more difficult for someone else to read the data on your hard drive if they get the drive out of your computer. When you choose Privacy & security in Windows 11 Settings, you can choose Device encryption. If your computer does, you can do this by clicking on “Device encryption” and then clicking on “Enable device encryption.”
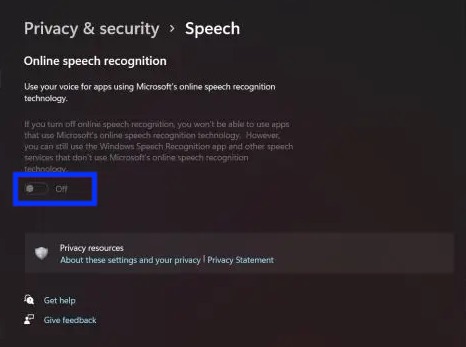
12. Disable Speech Recognition Online.

For example, if you don’t want to use Voice Typing or Voice Access, you can turn them off. These new features use Microsoft’s online speech recognition to work. If you do this, Microsoft won’t send your voice data to the cloud, which will keep your privacy.
Also Read:Network Sharing Not Working In Windows 11? Apply These Fixes
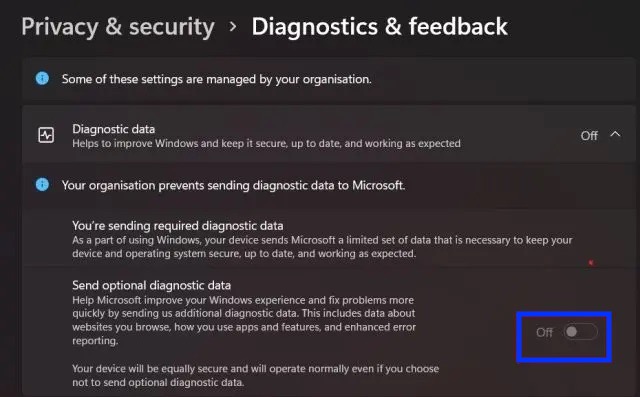
13.Disable Sending of Diagnostic Data

To keep Windows 11 safe and up to date, Microsoft sends a small amount of diagnostic data required by default. You can turn this off. You can also give Microsoft access to your browsing history, how you use an app or feature, and more.
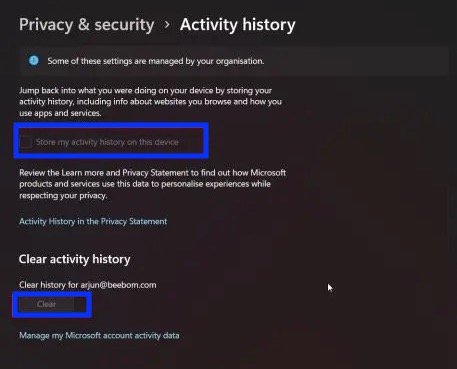
14. Turn off the Activity History.

In 2018, Microsoft added the Timeline feature to Windows 10. This feature kept track of everything you did on the computer to see what you did at any time. It was later changed to “Activity History.” In Windows 11, you can’t see a timeline of your tasks and activities. However, Microsoft still keeps a record of all your activities, which is a little weird.
Also Read:How To Always Show Scrollbars In Windows 11
15. Modify Windows 11’s Camera and Mic Permissions

You need to make changes to your Windows 11 PC to stop apps from accessing your camera and microphone while they’re running in the background. Camera and microphone permissions are the most important. This will do a lot to keep your privacy safe on Windows 11.
The Bottom Line
The important privacy settings on Windows 11 can now be turned off, so now you know how? This does not mean you should switch off everything. Would it be bad if you did that? For example, let’s say that you turned off App permissions for your camera and microphone so that no one could see or hear you. Afterward, the next time you have a meeting, you’ll soon find out that no one can see or hear you.
To avoid this situation, you need to think carefully before you turn off a privacy setting that you don’t want. Some settings may make sense to turn off in order to protect your data, but in reality, it could be a pain. All of us have to decide for ourselves what is the best balance between privacy and accessibility for our own needs.


