Microsoft continuously upgrades and adds new features that ease the management of battery life that seem to significantly improve the battery life overall. However, some users report Windows 11 battery drain issues after upgrading their OS or Windows 11 laptop battery drain even after shutdown. Battery drain is an issue that has remained constant throughout all the iterations of Windows Sadly, Windows 11 is no different. So, this guide is for you. We’ve put together a list of troubleshooting tips to help you fix the battery drain issue on Windows 11. So, let’s get started.
Also read: 10 Best Tips And Tricks For Windows 11
Content
- Run Power TroubleShooter
- Kill Resource Hogging Apps
- Optimize the Power Plan
- Turn on Battery Saver
- Reduce Screen Brightness
- Update your Windows
- Video Playback Settings
- Restrict Background Apps
- Turn Off fast startup
- Battery Report
Now we’ll discuss these ways in detail:
Run Power TroubleShooter
There is an option of troubleshooter for about every utility in Windows 11. So, if you’re facing unusual battery drain issues on Windows 11 PC. Here’s how you can run the Power TroubleShooter:
1: Tap on the search icon on the Taskbar, type troubleshooter settings, and click Enter.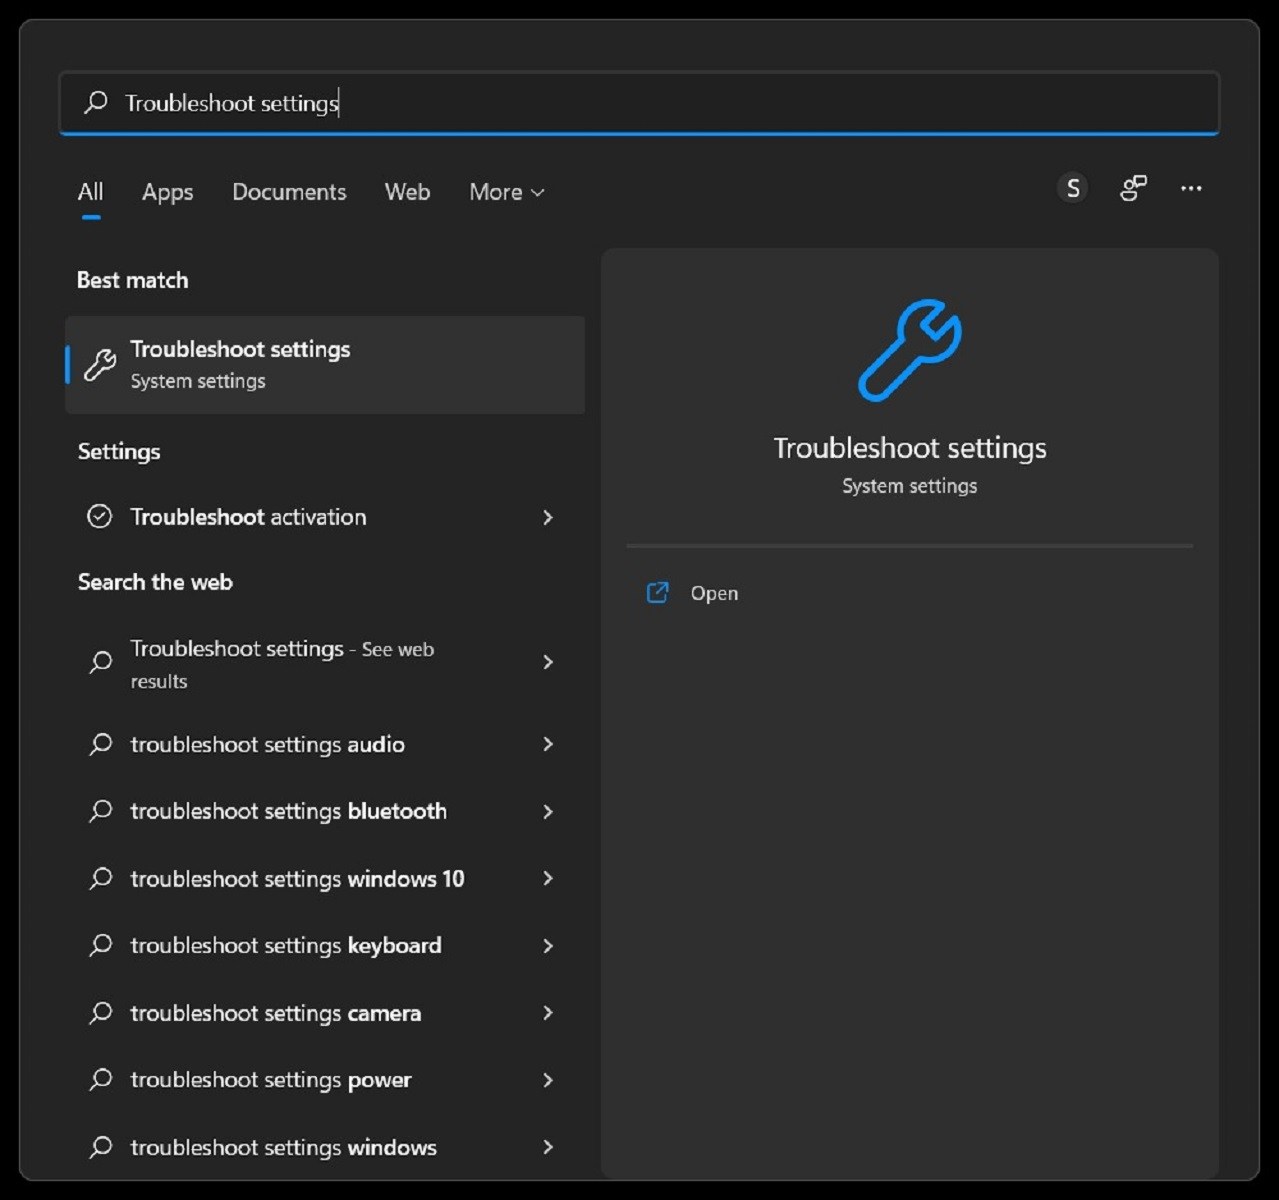
- Step 2: Select other troubleshooters
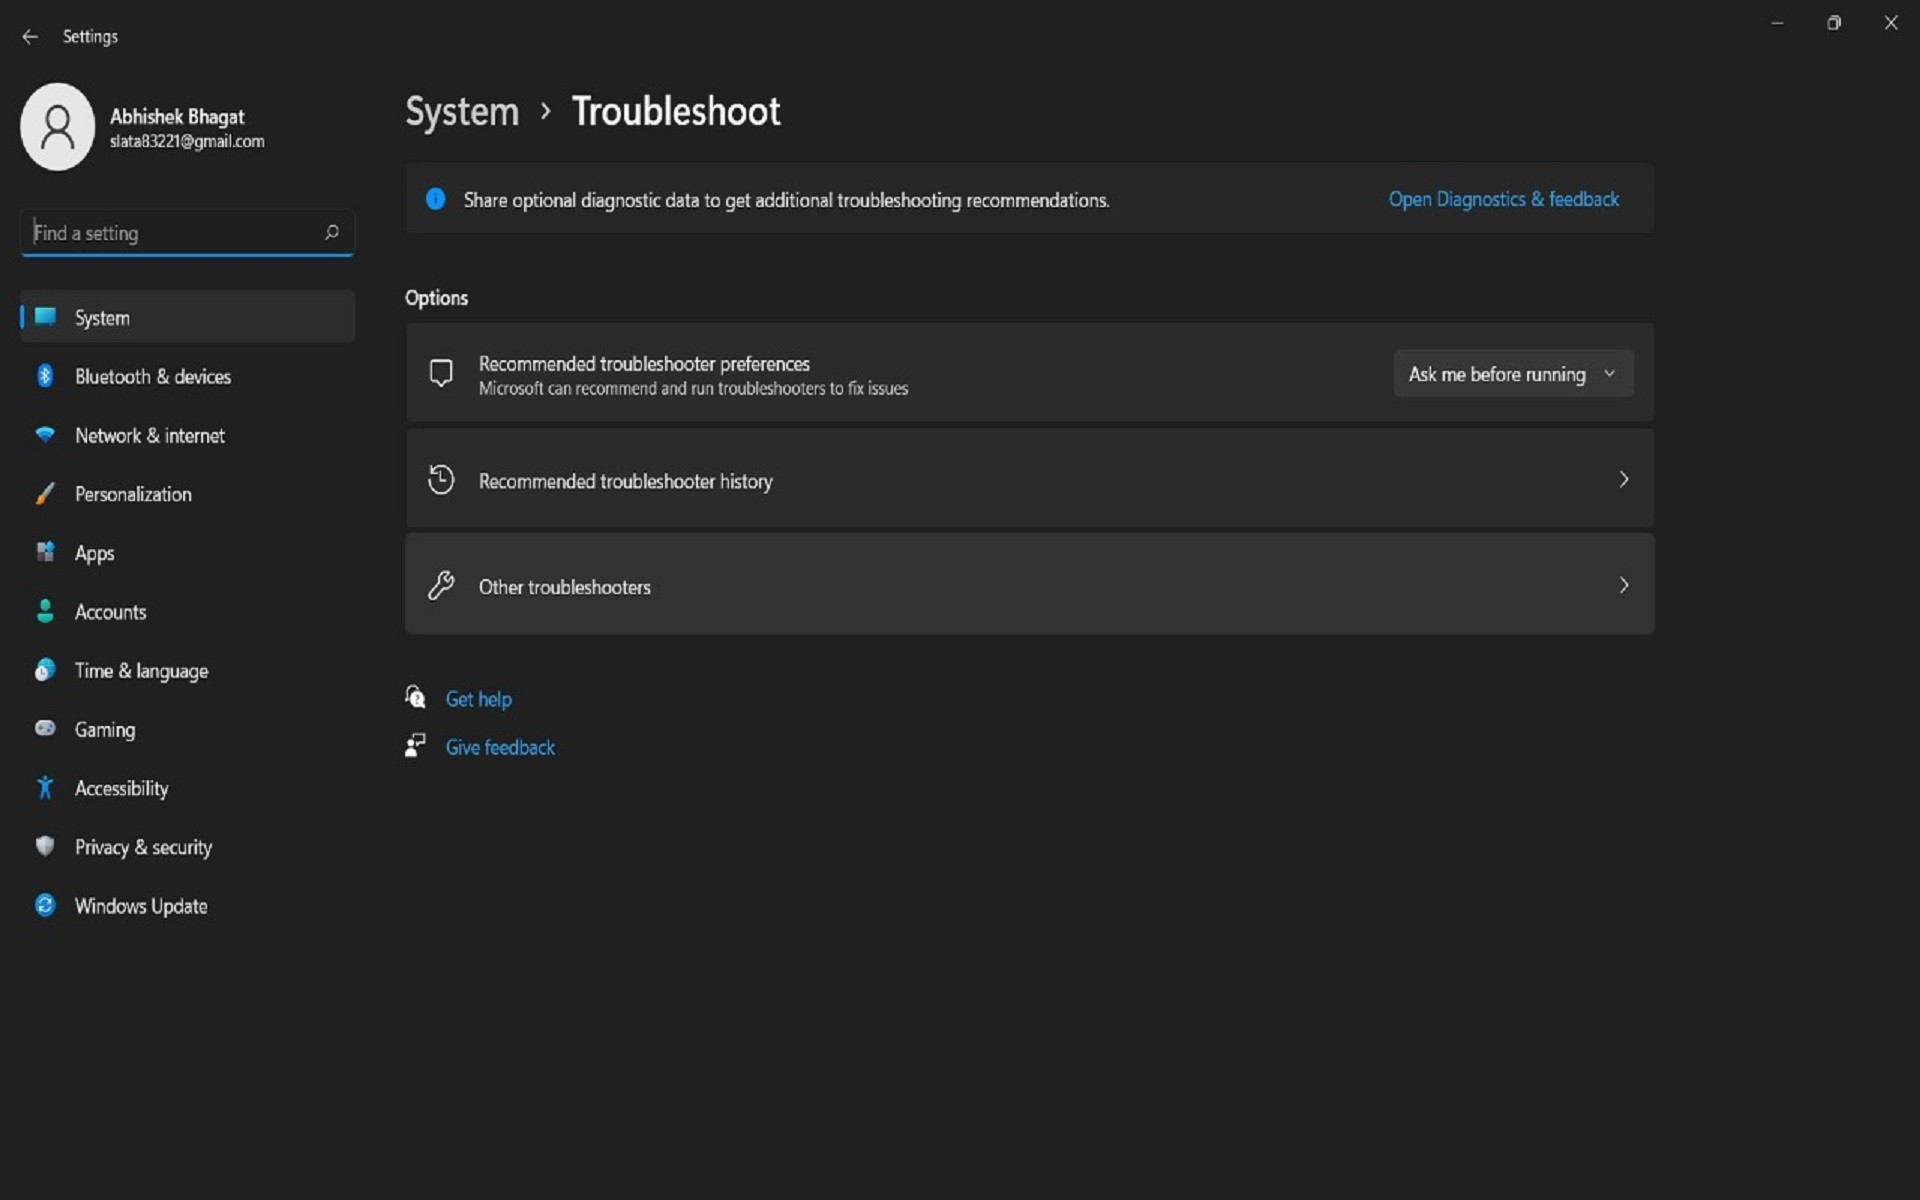
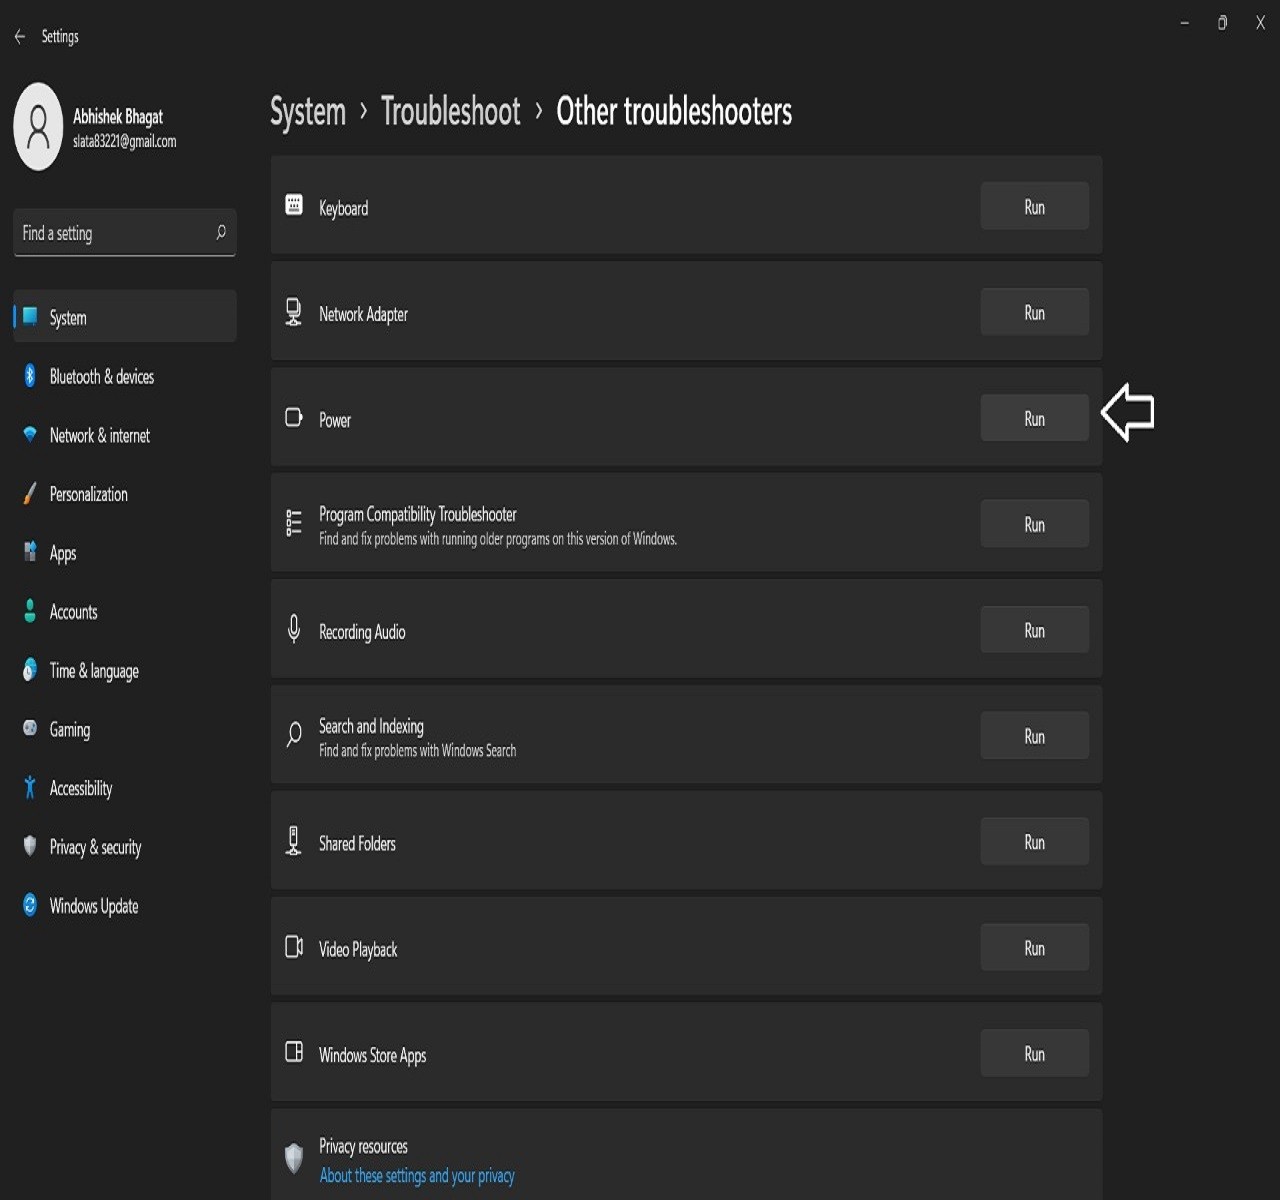
Step 3: Lastly, click on the Run button next to Power.
2. Kill Resource Hogging Apps
You have to look at all the background running apps and services and then stop ones that are consuming a large amount of CPU and memory.
This is because the apps hogging unnecessary system resources also consume much of the battery. So, it’s better to suspend them, which could be done as follows:
- Launch the Task Manager
- Then scroll to the Background Processes
- Select that app from the list that is taking up much of the CPU and memory resources and click on the End Task button to end its process.
- Do this for all the apps that are consuming high resources.
- Once done, it will end up Windows 11 battery drain issue.
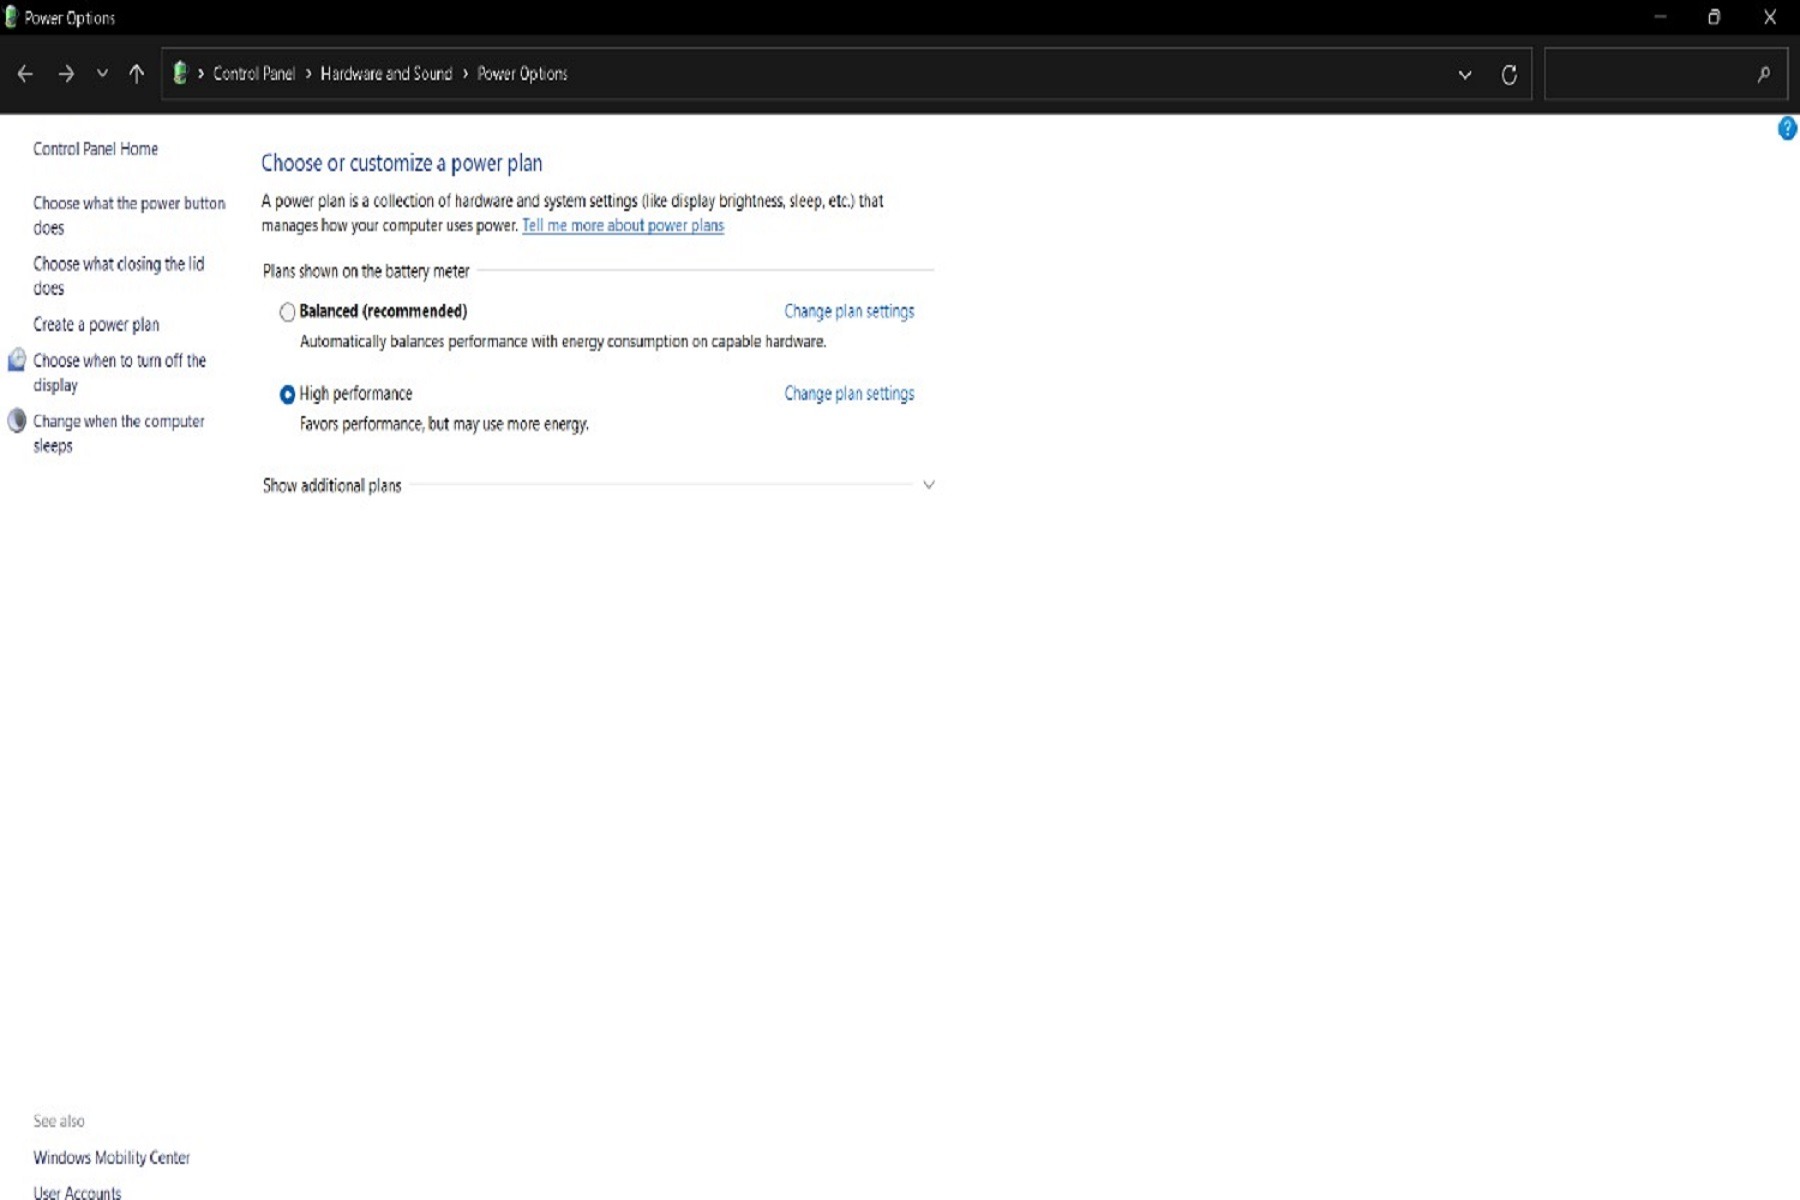
3. Optimize the Power Plan
There are many ways that you could take to save the battery from discharging and one of the ways is to Optimize the Power Plan. The process is as follows:
- Tap on Start Menu, search Power Plan, and click Choose a Power Plan.
- Then select Change plan settings next to your recommended plan.

- Then, click Change advanced power settings.
- Expand the Multimedia Settings section and click on Video Playback quality bias.
- Now change the On Battery and Plugged in settings to Video Playback power-saving bias.
- Then expand the When playing video section.
- Change the On Battery and Plugged in settings to Optimize Power Saving and click OK to save the changes.
- Now verify if the Windows 11 battery drain issue has been fixed or not.
- Turn Off Fast Startup
- Battery Report
4. Turn on Battery Saver
While not exactly a fix, this is among the best restrictive measures you could apply to put a brake on the battery’s quick discharge issue.
Performance might be little affected by enabling this mode. So, here’s how you could enable or turn on Battery Saver on your Windows 11 PC:
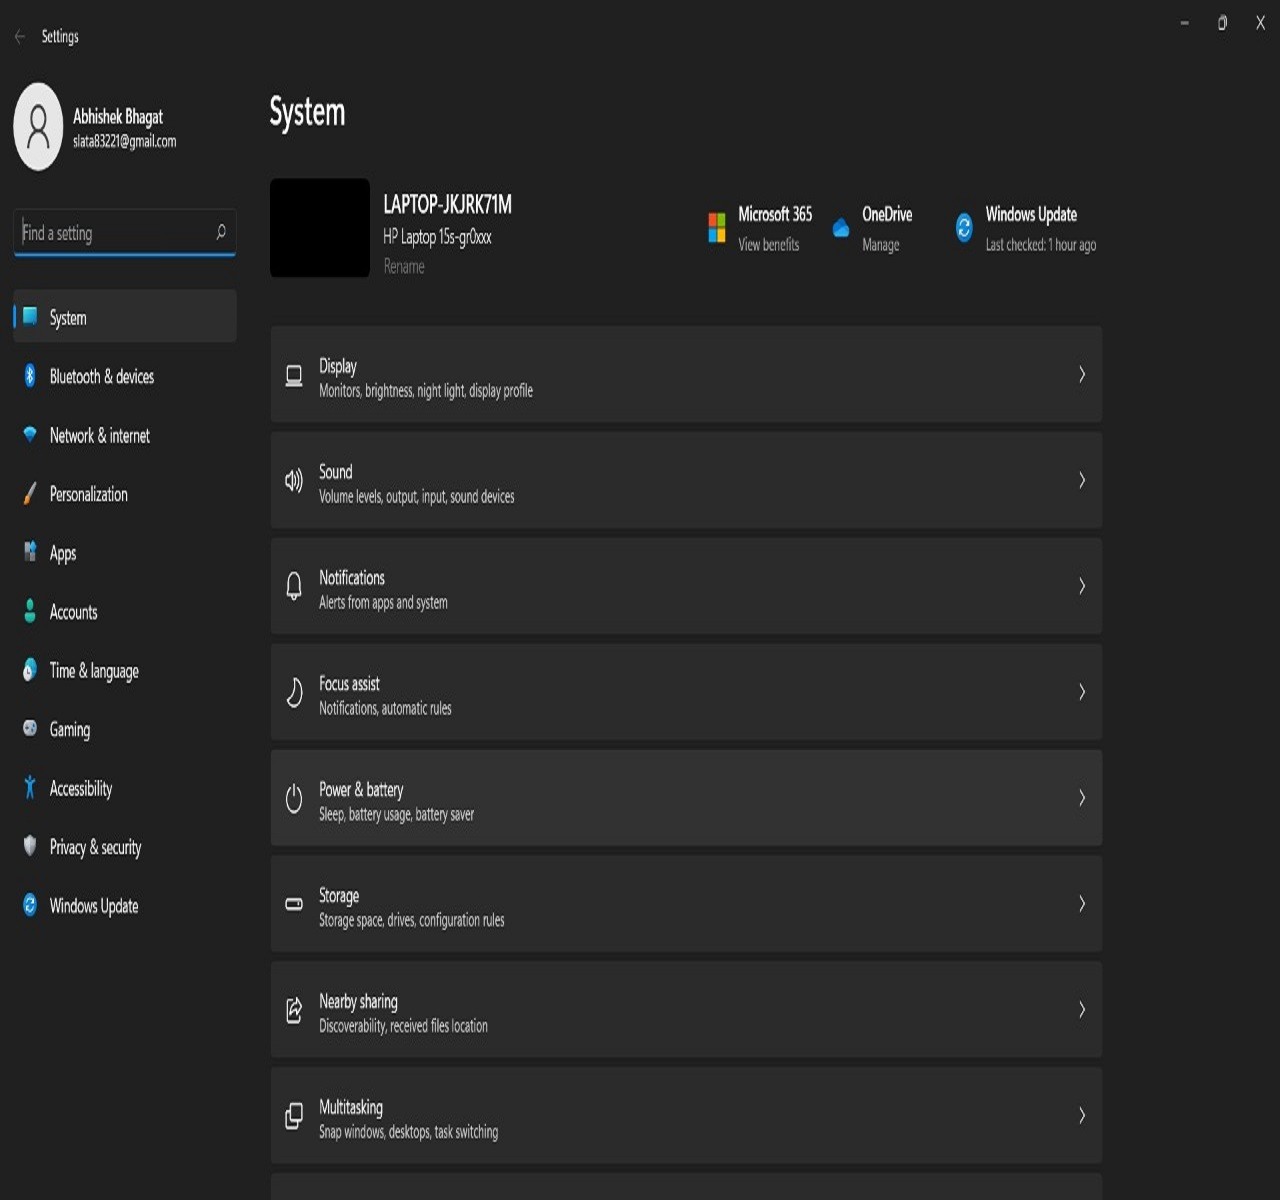
- Open Settings from Menu appears by pressing Windows+X
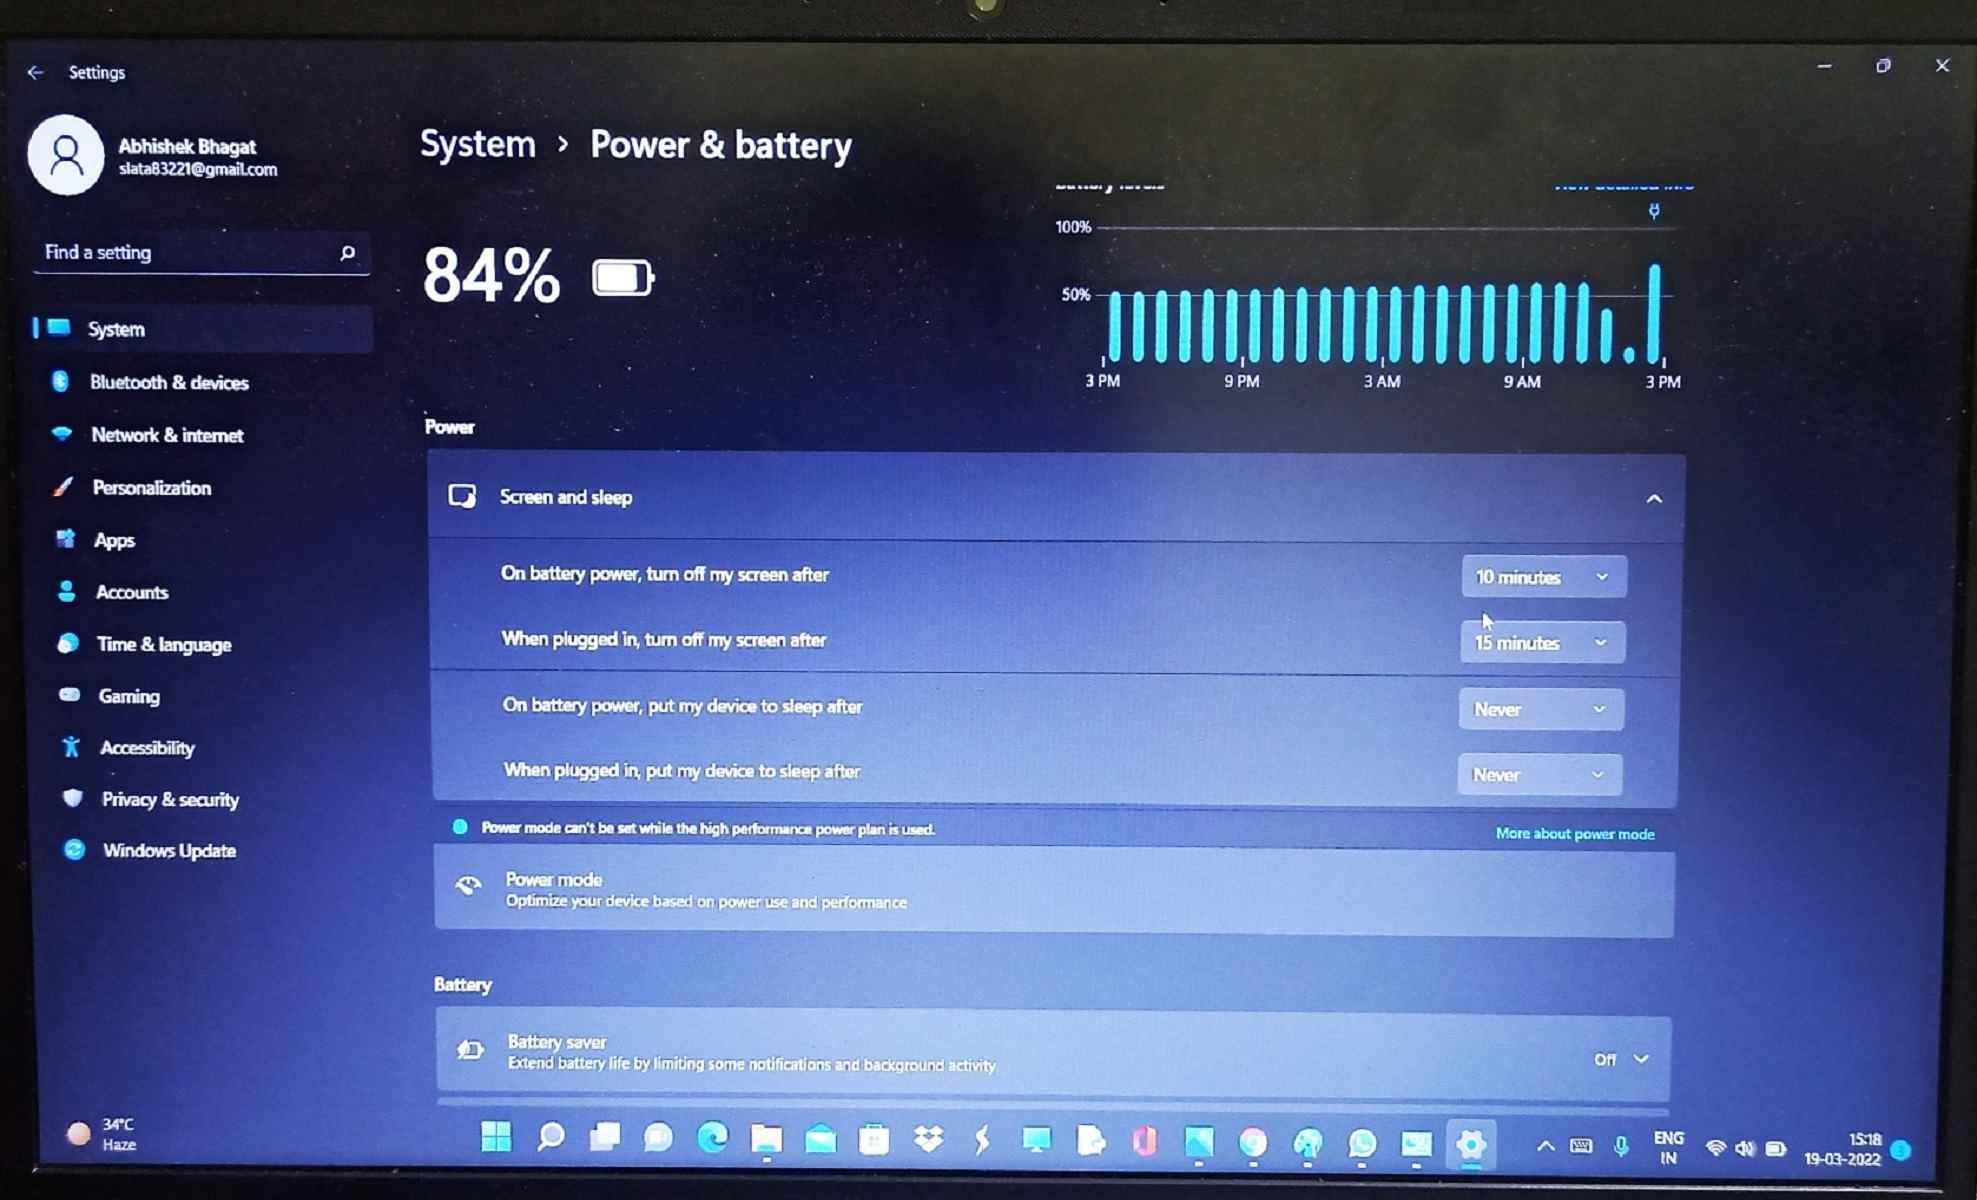
- Then select System and go to the Power and Battery section.

- Now expand the Battery Saver section and click on Turn on now.
- Battery saver is enabled, now there shouldn’t be any drastic battery drain issues.
Also Read: iPhone 13 Battery Draining Overnight? Try These Fixes
5. Reduce Screen Brightness
The display is one of the most power-hungry components on your PC or laptop with high brightness. Reducing the brightness significantly improves battery efficiency.
- Open settings.
- Click on System
- Click on display
- Under Display, Use the slider next to Brightness to adjust the brightness level of the device.

- There is an alternative way t reduce the brightness or display’s power draw is to turn it off.
- Open Settings by using Shortcut( Windows+i)
- Select System and then Power & battery, and Screen and sleep
- Here Select how long the operating system and screen waits in an inactive.

6. Update your Windows
An Outdated Windows system or Operating system creates loopholes in the security of the Windows and it also causes battery drain issues which drain your battery very quickly. Updating your operating system update security patch holes and improve performance and make the software run more efficiently, reducing how much power it uses.
You can check for updates on Windows 11:
- Open Settings by using the shortcut key(Windows+i)
- On the left-side panel of the Settings page, select Windows update.
- Select Check for updates, to allow download and install latest Windows 11 updates from Microsoft server.
- If there are available updates, download and install them, a restart will install all the updates pending.
Also Read: How To Update Drivers In Windows 11
7. Video Playback Settings
If you use your PC for streaming videos or movies on a regular basis, then you should instruct the video playback settings to give optimize the battery life. Here are the steps to do so:
- Open the Start Menu and click on the gear icon to open the settings.
- Scroll to the Apps tab and select Video Playback
- Use the drop-down menu next to Battery options to select Optimize Battery life.
- Similarly, you can mark the checkbox that reads “Play video at a lower resolution when on battery” to save power while streaming.
8. Restrict Background Apps
Background apps are the most common reason when it comes to quick battery drainage issues. Therefore, it’s recommended to set their behavior to Power optimized so that they maintain a balance between performance and battery consumption. You can Consider preventing unimportant apps from running in the background to curb the battery drain on Windows 11. Here is the procedure:
- Open Settings app by using the shortcut key( Windows+i)
- Select Power & battery
- Select Battery usage
- You’ll find all the apps along with their battery usage. Select any unimportant app and tap on the three dots to open the menu and select Manage background activity.
- Under Background apps permissions, Select Never
9. Turn Off Fast Startup
Fast startup option used to reduce the boot time causes battery drainage. Since fast startup doesn’t allow your system to shut down completely, you may experience a battery drain when your PC is off.
- Press Windows+R, to open the Run dialog, type control, and press enter.
- Select Power Options.
- Click on “Choose what the power buttons do” on the left sidebar.
- Since you’ll need administrator permissions to disable the fast startup, click the text at the top “Change settings that are currently unavailable”
- Uncheck the box that reads the ‘Turn on Fast startup’ box, and hit Save Changes.
Also Read: How To Calibrate Laptop Battery Correctly In Windows 10?
10. Battery Report
This is the best way to find out the reason why your PC’s battery is draining. You just need to execute a command, and it shall bring up an HTML report listing out all the errors and warnings. That helps you to inspect the health of your battery. You need to refer to the report and act accordingly to rectify those issues. So follow along for the steps to generate your PC’s battery report.
- Tap on Start Menu, search Command Prompt, and launch it as an admin
- Now copy-paste the below command in the CMD window and press Enter
powercfg/energy
3. It will now observe battery performance for 60 seconds and then make you aware of the Energy efficiency problems that it got hold of.
4. The results will be shown in the energy-report.html file, which you could access from the below location:
5. Open the energy-report.html file in the browser, have a look at al the errors and warnings, and then rectify them accordingly.
Also Read: How To Create Beautiful Box Shadows In HTML And CSS
Conclusion:
So with this, we round off the guide on how you could fix Windows 11 battery drain issues. We have listed different methods for the issue of battery drainage. Do let us know in the comments section which one worked out in your favor. Likewise, all your queries are welcomed in the comments below.


