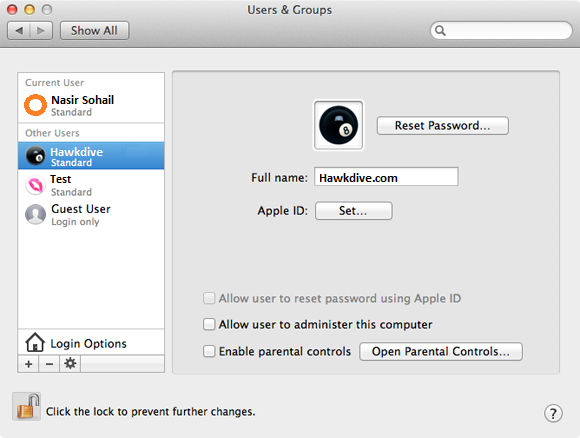
When you bring a brand new Mac or set up your Mac OS X for the first time after clean installation, your initial account that you create during setup is always an admin account. An admin account allows you to configure the system, install new software and hardware and access all the files on the system or make any changes to the other user accounts. Imagine a situation where all admin accounts on your mac has changed into standard, how would you install / uninstall a software or hardware? In this post I am going to describe about the troubleshooting steps if all the admin accounts on your Mac has turned into standard.
 |
| All admin accounts changed to standard on Mac |
After reading different articles on the internet I found that this issue is more likely to occur after the following activities.
- Upgrading the OS X , e.g. from OS X 10.10 Yosemite to OS X 10.11 El Capitan,
- Restoring OS X from backup,
- Making heavy modifications to the system
You do not need to worry even if you have lost all of your admin accounts you still have root which you could use to convert standard accounts into admin.I am going to show you some really simple options to regain access to your lost admin accounts. The only thing you need to do a little complex is ” Reset Root password“. Here are some simple methods to recover the lost admin accounts.
Fix all admin accounts changed to standard on Mac
Option 1
Using Recovery Mode
This option is available for Mac OS X 10.7 and above and it only takes a few steps.Starting with the release of OS X Lion in 2011, Apple stopped selling DVDs of its operating systems and started offering a built-in recovery partition that is created automatically for you during installation and stored in a small hidden section of the hard drive. It contains a stripped-down version of Mac OS X and essential utilities which are used to diagnose hardware issues, reinstallation of OS X , restoration from Time Machine backups and hard drive management.To regain the admin rights we reset the password of the root first and then with the help of root we change other standard users to admin. Follow the steps mentioned below to convert the standard users into admin.
Start the Mac in Recovery Mode:
1. Shut down the computer first then turn it back on and hold “Command + r” keys together until you see the Apple Logo. Let go off the keys and you should see the Apple logo with spinning gear, or progress bar if you are using Yosemite.
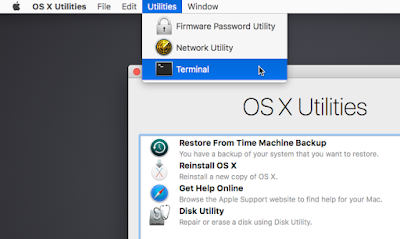
2. Mac will boot into OS X on the Recovery Partition and you will see a “OS X Utilities” window.
 |
| All the admin accounts changed to standard on Mac |
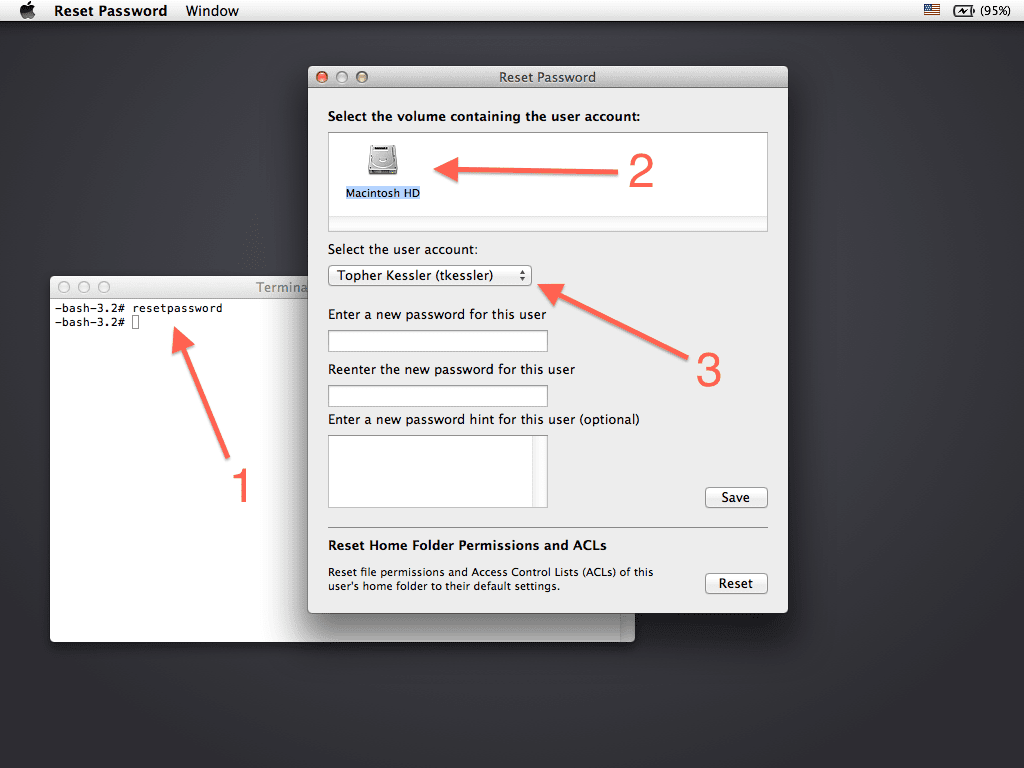
3. In the Utilities menu on the top, select Terminal and type: resetpassword and hit return.
4. This will launch a new Reset Password screen at the back,Click on the newly opened window and select the volume Macintosh HD containing the user account.Now select the System Administrator(root) from the drop down list and then type the new password , confirm the password and then click save to change the password.
 |
| Reset Password for Root account |
5. Go to Apple Menu at the top. Select OS X Utilities, then Quit OS X Utilities. This will restart the Mac.
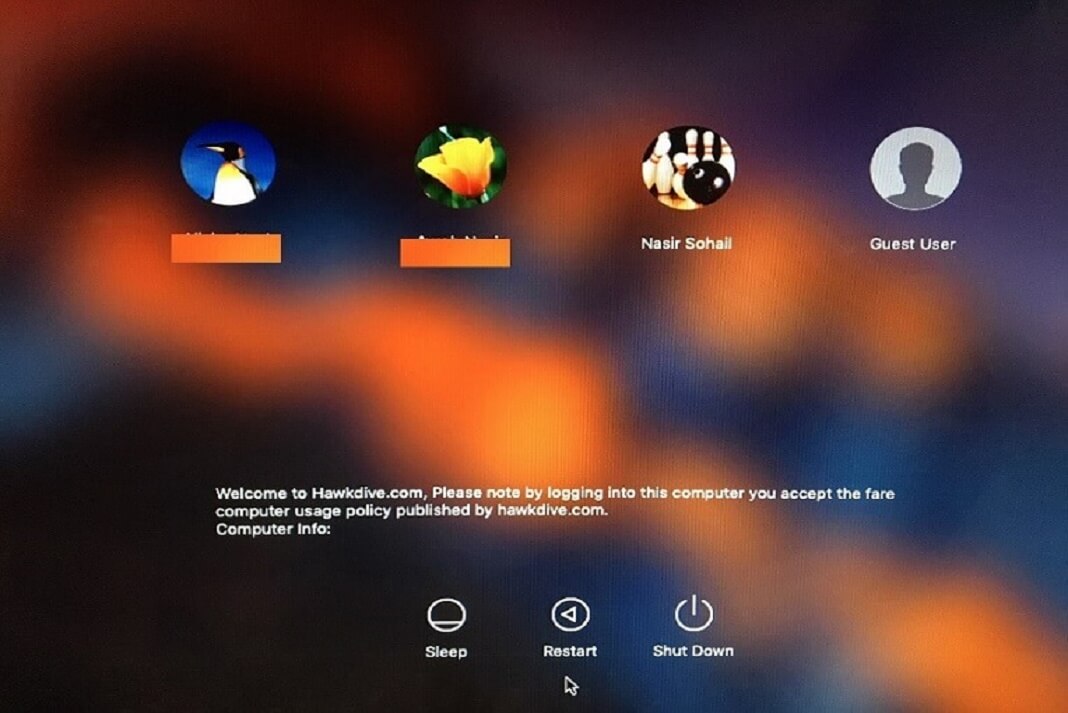
6. Login As a Root User: When the login window appears, select “Other…” and log in as the root user using the password that you just created above. Note: If Mac OS X automatically logs in, choose Log Out from the Apple menu to get to the login window.
7. Once logged in with the root you can change any standard user to admin just by selecting the option ” Allow user to administer this computer” under users and group in system preferences.
For OS X 10.6 and below
As we know, OS X 10.6 and below does not have recovery partition. So in order to reset password for root you will need to have their OS X install DVDs, if you don’t have one you can buy it from Amazon or Apple. You do not need to install OS X again.
Follow the steps mentioned here below.
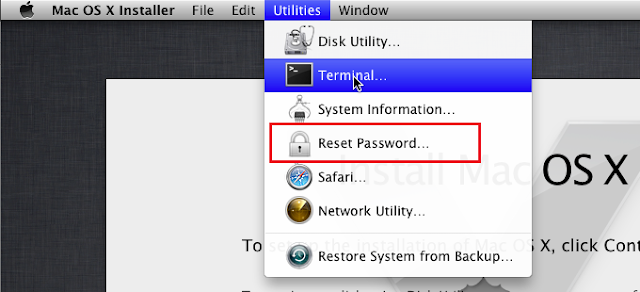
1. Hold down the option or C key during boot up and select the boot device as OS X install DVD.This will boot your Mac into the exact same OS X utilities screen with option to reinstall OS X, restore from time machine back up or Disk utility.
2. In the Utilities Menu on the top, choose “ Reset Password….”.
 |
| Reset Password using install DVD |
3. Select the name of the drive that Mac OS X is installed on, select the user named “System Administrator (root)” from the pop-up menu, type the password in the first field, re-enter the password in the second field, then click on the Save button.
4. Restart your Mac and when the login window appears, select “Other…” and log in as the root user using the password that you just created above.
5. Once logged in with the root you can change any standard user to admin just by selecting the option “ Allow user to administer this computer” under users and group in system preferences.
Note: If Mac OS X automatically logs in, choose Log Out (name) from the Apple menu to get to the login window.
Option 2
Using Setup Assistant tool
When you buy a new Mac and open it for the first time or you install the Mac OS X , it’s the setup assistant which runs before loading the desktop. Setup Assistant guides you through the steps of creating a new admin account for your newly bought Mac. Once the setup assistant is completed, it creates a hidden file named .AppleSetupDone and save it to /var/db folder to prevent Setup Assistant from running again. Therefore, to have the Setup Assistant run again so that you can create a fresh admin account, you simply need to remove this file and restart the Mac.This will run before any accounts have been loaded, and will run in “root” mode, allowing you to create new admin accounts on your Mac.Your previous accounts will remain intact. You will be logged in automatically with newly created admin account which you could to change other standard account into admin.
To do this follow the steps mentioned below
1. Shut down the computer first. Now turn it back on and hold “Command + S” keys together until you see a black screen with messages written in white. you will see the messages scrolling up and at the end of the screen it will show prompt ” root# “. Type the following command to mount the hard drive in read & write mode.
mount -uw /
2. Now that the drive is mounted, you can edit the file system. Delete the file which tells the OS X that the setup has been completed.
rm /var/db/.AppleSetupDone
reboot
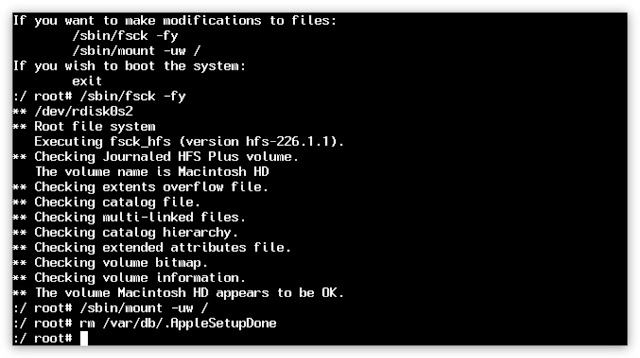 |
| Delete the Apple Setup done file to change standard account into admin |
3. This will force the next boot to run Setup Assistant. Continue through the rest of the setup process and be sure to select “Do not transfer my data” because all your data remain intact.
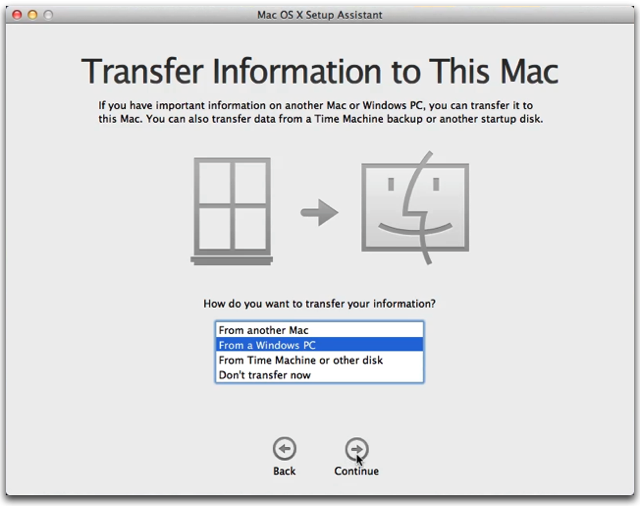 |
| Set up assistant |
4. Set up the administrator account – At the end of the setup you’ll be prompted to create a user account. That user account should be an administrator. Be sure to make the name of the admin account different from the existing one. If the new account is given the same name as the old one it will overwrite the old account, causing all the old account’s files to be deleted.Once created, you can login with the newly created admin account and change the other back to admin.
Option 3
Reset Root password using Single user mode
Single user mode is a diagnostic mode where a multi user computer operating system boots into a single superuser mode. It is mainly used for maintenance, recovery and diagnostic purposes such as disk diagnostic and repairing, Data recovery after a system or HDD failure and other repair works.This mode can also be used for security purposes because network services do not run, eliminating the possibility of outside interference. and the boot disk isn’t even fully mounted. Using the command line in single user mode you can mount an external hard drive and take the back up of your data as well. Here we will be using single user mode to reset the password for ” System Administrator ( Root)” and then convert the other standard users into the admin with the help of root privilege.
To do so follow the steps mentioned below
1. Shut down the computer first. Now turn it back on and hold “Command + S” keys together until you see a black screen with messages written in white. you will see the messages scrolling up and at the end of the screen it will show prompt ” root# “. Type the following command to mount the hard drive.
mount -uw /
The mount command is necessary because your hard drive is mounted read-only by default, so this re-mounts it in read/write mode.
2. Run the file system check up utility ( fsck) to check and repair any file system errors or inconsistency.
launchctl load /System/Library/LaunchDaemons/com.apple.DirectoryServices.plist
passwd root
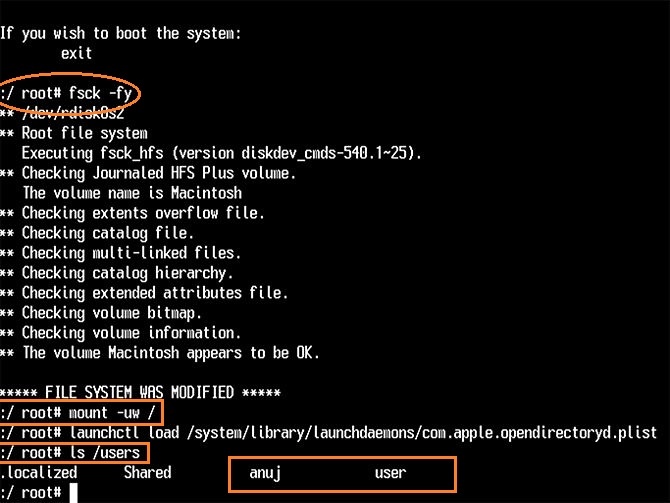 |
| Reset the root password from Single user mode to gain access to admin if all accounts have been changed to standard |
This command actually enables the Root account and changes the password. You will be prompted for a new password twice. Type the password and hit enter and confirm the same password again and hit enter again.
4. Even if you simply type the command ” passwd ” it will do the same thing and will allow you to reset password for root on OS X 10.6 and below.
passwd
5. Type reboot hit enter.
6. When the login window appears, select “Other…” and log in as the root user using the password that you just created above.
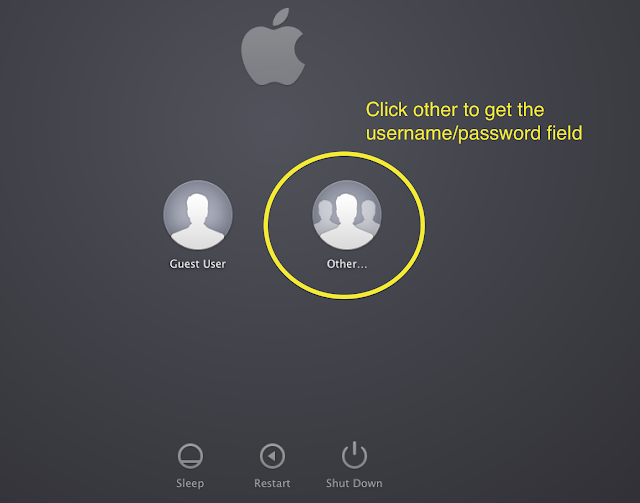 |
| Select Other to log in with Root |
7. Once logged in with the root you can change any other user to administrator just by selecting the option ” Allow user to administer this computer” under users and group in system preferences.
Note: Your Mac can’t start up in single-user or verbose mode if the computer owner or administrator has set a firmware password set. If FileVault is enabled, you need to unlock the startup disk as part of this process. White text appears briefly before the FileVault login screen is shown. After selecting a user and entering the user’s password, the single-user mode or verbose mode startup process continues.
Option 4
CHANGE THE USER GROUP
Another simple method to convert the standard users into admin is ” Change the standard users group or make them a member of admin group. In order to change the group of a user you need to login to single user mode first. Follow the steps mentioned below.
1. Shut down the computer first. Now turn it back on and hold “Command + S” keys together until you see a black screen with messages written in white. you will see the messages scrolling up and at the end of the screen it will show prompt ” root# “. Type the following command to mount the hard drive.
mount -uw /
the above command mounts the file system in read/write mode.So now we can change the GroupMembership of an account. We will be using the dscl utility to change the user’s group. Use the following command, replacing “username” with the short name of the user you want to give admin privileges to:
2. Type the following command and press Return:
ls /Users
3. Look at the listing and note the short name (username) of the affected user account to use it in the next command to add a user in admin Group.
dscl . -append /Groups/admin GroupMembership username
4. type reboot and hit return. The computer will reboot and start up normally, and you’ve successfully changed the GroupMembership of a Standard user account to an admin account.
What if your OS X does not have any Administrator group either?
Once I came across a strange issue that every time I reopen the system preferences or restart the computer I see my user account changes back to a standard user. I had reset the root password to gain the administrative privilege because all of the accounts on my Mac changed into standard user. So I would go to the users and Group in system preferences, select my user account and open the security lock using root and its password then check the box next to ” Allow user to administer this computer ” to make myself an admin. But much to my surprise when I close the system preferences box and reopen it I see the changes made to my account are reverted and there is no longer any check mark next to ” Allow user to administer this computer “. So I restarted the computer in Single user mode by holding ” Command + S ” keys together during boot up and typed the following command to check the members in the admin group to see if I am a member of an admin.
dscl . -read /Groups/wheel GroupMembership
dscl . -read /Groups/admin GroupMembership
These commands will look the “wheel” and “admin” groups in the directory and list the account members who are in the respective groups. The wheel group should contain the root account, and the admin group should contain the usernames of all administrative accounts on the system.
In my case, instead of listing the admin group members, the command gave the following error:
<dscl_cmd> DS Error: -1436 (eDSRecordNotFound)
This error states the admin group is missing, which would explain the problem. If the admin group is not available, then the system cannot add new users to it and therefore will not promote any to have administrative functions.While the system preferences may allow you to check the “Admin” box for a user, when the preferences reload the user’s credentials, they will not show the user as being a member of the admin group.
So in order to fix this problem you will need to create a replacement administrator group. The admin group is called “admin” but is identified by the system through its “GID” (Group ID number) which is “80.” If you create a new group with this number, the system should then allow this group to access files and resources that are tagged with this number.
To do this, the first step is to enable the root user account (Follow the steps mentioned in Option -1 in this article, since using Directory Utility may not work ) and then log in as root.
When logged in, launch the Terminal application and run the following commands sequentially:
dscl . -create /Groups/admin
dscl . -create /Groups/admin RealName Administrators
dscl . -create /Groups/admin PrimaryGroupID 80
dscl . -create /Groups/admin Password *
dscl . -create /Groups/admin GroupMembership root
These commands will create the admin group, followed by setting the proper full name, and then set the group ID to the one which is used by the admin group in OS X. Lastly give the group an empty password, so it will require the use of the member passwords to work (requires authentication), and then assign the root account to the group. After running all the above commands restart the system and try giving users administrative access through the system preferences again (this may need to be done when logged in as root ).Once you have successfully changed a standard user to an admin account restart the computer and log in with the newly changed admin account and try to open security lock in system preferences to verify if your have really got the admin rights.
Tips: The command “ id ” can be used to displays the name of all the groups with their numeric IDs that a user is member of.
For example:
kevin-hawkdive-computer:~ Kevin$ id
uid=501(Kevin) gid=501(Kevin) groups=501(Kevin),101(com.apple.accessscreensharing),98(_lpadmin),81(_appserveradm),79(appserverusr),80(admin)
Security Precaution:- Above mentioned method can be used to reset any administrative account password or to change any account from standard to administrator and as a result you might be concerned about security of your files and folder that anyone can make these changes to your system. By default OS X does allow for this; however, there is a quick security settings you can make to prevent it and ensure that only you can perform these actions.
1. Enable Firmware Password
To prevent booting to alternative boot modes ( such as Single User Mode, recovery mode, verbose mode, boot from external disks ), you simply have to enable a firmware password on your system. To do this, reboot to the OS X installation drive (be it a DVD or the Recovery HD partition in OS X Lion or later) as mentioned in Option -1 in this article, choose your language when prompted, and then choose “Firmware Password” option in the Utilities menu at the top. Use this tool to set a firmware password, and then nobody will be able to reset PRAM, boot to Safe Mode, Single User Mode, or to alternative boot drives unless they either disable the password or supply it when prompted.
2. Turn Find My Mac on
If you have turned the Find My Mac on in iCloud settings under system preferences. You can remotely lock your lost Mac, this will also set a firmware password on your Mac to prevent a thief from using it. But you could set that firmware password ahead of time using recovery mode.
3. Keep sensitive information Password Protected
Disclaimer: Above written steps to reset password for root or to change a standard user to admin is intended for educational purposes only. I do not promote any hacking tips or activity. Hacking is against Law.Using these tricks outside your “own” test environment is considered malicious and is against the law.




Best tut ever. The only result I found for not having an admin group! Thank you!!!
Absolute great tutorial. 2 German OS X Services were not able to fix the problem. Now I fixed it myself with your help – I personally work only with Windows …